🌟 Elevate Your Gaming Experience with Style!
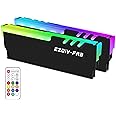
The EZDIY-FAB ARGB Memory RAM Cooler is a cutting-edge heatsink designed for gamers and PC enthusiasts. Featuring addressable RGB LED lights with 250 customizable colors, it ensures your build stands out. Its high-density LED technology provides even light distribution, while the aggressive aluminum heat spreader enhances cooling efficiency. Compatible with all DDR memory types and major RGB sync technologies, this cooler is the perfect addition to any DIY PC setup.
| RAM | ddr3_sdram |
| Brand | EZDIY-FAB |
| Item model number | US-DDR-3528-B-2P with C |
| Item Weight | 7.4 ounces |
| Package Dimensions | 6.81 x 5.24 x 0.98 inches |
| Computer Memory Type | DDR4 SDRAM |
| Voltage | 5 Volts |
| Manufacturer | EZDIY-FAB |
| ASIN | B07DVFM4TJ |
| Is Discontinued By Manufacturer | No |
| Date First Available | July 19, 2018 |
C**T
RGB For Your Bare RAM/Old RAM
NOTE: These are my personal experiences and I don't condone doing exactly what I did here to remove the RAM. If you are not confident in removing the shields either buy naked RAM or just don't get it.When I first saw this product online I was honestly skeptical of how well it will look when I have the product in hand. My mind immediately changed once I got the product and I had finished the installation (I'll go through the installation later). The heatsink, once installed, looked natural as if it was the G. Skill RGB RAM. The lighting is bright enough to light up your rig and I do recommend it that you dim your light strips down to emphasize these RGB kits. The kit I bought has a remote with settings for speed, pre-set illumination, and brightness. Like a typical standard RGB remote it also has the 12 static colors to chose from. Changing the lighting is as simple as pointing the remote, granted you have removed the battery blocker. If you don't want the lights for some reason you can also turn them off.TL,DR: YOU ARE RESPONSIBLE FOR YOUR OWN MISTAKES. Use heatgun to weaken adhesive if you have RAM shields and pry with a tool you are comfortable with. Once done, test fit RAM to see where the memory sits so you can correctly place the thermal pads and then rinse and repeat for the other side/the rest of your kit.Installing these are a bit tricky. Mind you that YOU ARE RESPONSIBLE for your own mistakes when installing these. Docking it down a few stars because you yourself took the brutish way of installation does not make it the manufacturer's fault. In my case of installation I referred to YT vids on my specific RAM, which were Corsair Vengeance DDR3s. Use a heatgun and set it to high and have it about 6" away from the RAM and just slowly sweep side to side for about 10 sec. To remove the metal shielding, in my case I just used a thin flat head screw driver, and slowly lift the shield off while applying only the right amount of pressure where you can hear the adhesive come off. I DO NOT recommend using a screw driver as that can damage your RAM, but since I was confident enough with my skills I went straight ahead. Once you have slowly and carefully removed the shielding, place your RAM on the RGB shield without the thermal pad, so you can get an approximation on where the memory modules would sit. After taking note take off the plastic from the thermal pads and place it where you saw the memory modules had rested during the test fit. Pretty much rinse and repeat after that for the other face of the shield.Last thing to note: the kit I received was missing a thermal pad, so I ended up messaging the company to get the thermal pad sent to me, but they sent 1 kit. Got my thermal pad and an extra RGB shield also.
M**.
Adds super bright RGB to my PC
These are just perfect. I was thinking about buying some new ram that has RGB on the stock heat sink, but I came across this mod by EZDIY, and I am so glad I chose these instead. It is such a good way to add RGB onto your PC in a very inexpensive way. I use these heat sinks on my HyperX Predator ram sticks, and it comes with foam pads and heat spreaders and a screwdriver so you are all set. Great product!
M**T
No the best.
Alright, but would probably spend the extra couple bucks next time.
V**R
Comes with everything you need
This kit (with the remote control included) is designed for older motherboards that don’t have a rgb header. The ram heatsinks were easy to install. The lights are bright. The kit comes with everything you need to power it up. It is not shown in the product description but it does come with a three pin 5V controller cable with the wireless controller built into it. This cable has a Molex connector on one end and the three pin connector on the other end. Just daisy chain the heat sinks together and plug them into the power cable. Plug the power cable into a spare molex connector and you are good to go. The remote control does the rest and works great.
W**L
Arrived defective and missing remote
Item seems adequately priced and I was looking forward to installing. Upon arrival, items arrived defective and could not get it yo work despite several efforts. No remote and extremely poor install instructions
B**E
It looks good, price is right
New ReviewEZDIY-FAB, Contacted me regarding the issues I have had, they have been relentless trying to understand and solve the problem. The lights work good as it is with a different controller and the daisy chain connection using tape to keep the ends in place, with that in mind and them working with me, I'm going to give it two extra stars just for the customer service, which in my mind is outstanding.First ReviewIt fit's DDR2, it looks good (when it works) My problem is the 3-pin RGB cables have a habit of falling out of the female plugs, all the plugs are not tight fitting. I would have expected a little better tension on the 3-pin female plug not loose fitting, I had to tape the plugs together. Also, I installed this Thursday and by Friday the controller stopped working, I ended up having to plug the RGB lights in another controller (FormulaMod Fm-MFC Sync Controller)I would have given 5 stars for the price, ease of installation and they look good but because of issues of very loose fitting of the 3-pin RGB female cable ends and having the controller quit within 24hr, two stars is all I can give right now. if I didn't have to tape the 3-pin RGB cables ends together to keep them from falling out I would have given four stars.Don't throw away the end cap that comes on the controller RGB cable, you will need that, depending on your wiring configuration you may have exposed unused male plug, be sure to tape the cap on because it also falls right off, I really hate using tape on anything in a computer.
A**R
These lights are super legit!
So yeah I really love these. I’m not a tinkerer by any stretch and was super nervous about installing these. Taking the heat spreaders off my rams was probably the most nerve wrecking, but it’s actually super easy with a blow dryer.I didn’t have the LED headers on my board, so I need to get the one with the controller. You pretty much just need one controller as you can just daisychain them all together. Might have been a given but I didn’t know that. I’m not a tinkerer.The instruction given is pretty useless but you can look up some useful videos on YouTube. Found out I needed molex to SATA adapter for my modular PSU so that would have been great to know. But i ordered one and it all worked out. These lights are super legit!Now I can happily wait to upgrade my mobo and rams (led) when the new 7/10nm chips arrive.
Trustpilot
3 weeks ago
5 days ago