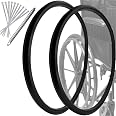
🛞 Roll worry-free with universal, flat-free power!
These 24" x 1" solid polyurethane wheelchair tires offer universal compatibility with nine-spoke plastic wheels across all brands. Designed for durability and zero flats, they come with mounting tools and straps for a secure fit. With a robust 2000 lb load capacity and expert customer support, these tires ensure reliable, hassle-free mobility every day.


| Size | 24X1 Standard |
| Brand | LEHUOJIA |
| Wheel Size | 24 Inches |
| Pitch Circle Diameter | 24 Inches |
| Item Diameter | 24 Inches |
| Vehicle Service Type | manual wheelchair, transport wheelchair, lightweight transport wheelchair, wheelchair, lightweight wheelchair, folding wheelchair |
| Load Index | 2000.0 |
| Rim Width | 0.77 Inches |
| Color | black |
| Manufacturer | LEHUOJIA |
| Model | LUOTAI-01 |
| Item Weight | 2.03 pounds |
| Country of Origin | China |
| Is Discontinued By Manufacturer | No |
| Manufacturer Part Number | 24"*1" |
| Bolt Pattern (Number of Holes) | 1 |
G**O
It will pay off with a little bit of moxie!
The description forewarned that the tire is smaller than the wheel, wow, were they right. This was much more difficult than I thought to install. I let tires sit in hot water, that was just boiled for 15 minutes. It helped some, but not as much as I thought (side note: DO NOT USE COOKING PANS TO SOAK TIRES, AS THEY CONTAIN CHEMICALS THAT WILL BE ABSORBED IN THE PAN MATERIAL AND IS NOT SAFE FOR COOKING IN LATER). You must have some strength to perform this, particularly with no additional hands. I followed video instructions (be sure to zip tie two opposite sides of wheel first) but ended up having to use two pry bars. One to hold the spot I just pried and another to begin a new spot down the line. Add a zip tie every eight inches or so. Be careful! Throughout process, I was very concerned not to get stabbed by either of the pry bars as I am using quite a bit of force to stretch out tire. Used all but two of the zip ties provided. The zip ties are very strong. I ended up removing them without damaging them for future use. I've done this before. If you don't know how, there are YouTube videos to explain procedure. The whole process took me about 30-40 min. for both wheels. I was definitely perspiring when finished. I understand why they are so tight, because once installed, they do not slip and are very snug. They look great and I expect really good performance. Price appears to be good value for the money. Zip ties are included, but you will need to find your own pry bar. I suggest something thin and slick. BE VERY CAREFUL YOU DON'T LET THE PRY BARS SLIP ON YOU AND STAB YOURSELF. THIS COULD CAUSE SERIOUSE INJURY.
E**E
Replacement tyre for wheelchair wheel.
This replacement tyre was used on 24” Wheel. I made a jig out of scrap wood with and a few tools. The pictures show some of the steps I took to mount the tyres. The fabrication just needed a little time. The 12 1/8” radius for 7/16” hole and 1/2” hole to put bolts is important. I had a thick piece of wood so I did not drill completely through wood but there are other ways bolts could be put to hold wheel. I had a piece of copper tubing that could spin around 1/2” bolt when mounting tyre. The bolts were removed after mounting tyre. I used no lubricants, no tie wraps, and no hot water to soak tyres. I did use a sturdy table and two C clamps to secure jig to table. The whole mounting process took me less than 30 minutes. Please do not send me a lot of questions about the process. I submitted this review to help someone fix a good useable chair for the minimal cost of replacement tyres if they have a few basic skills and hand tools. The photos should help if you want to attempt this repair. The tyres were tight to put on but process was relatively easy.
T**L
Great replacement
Their holding up well, but they were definitely difficult to put on, it's a two person job for sure.
J**N
They fit
Hard to put on but they fit.
G**N
With tips to ease install_ quality tire
Couldn't video because this was a two-handed job. My first tip is that hot water doesn't soften enough for stretch. I put mine in the microwave for a minute and got it soft before putting it on. For the first one I used to heat gun.I watched another person's video and I think he had much valuable tips...a long flat headscrewdriver gives much more leverage than the provided pry tool. I actually used both I used the pride tool to hold the tire in place while I pryed with my long handle screwdriver. The second thing is is that I put the zip ties on Loosely around the tire my second Tire before starting so that once I had it in place I could cinch it down to hold. A rubber mallet helps to get the tire snapped down and you may need some extra zip ties that you can pick up at the dollar store.The fit, once installed is perfect and secure. I bought the bigger tires for added durability. There are minimal instructions included which I think is a downside for such a nice product
N**N
Will order again
Worked great. The zipties that where included in the order made a world of difference.
H**.
No one said it would be easy
Tires appear good hoping they will last a long time. These are very hard to instal, so here's some tips that you may find helpful. I was not able to get my wheels off so I turned the chair on it's side and but a box in seat area to prevent it from collapsing this allows you to side in a chair and the wheels are at a level that make work easier. You definitely need to soak tire(one at a time as you work) I found the tool included helpful but you really need 2, so I got a small prybar from $1 store they give you zip ties but I found some break as you get to end, also you need to take hand rail off the wheel. I used 2 zip ties to start at the same spot. Then I turned this spot to the brake and set the brake to keep wheel from spinning, as the chair was supported by the other wheel I could turn it as I worked. Now instead of using zip ties from here on I got some grill tape and pulled tire onto rim and taped it to wheel every 6 inches, when you get to the place that you need the tools I do a small amount at a time again about 6 inches and tape it down. I started using 2 tools as I met more resistance( don't worry that the tire isn't seated in groove fully) when I got to last 14 inches or so this is when I found 2 tools worked. Take a bite with tool they send maybe 4-6 inches, the I took prybar and put it in middle of remaining tire that needed seating on rim, it took a big pull but the tire goes on and you have a little struggle to get tools out, I used a flathead screw driver. After that the tire is on but not fully seated, I took a rubber mallet and tapped gently to seat, if you run into area that doesn't go smoothly take the tool and gently tap where it's not going to get tire in the groove, only had a few if these the tire basically seated with slight tapping, after both tires on I got in chair and rolled around to fully seat, no slippage tires work great, now you will probably have to adjust brakes because you don't want to scar new tires, good luck hope this helps, oh I forgot cut the tape off before tapping tire on lol
Trustpilot
2 weeks ago
2 days ago