


Project Patio - Rocker Spring Plate 3 Inch x 5 Inch, Universal Fiberglass Replacement Part for Swivel Rocking Chair, Outdoor Furniture Repair - 2 Pack
Product ID: 43035481
Details
- BrandProject Patio
- ColorDark
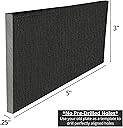
- Product Dimensions5"D x 3"W x
- Size3" x 5"
- Back StyleSolid Back
📏Universal 3" x 5" size
🔩Custom drill hole template
🛠️Durable fiberglass build


