✨ Transform your space in minutes — no mess, all style!
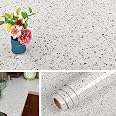
Livelynine’s Terrazzo White Granite Contact Paper offers an 8.65 sq.ft waterproof, stain-resistant vinyl surface with self-adhesive backing and precise gridlines for easy trimming. Perfect for renters and DIY enthusiasts, it refreshes countertops, cabinets, desks, and more with a durable, fade-resistant granite finish that’s fully removable without residue.


| Brand | Livelynine |
| Color | Granite |
| Material | Plastic |
| Product Dimensions | 78.8"L x 15.8"W |
| Recommended Uses For Product | Table, Sink, Cabinet, Cupboard, Desk |
| Special Feature | Removable |
| Theme | Urban |
| Pattern | Granite contact paper |
| Product Care Instructions | Wipe with Damp Cloth |
| Number of Items | 1 |
| Number of Pieces | 1 |
| Size | 15.8"W x 78.8"L |
| Is Stain Resistant | Yes |
| Manufacturer | Livelynine |
| Unit Count | 8.65 Sq Ft |
| Item Weight | 8.4 ounces |
| Is Discontinued By Manufacturer | No |
| Style | Shapes/Stripes |
| Finish | Finished |
| Shape | wall paper roll |
| Installation Method | Self-Adhesive |
| Coverage | 8.65 square feet |
| Special Features | Removable |
| Usage | Commercial/Residential |
| Included Components | peel and stick |
| Batteries Included? | No |
| Batteries Required? | No |
| Warranty Description | Replacement if defective. |
Z**!
Fist Time Covering Countertops with Vinyl Wrap
Well this was my first time ever attempting this. And I gotta say, the product was great and the process was time consuming (mostly because I'm a little too nit picky) but well worth the transformation.PREP:I used the leading blue grease cutting soap to really scrub the counter tops. Then I used engine decreased (serious stuff) that I had in my trunk for my car. I used an old toothbrush to really get into the crevices and also a small scraper to get off any hardened crud.Next I measured the center of the counter top where my seam would fall. I measured approx 12 inches in from the front edge of the countertop. If you measure from the wall, you run the risk of the wall/ backslash not being the same measurement to the center if you have any bowing walls or poor construction. The front edge is factory cut generally and is the best place to pull the measurement from.INSTALLI didn't want more than the one horizontal seam in the countertop so I cut my vinyl to length leaving enough on the right exposed edge to completely wrap the edge with about an additional inch tucked under. I started peeling the paper backing off from the vinyl in the upper left corner and pressed a few inches of the product onto my center line. Then I took a tool used for installing vinyl wrap or car tint which is basically a flexible plastic creditcard looking smoother with felt wrapped around the end that makes contact with the vinyl. You can buy them on here for like $3. Also important is a really sharp hobby knife. A good one will be around $10 with a nice grip. I recommend that over the cheapest ones because you will appreciate the heft and fat grip on precision cuts. I smoothed as I unrolled and went little by little, not completely removing the paper and trying to wrestle the whole sheet. Easy does it and patience. If I noticed an air bubble, I either stopped and worked it out or pulled the contact vinyl back to release the air. Side note, this stuff is REALLY STICKY, so don't pull too hard because the vinyl will stretch and cause wrinkling. Just ease the vinyl back slowly until the bubble is gone. Also, if you find a bubble afterward, you can make a small slice all the way thru to the counter top (very small) and force the air out that way too. It basically self seals the cut. The hairdryer trick DOES NOT work on this vinyl. Imeven on a low setting the top "clearcoat" shiny finish started to separate from the printed "stone" base layer.So I did this and cut 90 degree angles at the corners and tucked everything nicely underneath the edge. When applying the next piece, I was sure to use a factory edge to but up to the center line and existing vinyl I had just installed. So, factory edge to factory edge for the seam. That's important. Very. I slightly overlapped the seam in a few small areas and I had to pull up on part of the vinyl bc I was going a bit crooked but it is forgiving if you take your time and don't get bent put of shape about little errors.This vinyl has such a small print or field that you don't notice really any seams or errors. That's why I chose this quartz look over the faux marble because the marble veins are so pronounced if you don't line up the pattern. And they just look so overused now. But, honestly, anything was going to be a better temp fix for my beautiful, well worn 1960s gold flaked formula. The kind that was used by every cheap skate from 1962 to 1976. You know what I'm talking about ;)After I was satisfied with the main counters, I went to work on the 4" backslash. That was fairly easy. I wrapped with the factor edge to the wall and smoothed as o went down to the base of the back splash, where it meets the counter. I left extra because then I took that smoothing tool and used it as a straight edge to cut a nice crisp line and removed the excess.Now, this is where you may think it's OK to stop. And for you, that may be perfectly fine and good. But for me, wanting to get a year our of this stuff, I decided to use a clear latex/silicone caulk wherever there was a cut. Including the center seam. I absolutely did not want water getting in between the counter and the adhesive and pull it up after a week. I caulked along the sink, the backslash and even the seams of my corners. The clear latex hybrid caulk is VERY FORGIVING. I again used my smoother tool to go back over the caulk bead and make a nice finished look. For about the first 10 minutes out of the tube, the caulk is very pliable and washable. Just don't wash it all off if you're cleaning up some overflow onto an area. I did do the center seam with a fine bead and just took my smoother tool and made one pass right over it to flatten the caulk and seal the seam. Can't even tell. That's primarily because the vinyl has a very high gloss look. I read some complained about that but if you go to any home store and look at quartz countrrtop samples, they are all high gloss by nature. Only formica and solid surface (think fast food restaurant counters) have a matte finish. This mimics the look of quartz very very well.I should add, the background color is not bright stark white. It's a white with a bit of a grayish undertone. The "quartz specks" are charcoal, off white, gray and a pinch of brown. I looks great with brown cabinets but will definitely not be bright white like some had hoped. I think the grayish white is very sophisticated looking and easy to match. Besides, in men's suiting, gray with brown is very dapper.So all in all, an eight foot galley kitchen took me four hours. Plus breaks. I had to walk away from it at times because the tediousness was bugging me. But I'm glad I took my time because I couldn't be happier with the results. Now, if it lasts a year and still holds up pretty well without peeling, then that's just peachy.Oh I ordered the largest amount and gas a good amount left. I'm just crazy that I'll ruin some big run of it and not have enough. So at least there wasn't that stress. I had so much left over, I did my microwave cart. And the good news is, if the landlord wants to see her cruddy, aged and abused countertops, all she has to do when I vacate is just pull it up. Lol.
A**R
It seriously makes a difference in the best way.
I never write reviews - but I had to because this stuff is legit. I was skeptical when I bought it, but I was so sick of the horrible Formica countertops in my rental and came across this.It works just like shelf paper - adhesive but can be removed and replaced (especially you’re like me and need way too many tries to get anything straight). Even after that, it still stays in place. And with just this little bit of sticky paper - my kitchen and bathrooms look like whole new rooms. I took and in progress and final photo to show the difference. So easy to use for a huge impact. Sure it’s not perfect - but I got way more for my money than I expected.
S**M
Looks great!
I used this to redo my countertops and I love how it ended up looking! It is very shiny, but I really like that. You can't see the seeks from a few feet back, but if you get close and the lighting is right you can see them, but they're not noticable at all. You can feel them also if you rub your hand over the countertop.l but that's about it. The installation was very easy too, this contact paper was extremely easy to use. I just had the paper, scissors, and exacto knife, and a credit card type card to smooth it over/help cut around edges and the sink. This is right after I installed it so not sure how it will hold up but I will update this later!
J**E
Just get it!
I contemplated doing this WAY too long. I was worried I wouldn’t be able to do it or that it would look cheap. I finally decided to just try it and I’m so glad I did. I am ordering more to finish the rest of my countertops today!! It was easy and it looks so good! I would recommend getting some type of glue (I used gorilla spray) for the underside if you’re using it for counters bc it didn’t stick to the unfinished part very well. Other than that so easy, so affordable and it looks like new countertops!
J**J
Print and color doesn't match.
I was excited when I got my first roll. The print looked crisp and beautiful. It looked like white quartz. The vinyl was shiny but not too shiny so it was perfect for me! Unfortunately I ran out and needed another roll. When my next order came in, the print and color were very inconsistent with the first roll. The second roll looked greyish in color. The print had more specs in it and the overall look was dingy. It's very disappointing!
C**Y
Horrible Image
The image on this paper looks off. Almost like the contact paper shifted while being printed. Not clear and extremely blurry. Not worth the money at all. I didn’t attempt to install so I can’t say adhesion is bad or how easy installation was… never made it to those steps.
L**E
Looks great - super easy to use
This worked perfectly for our needs. It was really easy to put on and looks great.
E**A
Easy to apply!
The media could not be loaded. I was able to apply this fairly easy! Just roll off the backing little by little. To get it started just roll off just enough to where it’s aligned properly and stuck to the surface how you want it and then slowly peel while sliding something with a straight edge like a credit card across as you go little by little and it should come out with little to no air bubbles. I love it so far.. so far so good! It’s nice and shiny and looks so good.
Trustpilot
2 weeks ago
1 month ago