⚡ Upgrade your ride’s climate control with GM precision power!
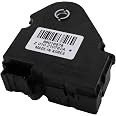
The ACDelco GM Original Equipment 15-73599 Air Inlet Door Actuator is a direct replacement part designed to restore your GM vehicle’s heating and air conditioning system. Built to exact GM OE specifications with durable metal construction and a seamless electrical connector, it guarantees reliable, long-lasting performance and easy installation. Perfect for professionals who demand factory-quality parts that keep their vehicle running smoothly and efficiently.


| Material | Metal |
| Brand | GM |
| Color | Black |
| Item dimensions L x W x H | 5.4 x 4.3 x 5.5 inches |
| Connector Type | Electrical Connector |
| Exterior Finish | Machined |
| Item Weight | 6.4 ounces |
| Number of Pieces | 1 |
| Global Trade Identification Number | 00707773188002 |
| Manufacturer | ACDelco |
| UPC | 707773188002 |
| Model | Air Inlet Door Actuator |
| Product Dimensions | 5.4 x 4.3 x 5.5 inches |
| Item model number | 15-73599 |
| Manufacturer Part Number | 15-73599 |
| OEM Part Number | 89018678 |
T**R
This is my preferred part for the fresh / recirculate door on the 99 silverado. I did it twice!
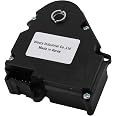
I did this twice... First with the Dorman 604-120 which started to act up after a few months. That said, it may have been my fault since I'd opened it up and turned the gears a wee bit during the instal because I could not get it to slip onto the shaft. After inspecting it, it seems there was nothing broken and perhaps since I'd opened it, there was enough slop to let the gears jump. Regardless, while still difficult to slip on in the tight space, the AC Delco 15-73599 is stopped in such a position that it slips on with the fresh / recirculation door about half open so it is easy. Do not test run it with 12v before installing it.I will post my original install instructions below but first will give a brief rundown of this install after doing it a second time. First, unhook the battery negative with an 8mm wrench. Second, using a Phillips #2 screwdriver to remove the glovebox with it's hinge.. you may need to drill off a couple of rivet heads that were for factory pre-install alignment and do not need to be replaced. Third, using a small flat screw driver, pop out the two vents on each side of the glove box. They just pull out. Forth, with 10mm tools, unscrew the two bolts from underneath that hold the airbag in place. Then on each side reach into the vent holes and feel for the head of a 10mm bolt that goes back into the airbag and holds it in place. They are nearer the top of the side rails and about an inch offset from the vent holes. I used a nut driver on the removal but had better luck resetting them with a short socket, 1.5" to 2" extension and my thumb ratchet driver. It is something that requires patience. Once removed, unplug the airbag and set it aside. The plastic cover is a tiny bit larger than the hole in the dash but it easily pops out and back in later. Fifth, you'll need to cut out a section of the black cross duct about 2.5" in diameter. Watch for wires and using a hacksaw blade only, cut about 5 inches out. You'll feel a web on the back of it that hooks it to the one in front. Cut the right hand cut just about 3/4" left of this so you'll have room to clamp it later. The left cut is not as critical but 4 or 5 inches left of that other will be fine. Once removed you'll see the actuator. Sixth.... There are two 5.5 mm hex head screws that hold the actuator in place. One you can see, the other only feel. I used a 1/4" ratchet, short extension and a socket but once loose, only the extension was fine. You can make a fat spot with electrical tape on your extension to make it easier to spin by finger tip. Once you have those off, you can pop it of the plastic guide pin and shaft by moving it straight left about 1/2" and then you'll just have the wire plug to unhook.Installation is frustrating since you can't see through your hand but with some patience, you'll get it on. Mine slid on with the door about half open. Once in, attached with the two screws and plugged in you'll need to cut some plastic off of the short piece of tube you cut out so it is rounder. Set it in place and wrap some rubber tube, sandpaper sheet or other such material around and use 4 regular stainless steel hose clamps to clamp it in place. The are about 3" and use a 5/16 nut driver or flat slot screw driver. Once tight, it will be sealed and snug so it can't go anywhere or leak. Then plug in the airbag and re-install the 4 bolts with 10mm tools that hold it. Insert the two vents and glove box with it's 3 phillips screws and reconnect your battery. That's it.Here is my commentary from the first time around..This was not the typical bottom 'blend door' actuator that went bad on my truck but the one up under the dash way in front of the passenger air bag. It is almost impossible to get at. I couldn't find a part number for it so I took it out first and then searched for it via the GM part number written on it. This truck has no automatic climate control and the actuator has only the 3 pins on the right side as shown in the picture. To get at it it seems you ought to remove the top of the dash but I could not figure that out. The grab handle is bolted on somewhere. Anyhow, I took off the glove box.... you'll need to drill out the 2 rivets. Then pull / pry out the two vents on either side of the airbag. Using a 10mm socket remove the two bolts that hold the top corners of the airbag. They are just past a ridge and about an inch or so from the opening left by the vent. Impossible to see, hard to remove but I managed with a 1/4 inch ratchet... patience needed. Then from underneath, two more 10 mm bolts and you'll be able to remove it. The dash trim panel is slightly bigger than the opening so carefully pry it out with a flat screwdriver and the whole thing moves out. Unplug the wire harness. Now, you'll be able to see the big foam covered door behind the screen on the right and just to it's left, the actuator. Turn on the key and hear it groan to make sure because there is apparently a 3rd one more to the center on top somewhere... maybe behind the radio. Now... to get at this, I opted to cut out a 5 inch or so section of the plastic duct that crosses this area and prevents you from reaching it. I used a hacksaw blade and was very careful to not cut any wires or the vacuum hose that was clipped to the back of the duct. I popped the clip off... careful not to drop it inside the fan. Once this was out, I could unplug the harness and then remove the two 5.5mm screws that hold it. They go through the holes pictured above at about 9 and 3 while the 6 o'clock hole just sits over a plastic pin. The back one or technically the front one, is impossible to see. Once out, I opened it up and found the large gear broken. Got the new one... compared it... same thing so I went to put it in. Problem is, you are not able to stick it on because the door wants to hang down so I used a 2 foot long rod to push it forward through the grate and then hoped it would line up. Hard to see what you are doing and it just would not go so I carefully popped it open and then spun the motor worm gear a bunch of times to rotate the thing a bit to the open side... maybe 1 or 1.5 teeth worth. Then snap back together and it went on after a few minutes of struggling. Got the screws in fine too. Next, the wire harness. The clip did not hold. I took a small screw and turned it in by hand under the pinch tab to lock it on. I must have messed it up taking it apart but anyhow, it is solid and once the key was turned, it worked perfectly. Next, cut the flange off of the piece of duct that came out so it is relatively round. Also trim the pieces left in under the dash a ways back. Then 4 gear clamps and a chunk of rubber wheel barrow tube or anything else about 6 or 7 inches wide by 10 or 12 inches... wrap the stuff around and put the 4 clamps on to seal and hold it. Put the air bag back in, replace the glove box... not the rivets, they were to hold the glove box to the trim before it got to the truck on the assembly line. You are done! It took more than one day for me but if I had to do it again on another one, I'd guess at maybe 4 hours total now that I know what to do.6 months later... The Dorman 604-120 actuator failed once again! I am not sure yet if the gear broke or if, because I rotated it slightly, I'm off the end of the worm gear... I will update once I replace it again. Meanwhile, based on Dorman's web description, this part comes back to AC Delco part number 15-73599 which I am buying this time around. Other GM part numbers listed are 89018373 and 89018678 if that helps anyone. I will add additional comments on both this dorman part and the AC Delco 15-73599 part review once I get to changing it later this week.
A**R
5 wire pins vs 3
This product only has 3 wire pins.check your original part some blend doors use 5 wire pins
L**E
What a pain in the rear to replace
Rant on: GM has been putting these things in their vehicles for years! They have a complex set of PLASTIC worm gears that eventually bind and become useless or partially working like mine. You'll know it when your AC blows hot on one side or the other. My 05 Silverado starting blowing hot on the passenger side. I researched repair costs and found that dealers charge at least $1000 to replace due to the amount labor involved. I roamed around youtube and the net and found some home made tutorials on changing out the drivers side which turns out to be much easier than the passenger side due to the location way up under the dash. I eventually found home made instructions on the passenger side. I'm a DY'r so I bought this thing and jumped in.After removing almost my entire dashboard and framework and a lot of prying/cursing I was able to replace the unit. You can't really test it until everything is put back together which sucks. So after about 6 hours I was able to test it and it WORKED and has continued to work.. until the gears fail again I suppose. If this thing was a safety issue GM would have been forced to recall these things years ago! Rant off
A**Y
Good
Good
K**Y
Not for the HVAC fresh air/ recirculating door on a !999 Chevy Tahoe.
Did not work for the recirculating/ fresh air flap on a 1999 Chevy Tahoe as it said it would. It worked exactly oppositewhen in stalled. Ended up putting in a cheap Doorman actuator. Works fine now.
R**D
One hour job! Great OEM actuator!
1999 Silverado recirculation intake door actuator. I already had dashboard and glovebox off for another problem, but those two took less than 30 min to get off. I set it on recirculation than pulled negative battery. Separate that defrost tube near windshield from front vent tube at that tab where they are melted together, just drill in the middle of it and they'll come apart. Put a piece of wood under defrost tube to hold it up about 4". I used ONLY a 1/4" drive ratchet and I believe a 7/32 socket to get both bolts out! I did not remove airbag! One left hand thru left of glovebox and right hand at top....15 minutes out and 15 in, maybe! When you pull the motor out the door will still down and hang straight down. The new moter was all ready in this position, so when I put it in there it slipped right on shaft. After I tightened it up and plugged it in, I connected negative battery, then turned ignition to on position without starting. The door moved closed to recirculation position. DO NOT TOUCH/MOVE AND OF THE DASH CONTROLS AFTER YOU START! This motor works great...you can even hear it! Shipping was fast!
M**R
Three Stars
Worked like it should. Too bad this type of part is common for GM.
J**E
ACDelco is the way to go for this part!
I learned my lesson the hard way.. My original actuator started going out 10+ years after I bought my truck new. It started humming and it wouldn't close the blend door all the way. I originally replaced the inside/outside mix actuator with a different brand. It worked for about 6 months before it started clicking and popping. When I say, "clicking and popping" I mean the most god awe full, annoying, incessant nagging noise you can imagine. It drove me absolutely crazy... and wouldn't stop unless I turned off the key.Installing the actuator in my vehicle is a huge pain because of the location in the back of my dash behind the passenger air bag. If I'd known what I know now, I would have paid a $100 premium to get the ACDelco version in the beginning. I have had no issues in the 1 1/2 years since I installed this actuator. This is one item well worth paying extra for extra quality.
Trustpilot
1 day ago
1 week ago