We remain fully operational. Our teams are working around the clock to ensure your deliveries continue safely.
DOWNLOAD THE APP


Customer Services
Copyright © 2025 Desertcart Holdings Limited
DOWNLOAD THE APP
Buy anything from 5,000+ international stores. One checkout price. No surprise fees. Join 2M+ shoppers on Desertcart.
Desertcart purchases this item on your behalf and handles shipping, customs, and support to Japan.
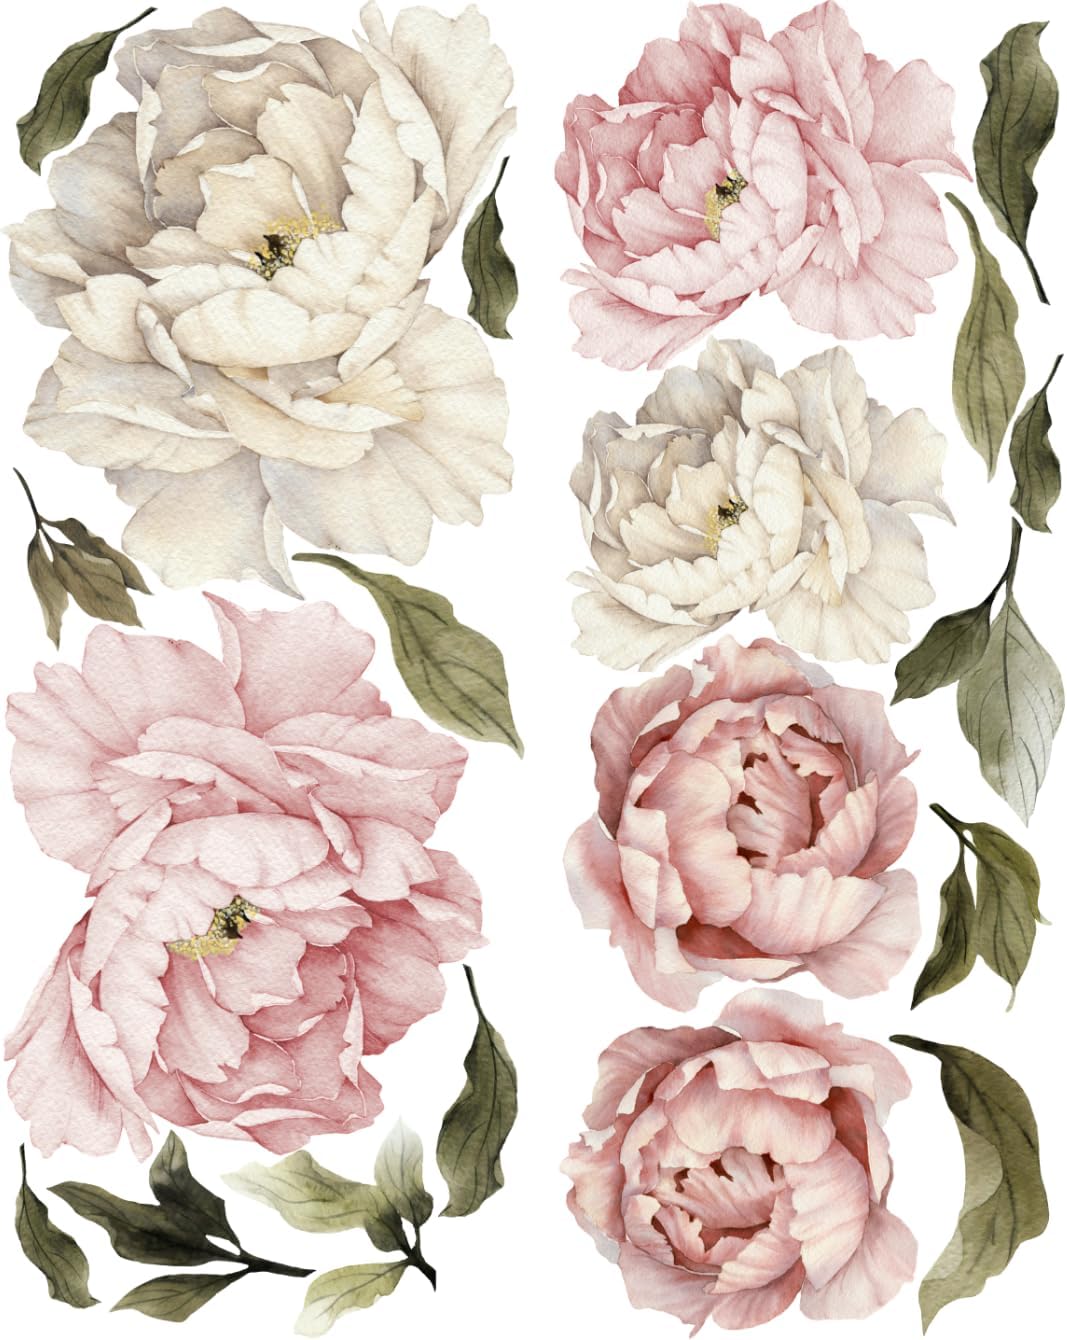
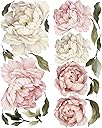
🌿 Peel, Stick, and Bloom: Your walls deserve a fresh floral glow!
The Murwall Floral Peonies Wall Decal set includes 6 intricately designed peony flower decals and 14 leaf clusters, ranging from 8.6" to 24" in size. Featuring a matte finish and easy peel-and-stick application, these removable decals allow for customizable, damage-free decorating that instantly elevates indoor spaces with timeless botanical charm.
| ASIN | B07M7PFZXV |
| Best Sellers Rank | #71,922 in Arts, Crafts & Sewing ( See Top 100 in Arts, Crafts & Sewing ) #1,231 in Scrapbooking Stickers |
| Brand | Murwall |
| Color | Pink |
| Customer Reviews | 4.6 4.6 out of 5 stars (1,867) |
| Date First Available | January 10, 2019 |
| Finish Type | Matte |
| Indoor/Outdoor Usage | Indoor |
| Item Weight | 1.1 pounds |
| Item dimensions L x W x H | 67 x 45 x 0.03 inches |
| Number of Items | 1 |
| Number of Pieces | 20 |
| Pattern | Floral |
| Product Dimensions | 67 x 45 x 0.03 inches |
| Recommended Uses For Product | Wall |
| Size | Large |
| Style | Floral |
| Theme | Botanical |
| Unit Count | 1 Count |
A**R
Simply Stunning
These removable wallpaper stickers were simple to apply. It takes time and patience, but it is not difficult! After painting the bathroom walls (not textured) black, and allowing the paint to dry for a few days, I cut around every sticker, allowing about an inch beyond each design. Next, with the help of a friend, I held each one up to get an idea of where I wanted each, and layed out a design on the bedroom floor. Once I decided my layout, it was time to begin. I started in the middle, at the height of my design, and one by one placed each sticker up. The pre-cut detailed edges of each flower can easily fold, and stick to other parts of itself, so be careful to hold up as you peel off backing to avoid a mishap like this. Begin adhering to the wall in the center, and push out toward the edges, pressing air bubbles out. I used my palm of my hand, washed of course. No special tool was needed. This process was used for each individual flower sticker, taking care to overlap flowers so the arrangement looked natural. The stickers adhere so well, that it wasn’t easy to lift the already adhered sticker in order to layer/overlap. I used a stainless steel drywall tool to lift the delicate edges. This tool is used to apply and flatten spackle/mud (I don’t know the name of the tool), and its edge is thin, like a knife. It has a handle and a 5 inch “paddle.” Imagine a ping pong paddle, but very thin steel, in a rectangular shape. I tried a plastic version of this tool, but the steel one worked much better. This tool saved the integrity of the delicate edges. Just using a fingernail tended to bend the stickers edges, making it difficult to reapply smoothly. In the case of overlapping a large area of a flower, I did trim excess with a scissor. I’m pleasantly surprised to see that, once applied, the overlaps are not visible. I had a friend, who knows that I myself paint, come over; and he actually got very close, and ran his hand over the wall, while asking, did you paint all this?! The finished design is absolutely beautiful! I’m very picky, and I do not have the urge to take them down and paint a design myself, LOL! I do wish I could purchase the vinyl sticker pages, without a design printed, to paint myself, and make my own wallpaper stickers in the future!!!
D**H
Beautiful addition to any space!
These vinyl wall decals were above & beyond I was hopeful for! They’re really nice quality, easy application, immediate upgrade to your space! -When they arrived, I removed them from the tube they came in, and laid them flat with some heavy items on the corners for an entire workday. -Next, I cut around each flower and each of the leaves, (doesn’t have to be exact or perfect!) leave enough of an edge to peel decals off. A few things worth mentioning: -Decals peel off backing easily- but can also get stuck to itself as you peel it off… -Try to choose where you’ll want leaves because I preferred them under the floral decals, which was hard as I had put up all of the flowers on their own, before deciding where I’d put the leaves. *I mapped out what order I wanted the flowers in, by moving them around on my bed until I liked the layout. Then I started transferring them to the wall. -I have textured walls and the vinyl is sticking fine (with the exception an edge, here or there) These peonies were so much more beautiful than I thought they’d be. Definitely a great value, you will not be disappointed, I love the way my space feels completely fresh and new💖
J**.
Stunning. Just stunning!!
Update July 2021: These are still stunning, have never faded, have not peeled or rolled and are still on the wall as I originally placed them- even with it getting humid and hot at times. We get compliments on them all the time and I'm very happy with how it all turned out. I felt like I wanted to know this when I was considering buying and reading reviews so I hope this update helps someone! Original post March 2021: I bought two rolls of the flowers for our daughter's nursery and since the ceilings are high and vaulted, I wasn't sure if one would've been sufficient for the kind of coverage I was looking for (also wanted to give myself room for error, based on some of the reviews on here.) Didn't need them immediately and wanted to follow the advice of another customer who'd suggested laying them flat for a while before hanging, so I did. In fact, I ended up leaving them flat for at least a month (probably overkill but I was preoccupied with other baby-related tasks, so it didn't bother me.) I'd say if you're able, leave them flat somewhere in the room where you plan to hang them for at least two weeks, to be safe. *To answer the million-dollar question (did they adhere or did they roll up a day after?): -They did adhere, really really well actually. Be sure you're committed to your layout before taking the backing off. It's not impossible to take one off right after placing if you have to move it, but you have to be patient and gentle to avoid messing it up or having it stick to itself. -The day after we hung them, I did notice that I had to use a finger to smooth down an edge here or there, but they'd only lifted about 2mm or so and since then I haven't had any issues with them threatening to roll off of the wall. Again, I think keeping them flat in the room where they were to hang helped a lot, as they weren't moving to a space with different temperature, humidity, etc. which could've made getting good adherence difficult. -Also, I did not clean nor prep the wall. I did not paint and then try to hang a week later... Our walls are a standard, smooth texture. If our palms started to sweat even a little, we used a hand towel to dry them off before resuming with hanging again to prevent moisture getting onto the backing. Take your time and be sensible. - It's been a week now without any lifting etc., so I'm feeling confident that these are going to stay put. *Application: -I used our ladder and hung them on the wall first with blue painters tape so I could play around with design (HIGHLY RECOMMEND THIS,) and then my husband and father-in-law placed them from there. They made sure to keep a hand on each applique and slowly remove the backing in a top-to-bottom fashion, and used their hands plus a small squeegee-like item to push out and prevent air bubbles (squeegee doesn't need to be anything special. We used a small tool that's square with beveled edges from pampered chef. A light weight, hardcover book or something would probably work well.) Once mounted, these flowers look almost as if they've been painted on. They're quite stunning in person and I can't stop looking at them! Finally, an "Insta-worthy" end product that I actually put together. Hopefully you'll be patting yourself on the back once it's all said and done as well! Side note: The custom name sign was purchased on Etsy. Look-up "TheWhimsyTimber" and you'll find them. Top notch business!!
Trustpilot
1 week ago
2 months ago