


Desertcart purchases this item on your behalf and handles shipping, customs, and support to Japan.
✨ Repair Like a Pro, Save Like a Boss 🛠️
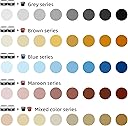
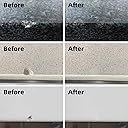
The Globalcom Marble and Granite Repair Kit is a versatile, two-part resin system designed to fix chips, cracks, dents, and missing pieces on a wide range of surfaces including porcelain, marble, granite, quartz, and more. Featuring customizable color gels for a perfect match, it cures to a hard, waterproof finish within 12 hours. Non-toxic and eco-friendly, this kit offers professional-grade results at a fraction of the cost, backed by a 60-day money-back guarantee.



| ASIN | B0D8SLS4PG |
| Best Sellers Rank | #6,272 in Tools & Home Improvement ( See Top 100 in Tools & Home Improvement ) #603 in Wall Painting Supplies, Tools & Wall Treatments |
| Brand | Globalcom |
| Brand Name | Globalcom |
| Color | White |
| Compatible Material | Porcelain, Marble, Stone, Quartz, Chip |
| Customer Reviews | 4.3 out of 5 stars 371 Reviews |
| Included Components | Marble & Granite Repair Kit |
| Item Dimensions | 5.1 x 5.1 x 6.1 centimeters |
| Item Form | Paste |
| Item Type Name | Marble & Granite Repair Kit |
| Item Weight | 3.7 Ounces |
| Item dimensions L x W x H | 5.1 x 5.1 x 6.1 centimeters |
| Item weight | 3.7 Ounces |
| Manufacturer | Globalcom |
| Material | Resin |
| Material Type | Resin |
| Model | GB012 |
| Number of Items | 1 |
| Part Number | GB012 |
| Style | Resin, Two-Part, Waterproof, Rigid |
| Style Name | Resin, Two-Part, Waterproof, Rigid |
| Unit Count | 1 Count |
| Water Resistance Level | Waterproof |
| Water resistance level | Waterproof |
G**N
good resins that work as advertised
The resins supplied work well. The heated spatula is a bit awkward to use due to its shape and being required to press a button to provide heat. A shape more like a soldering iron would be helpful and allow a finer application of the resins.
W**N
Blends in
I had a quarter size chip and this kit worked extremely well. Just don't get carried away when mixing in the color. When I stand back it is hard to see the repair .
B**H
Easy to use
Bought to repair a broken marble backsplash. It worked great. I know why they give you toothpicks to use in adding color. I first used a drop for a grey color repair and it was black. Then I used the toothpick, dipped the tip of the toothpick in the color, could hardly see the color and it worked great for grey. I would suggest wet sanding to finish the repair to get the shine back.
C**R
Solid Repair Kit with Tough Finish, but Challenging Color Matching
I accidentally burned a small spot on my countertop with a hot pan, so I got this repair kit to fix it. The final hardened surface is very tough and durable, which is great because it’s on a high-traffic area. Once cured, it feels solid and stable. However, the downside is that color matching was really difficult. For a beginner, it’s not very user-friendly, and getting the exact shade took a lot of trial and error. I did eventually get it close, but it required patience and a steady hand. Overall, the kit is a good solution if you’re willing to take the time with the color mixing. Once set, it provides a strong, long-lasting repair, even if the color matching takes a bit of effort.
D**.
Does the job well
Works well but the amounts of material are much smaller than expected.
R**B
Very Impressed!
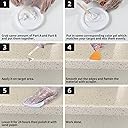
I was hesitant to try to fill a hairline crack on my granite kitchen countertop by myself, but I thought I’d give it a try. Initially, I called a business that specializes in granite repairs, but they quoted me a price of $350. I used the granite repair kit from Amazon this morning. The instructions were easy to follow. But remember to go easy on any colors that you add to the base. You get 4 toothpicks, one for each color container. Just a tiny bit of color on the tip of a toothpick is enough. The consistency of the filler was very smooth and creamy. And the filler was odorless. Before filling the crack, I put packing tape on both sides of the crack. Then using the putty knife that was included in the kit, I smeared the filler over the crack. I did this a couple of times. Then I removed the tape and wiped away any excess filler with a dry paper towel. I could tell right away that the crack had been filled. Tomorrow morning I’ll buff the area using the sandpaper that came with the kit.
Trustpilot
4 days ago
1 month ago