

Buy anything from 5,000+ international stores. One checkout price. No surprise fees. Join 2M+ shoppers on Desertcart.
Desertcart purchases this item on your behalf and handles shipping, customs, and support to Japan.
๐จ๏ธ Print, Peel, Perfect! Your 3D printing just got a major upgrade!
The 2PCS Creality Original Ultra Removable Magnetic 3D Printer Build Surface is a versatile and innovative solution for 3D printing enthusiasts. Designed for compatibility with various Ender models, this heated bed cover features a unique magnetic system that allows for easy model removal and customizable dimensions, making it perfect for any project. Its simple installation process ensures that both beginners and experienced users can enjoy a seamless printing experience.


| Best Sellers Rank | #2,263 in Industrial & Scientific ( See Top 100 in Industrial & Scientific ) #23 in 3D Printer Accessories |
| Brand | Comgrow |
| Color | Black |
| Compatible Devices | No |
| Customer Reviews | 4.4 out of 5 stars 9,342 Reviews |
| Material | Metal |
| Product Dimensions | 9.25"D x 9.25"W x 0.2"H |
| Supported File Format | stl, obj |
D**N
Better than glass, IMO
I bought a glass build surface awhile back, and effed it up because my nozzle was set too low. If the spongy surface on the glass bed is scratched, it ruins it. So I got one of these magnetic ones, and it's a big improvement over both the glass and stock build plates. One thing I noticed is that it's very difficult to remove prints if you set the print bed temp. at 60 degrees, but prints come right off if you set it at 50 degrees C or below very easily. Another thing to note is that both of the piecesโthe magnet and print bedโare both made up of smaller, rectangular magnets; neither is made of just metal. Because the magnets on both sides are rectangular, you can run into an issue where you stick the magnet down to the print bed, and go to lay the top sheet on it, and it won't line up exactly with your 3D print bed surface. There will be like an extra 1/4" of either underhang or overhang on the left or right. But the top surface itself is larger than the stock build plate, so you can also cut it to size if you prefer. I ran into the issue where if I let the top surface overhang on the right, it bumps against the power supply enclosure. So, I leave it with like 1/4" overhang on the left side of the plate, no big deal. It's so much better than holding down your print surface with binder clips. And the magnet is extremely flexible. Prints tend to peel right off, so long as you keep the bed temp. at 50 degrees C. I will say that they're near impossible to peel off if the bed is set at 60 degrees, and I can't emphasize this difference enough.
A**N
Went from clueless to glueless baby
Adventure 5m user here and the PEI metal plate it came with was really nice and worked for 100 plus hours of printing but then all of sudden the glue literally was not sticking to the metal plate anymore, I would apply glue (4 different brands) and once I over applied the glue it would not be sticky but slick instead. Hopped on amazon to see if there was a product to help me and this one is awesome! No need for the magnet sheet bc the bed is metal so just the top part is what I needed. NOTE: the sheet it comes with is thicker than my plate so you NEED to offset the Z axis, on my 5m its exactly -1.0mm and the prints always come out amazing and so easy to remove from the flexible sheet. No need for glue anymore baby!
R**F
Not stiff in the slightest
I immediately was thrown off when picking up the package. Flimsy and light, oh no! I thought I had ordered a bed with spring steel and magnetic mounting plate. This guy is incredibly flexible, and looking at the machine now, I can't see how that's a problem. There's like a centimeter of aluminum it mounts to, so it won't bend. Speaking of mounting, the adhesive on the magnetic backing was SO sticky, I had to forcibly rip the build plate from the machine so hard that I thougbt I would break something during installation. It just never gave me a chance to line it up straight before holding on for dear life. I do not think it's going anywhere. The adhesive lends itself to making bubbles you'll need to smooth out over and over before it is perfect. The magnets are very strong in the horizontal axis. I say magnets because it feels like it has been arranged in such a way that there is a predictable grid it adheres to, and you can line it up every time. The final mind blow was taking off the first print. Normally, I have a deep imprint of the prints I've made previously that I cannot remove. Not so with this, everything came off cleanly and the surface looks like it just came out of the envelope. I can definitely recommend this as a bed for repeated prints. Will update after more use of this *seemingly* wonderful bed.
A**N
I like the flexibility, but my filament sticks
I like that this is flexible, and the filament sticks to it really well, but sometimes the filament sticks too well. Certain filaments do not want to pull off of the mat once printed, and Iโve tried different temperatures to see if it makes it easier to come off, but I havenโt found that sweet spot yet.
M**M
Must Have Upgrade If You Ask Me
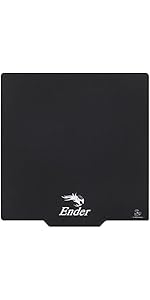
Nice, very, very nice. I replaced my scratched up glass bed with this an it's performing perfectly so far. This build surfaced comes in two pieces, the build sheet itself and the magnetic sheet with adhesive backing that must be attached to your printers raw metal bed. I'd recommend test fitting the magnetic sheet to your bed before removing the peel sheet from the adhesive backing first so you can get a feel for centering it properly. I didn't do this and I have just a tiny bit of overhang on the back side. It appears with perfect alignment you shouldn't have any overhang at all I'm just a goober that rushes into things without stopping to think first cause once the magnetic sheet is stuck down, you're not going to want to remove it and weaken the adhesive. VERY IMPORTANT: The build sheet and magnet sheets each have their own north and south magnetic orientation you must be aware of. Take note of the orientation of the build surface in relation to the magnet sheet before you attempt to stick it down to the raw metal bed as they won't stick together if turned 90 degrees to one another. Remember opposite magnetic poles attract while like poles repel so if you line up the north magnetic pole of the build sheet with the north pole of the magnet sheet they'll push one another away and won't stick together. Don't stick your build sheet down 90 degrees off or you'll have to but the build sheet on 90 degrees off as well causing the Ender logo to be on the side instead of in the front where it should be. Once the magnetic sheet is attached properly to your printer the build sheet just snaps to the magnet and you're good to go. Once assembled I have no fear of this moving at all, it holds position just fine an the magnet has good strength. That was at least my observation. I'm running this on my Ender 3 v2 at 55C, wiping the bed first with 90 percent IPA. Print adhesion has been perfect while also keeping the parts easy to remove. I wouldn't use a scraper on this and it hasn't really been necessary. Just print, pull the build sheet off the magnetic bed, give it a little flex and the parts pop right off. I'm sure the mass reduction of the lighter build surface helps with print quality and printer wear and tear as well. To clean, just wipe down with 90 percent IPA several times to get all remaining plastic and residue off and you'll be golden. Heat transfer is probably a little less efficient than the glass but that's just a guess, maybe not. I was printing on glass at 40C and I've upped that to 55C with this build surface. Only other thing to keep in mind is that extreme bed heat can possibly de-magnetize the magnet permanently but we're talking like 180C +. Personally, I don't think the Ender 3 v2 bed can even get hot enough to kill the magnet sheet but it's something to keep in mind of you plan of printing some exotic filament with possibly a modified printer. Just buy this, heck get the two pack, you will not be sorry it's a must have upgrade IMHO.
C**L
Love this plate
Before I bought this item I have to tell you that I bought a used Ender 3. After finding a broken extruder (plastic one that is known to break), I had trouble printing my first 3d object (pencil case). I saw issues with the start of the part not adhering very well to the plate. I realized the plate needed cleaning so I cleaned it with isopropyl alcohol. After I cleaned the plate I noticed deep gouges like someone didn't calibrate it before. So, I bought the sticker sheets as they seemed like a pretty good price. Well, they didn't work very well at all no matter what I did. I changed the extruder as it is a plastic one and known to break after a while. I bought a metal one to change out the plastic one. Also, I notice the feed gear was pretty worn so I changed that as well. I still had issues with adhesion. I read about the magnetic plate and it had fantastic reviews so I purchased that. Right away, my 3d object had no problem at all. The filament stuck to the plate and the build of the 3d object was perfect! I highly recommend the magnetic plate as well. It's very easy to install.
M**Y
Much better than original bed
So much better than my old plate. I got my Ender 3 used from an uncle, and the magnetic pad was already on the bed. The new flexible build plate adheres so much better than my old one. I donโt have hardly any issues at all with a well calibrated printer, it is very reliable and fit my Enders 3 bed with the correct size. Great value as well. I did notice that it had a tiny marking in the bed in one of the corners, probably from a little bend. It has not affected prints at all yet.
W**N
Turn down bed heat to 50C!
I followed the included instructions carefully and the installation went well. I decided to make my first test print. After making a slight adjustment to my Z offset and re-leveling the bed. I did not use any glue stick and the print went very well. But when I went to remove the finished print, it just would not come off the pad. I was very careful but there were just a few spots where it was not coming off, I tried heading the plate to 80C but still really stuck! I finally got the part off but damaged the magnetic cover. I actually cracked in a couple of places, and it is ruined. I have attached a photo. I started reading the comments and saw a post where someone said to set the bed tome to 50C NOT 60C and tried the second one (lucky I bought the two pack). This time the part came off without any damage. Too bad it did Not say this in the manual!
Trustpilot
2 months ago
1 week ago