Desertcart purchases this item on your behalf and handles shipping, customs, and support to Japan.
🚛 Transform your truck bed into a custom fortress of style and durability!
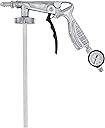
The Custom Shop U-Pol Raptor Tintable Urethane Spray-On Truck Bed Liner Kit is a 4-quart professional-grade protective coating system designed for truck beds and multiple surfaces. Featuring a tintable base for color customization, it includes a premium spray gun with regulator and gauge for precise application. This abrasion-resistant, waterproof urethane protects against rust, corrosion, stains, and extreme temperatures while also dampening sound and vibrations. Easy to use with a simple mix, shake, and spray process, it offers a cost-effective DIY solution trusted by thousands of users for durable, long-lasting truck bed protection.


| ASIN | B074KPF5X9 |
| Best Sellers Rank | #3,118 in Automotive ( See Top 100 in Automotive ) #6 in Truck Bed & Tailgate Bed Liners |
| Brand | Custom Shop |
| Brand Name | Custom Shop |
| Color | Tintable |
| Customer Reviews | 4.7 out of 5 stars 4,283 Reviews |
| Dry Time In Hours | 36 |
| Item Volume | 4 quarts |
| Item Weight | 0.27 g |
| Manufacturer | Custom Shop |
| Model Name | CUS KIT-0823-4-GUN |
| Model Number | 5841743442 |
| Part Number | CUS KIT-0823-4-GUN |
| Size | 4 Quart Kit |
| Specific Uses For Product | Exterior |
| UPC | 845927041510 |
| Unit Count | 128 Fluid Ounces |
M**E
Excellent DIY Alternative with Great Customer Service
This is a great kit. I purchased four kits to coat my work van, and even with buying multiple kits, it was still very affordable compared to the paint quotes I received. I was able to coat the entire van in a single day, and the product went on very well. The kit is easy to use and comes with everything needed to get started. The finish looks great, the texture turned out exactly how I wanted, and it has been holding up extremely well against scratches and everyday use. One of the kits arrived leaking, but customer service was excellent. The exchange process was simple, communication was easy, and they gave me the choice between a refund or replacement without any hassle. That level of customer support definitely stood out. A couple of tips for anyone considering this product. First, make sure you have access to a decent-sized air compressor. A small 5-gallon pancake compressor will struggle to keep up if you're trying to complete a larger project efficiently. Second, spend some time experimenting with air pressure settings and spray distance before starting your project. Small adjustments can create noticeably different textures, which gives you a lot of control over the final appearance. Overall, this was a fantastic value. The finished product looks great, has proven durable, and cost significantly less than even the lowest paint estimates I received. I would absolutely use it again.
B**W
Simply outstanding.
I have to start out by saying that I was incredibly skeptic of Raptor at first as it seemed too good to be true. I was also fairly intimidated by the level of effort required and risk associated with it coming out poorly. The main thing that kept running through my head was that if I mess it up there is no simply wiping it off and doing it again as this stuff is permanent. Well, let me say it is very forgiving. Keep the gun 12" - 16" away and you'll be fine. I put it on my brand new '21 truck. I bought a 6" nylon cup wheel and using my variable speed (kept it at 1400 RPM's) Dewalt buffer / polisher, proceeded to go over every square inch of the bed. One only needs to remove the shine of the paint, roughing it up just enough to take off the clear coat. You do not need to go down to metal. In a few spots I wore through the paint down to the primer which is totally fine. Once I was done with the nylon cup brush, I wiped it down with a damp terry cloth towel and then could see what all I missed. I then used a gray (coarse) Scotch Brite pad to go over the entire bed again by hand. It does take some time but it's worth it. I wiped it down again and then proceeded to tape with 3M blue painters tape. A local bed liner guy mentioned to not use Acetone to do the final wipe as it literally melts paint. Said that if you are really bent on using some sort of degreaser, to use denatured alcohol but the reality is that a damp rag or even a dry cloth is plenty. Any degreasing should be done prior to sanding. Pay special attn when taping making sure it's all pressed down real good. I then covered entire truck with 2 mil plastic sheeting. I donned a disposable Tyvek suit, disposable nitril gloves, and a $30 chemical / painting respirator and set out to get it done. Before adding the hardener, I shook all 6 bottles for real well then added the 250 ml hardener to 4 of them shaking those 4 again for the required 2 mins. I mixed 4 because I knew it would take 4 to cover my 6' 4" bed fairly well. I rinsed the sprayer with acetone (poured a cup of acetone in water bottle and shot into trash can) in between each new bottle of Raptor. There is no need to hurry when spraying as the pot life of this stuff (when mixed w/ hardener and cap kept on) is about an hour. I sprayed at 40 psi and it took about 5 mins / bottle. I probably could have gotten away with just the 4 bottles but I knew I wanted it thicker so why not do it right. Per the instructions, I waited the required 1 hour between coats and then sprayed the remaining 2 bottles evenly over the whole bed. After cleaning the gun and putting stuff away (took about 10 - 15 mins), I set about on the removal of the tape and plastic sheeting. As you can imagine it does have quite the chemical odor when spraying and continues to off gas for few days after so know if your garage is attached to your house, it just might stink up the house. I would highly suggest doing a dry run of sorts. Go through each step before actually mixing the product. Make sure your work area for mixing is clean and clear of clutter. Make sure you can walk freely around truck. Check over your tape job a few times. Imagine yourself spraying; where will you start, how will you hold gun to get proper angles to hit odd areas, etc. Dial in sprayer PSI. Have clean rags handy to wipe off spray tube in between bottles. All in all just make sure you are truly ready to spray before starting. Last thing you want is some kind of a hiccup in the process once started. Would I do it again? Perhaps. There is great satisfaction in doing it but after buying the tape, plastic, respirator, tyvek suit, 6" nylon wheel, scotch brite pads, and the kit itself plus the labor required I would seriously consider paying the $500 to have it done professionally. I probably ended up saving about $150. Also, even with 6 bottles sprayed on a 6' 4" bed, the thickness of the finished product is probably less than 1/2 of what it would be if you had LineX or similar. I would say that Raptor is good for the average grocery getter or occasional Home Depot run. Cannot imagine it being strong / thick enough to handle heavy duty stuff like constant rock hauling, excavator bucket moving, chains dragging, or shovels being constantly drug across it.
H**Y
Rugged...adds at least 3 testosterone points to your man card
The Raptor Liner system is outstanding and easy to use. I've used Raptor Liner to paint/coat steel bumpers, raw aluminum fender flares, and steel rock sliders on Jeeps as well as the 6' truck bed on a Toyota. It's is an easy product to spray on...noting that the preparation of the surface to be painted is the most difficult and time consuming part; but if you want the outcome to look great, spend the time on prep and let the Raptor Liner do the rest. It's a very forgiving paint that allows for easy blending of minor errors when applying multiple coats and is thick and rugged once it cures. The included gun works perfectly and allows the user to adjust the texture on the painted surface based on pressure out of the nozzle and distance away from the spray surface. Depending on your use, this allows the user to create a more 'rough-like' finish or a smoother finish (not like rattle can smooth) with ease. Clean gun between flash coats...you have an hour. I found Acetone is the BEST solution to clean the spray gun between coats and to clean up any drips or spillover on stray metal, pets, your hands, etc. Paint thinner does not do the job...trust me, just get a can of Acetone. Pro Tip: Wear nitrile or latex gloves, a mask (N95-style painters mask is fine), and safety glasses...but honestly, overspray is minimal except for the area you are painting. Get a small tupperware/plastic container to clean/soak spray gun parts in when using the acetone. Once you are done...DON'T TOUCH IT! Resist the urge to poke your finger at it...leave it alone and let it cure. It'll be generally 'touch dry' about an hour after your spray it...depending on the weather/temperature. When you want to rub your finger on it...because it looks so dang awesome when you are done, DON'T TOUCH IT!!! Let it cure. Peel any masking tape off 30-45 min after you sprayed the final coat so that the paint is still a bit pliable and doesn't harden with your tape. Real World Examples (thick coats applied): Poison Spider Crusher Fender Flares - 4 pack (black) Toyota truck bed - 6 pack (black) Steel off-road bumper - 2 pack (black) Rock Sliders - 2 pack (black) I've seen YouTube videos of people painting Jeeps and other vehicle exterior surfaces with tinted Raptor Liner...but so far, my above examples are from direct, personal experience using the black color. This is definitely a DIY or newbie-friendly product that looks great and provides a heavy duty protective surface. One note of caution...During use of this product, your beard will grow out at least 2-3 inches (unsure if it has the same affect on the ladies), you'll wonder when/how your shirt turned to flannel, the points value on your man card will triple, all Jeeps in your surrounding area will take their tops off - like some freak, cosmic 'Jeeps Gone Wild' thing, your cell phone battery will charge to 100% automatically, you'll somehow end up with the steely-eyed stare of the "Outlaw Josey Wales,' and will grow a bear-skin rug for chest hair. I can't explain it...it's just science.
2**R
Amazing product as expected
The decision to proceed with this project is the most difficult one; IF you have $1000, no time, no equipment, no talent :) then it would be fine to have a pro shop do it for you. That is a pretty fair price given the labor involved and perhaps any guarantee or warranty they will provide + perfection. HOWEVER, if you have an eagerness to save about $800, at least a 20 gal air compressor, respirator with face shield, tyvek suit, gloves, etc, and some auto body experience with safely handling urethane isocyanates, then this is definitely within your skill set. This is for a 21 Chevy Colorado with the 6' bed. I will not discuss the prep as that has been done by so many, in short, clean, scuff, clean...clean. Don't be in a hurry, when you think you're done, do it again. The key is to scratch the factory finish not remove it. There are so many irregular features in this truck bed that it could take a whole afternoon timewise in order to accomplish. Next is masking; make sure you overdo it here as well so as not to chance any overspray once things get real....roof, between the cab, bed rails in between the gate....you get the point. I was concerned about having enough product, but the 4-L kit was a perfect amount. Mixing was straightforward according to the directions, 8.0 fl oz of hardener per 1-L bottle...2 min of shaking. Spraying is an athletic activity. You'll definitely want a light 1/4" compressor spray line as you move about. You'll need to experiment with the best proximity and angle in order to achieve coverage. I had never used a schutz style gun, but it was easy and necessary in order to get the lumpy finish texture. It did not seem to throw out a huge cloud of overspray like hvlp guns can during a traditional paint job, although make sure the spray site is safe and clear of spectators. I sprayed the sides and front first, then the flat areas next. The first 2 bottles covered everything in 1 coat. I cleaned the gun with some lacquer thinner and waited for the flash time as suggested, before recoating everything with the final 2 bottles. Dried to-the-touch in about 1hr, so if you had to do light re-assembly or re-mount your tonneau cover you might be able. Instructions say no rain for 3 days, and no hard use for 7 days. In conclusion, I'm very happy with the project. It's like the bed is coated in a polyethylene-like shell and it seems to have REALY bonded well. Although I notice a few imperfections (light coverage in a few spots, extra heavy product in a few spots=gloss, etc...) most people wouldn't, and all could be fixed with a "psst" of touch up. You're going to have this if you're not spraying with ideal lighting conditions. One last thing, although there is a roll-on kit available, I'm convinced based on my experience that this is a better method of application for such a complex surface. Hope this helps!
C**F
Love it!
Absolutely love the outcome. My 5’8” bed was doable with 3 cans so I may use the 4th to do the fender trim, mirrors and rockers, or save it for touch up. I tinted with charcoal metallic, a decent match for satin steel metallic.
H**R
Great Product, but with a Consistent Packaging Issue
I'm giving the U-Pol bed liner kit four stars because, once applied, the product itself is fantastic. I've used it multiple times now and every single time the final result looks great and has held up perfectly. Being able to achieve a professional-looking, durable bed liner without having to spend thousands of dollars on a professional spray is a huge benefit. However, the reason I can't give it a full five stars is because of a recurring issue with the packaging. Nearly every time I've ordered a kit, one of the bottles has leaked in transit. While I've always been able to use the remaining product to complete my project without any issues, it's still frustrating. Amazon used to replace the leaky bottles, but this last time they did not, which was disappointing. The product is excellent, but the packaging needs some serious improvement.
A**R
Awesome product
Awesome product our project turned out great no issues pretty straightforward will buy again
D**K
It’s a DIY project most people can do.
This product appears to be great. It was very easy to use. Some of the videos that I’ve seen look like the product comes out slowly. I used a large compressor at 50 psi and comes out very good and uniform. I’d definitely suggest using a digital weight scale when mixing tintable Raptor. Keeps the color uniform from bottle to bottle.
A**ー
商品は良いですが
日本語の説明書が欲しいですね
Trustpilot
5 days ago
3 weeks ago