Desertcart purchases this item on your behalf and handles shipping, customs, and support to Japan.
๐ Elevate your Raspberry Pi 5 with NVMe speed โ donโt get left behind!
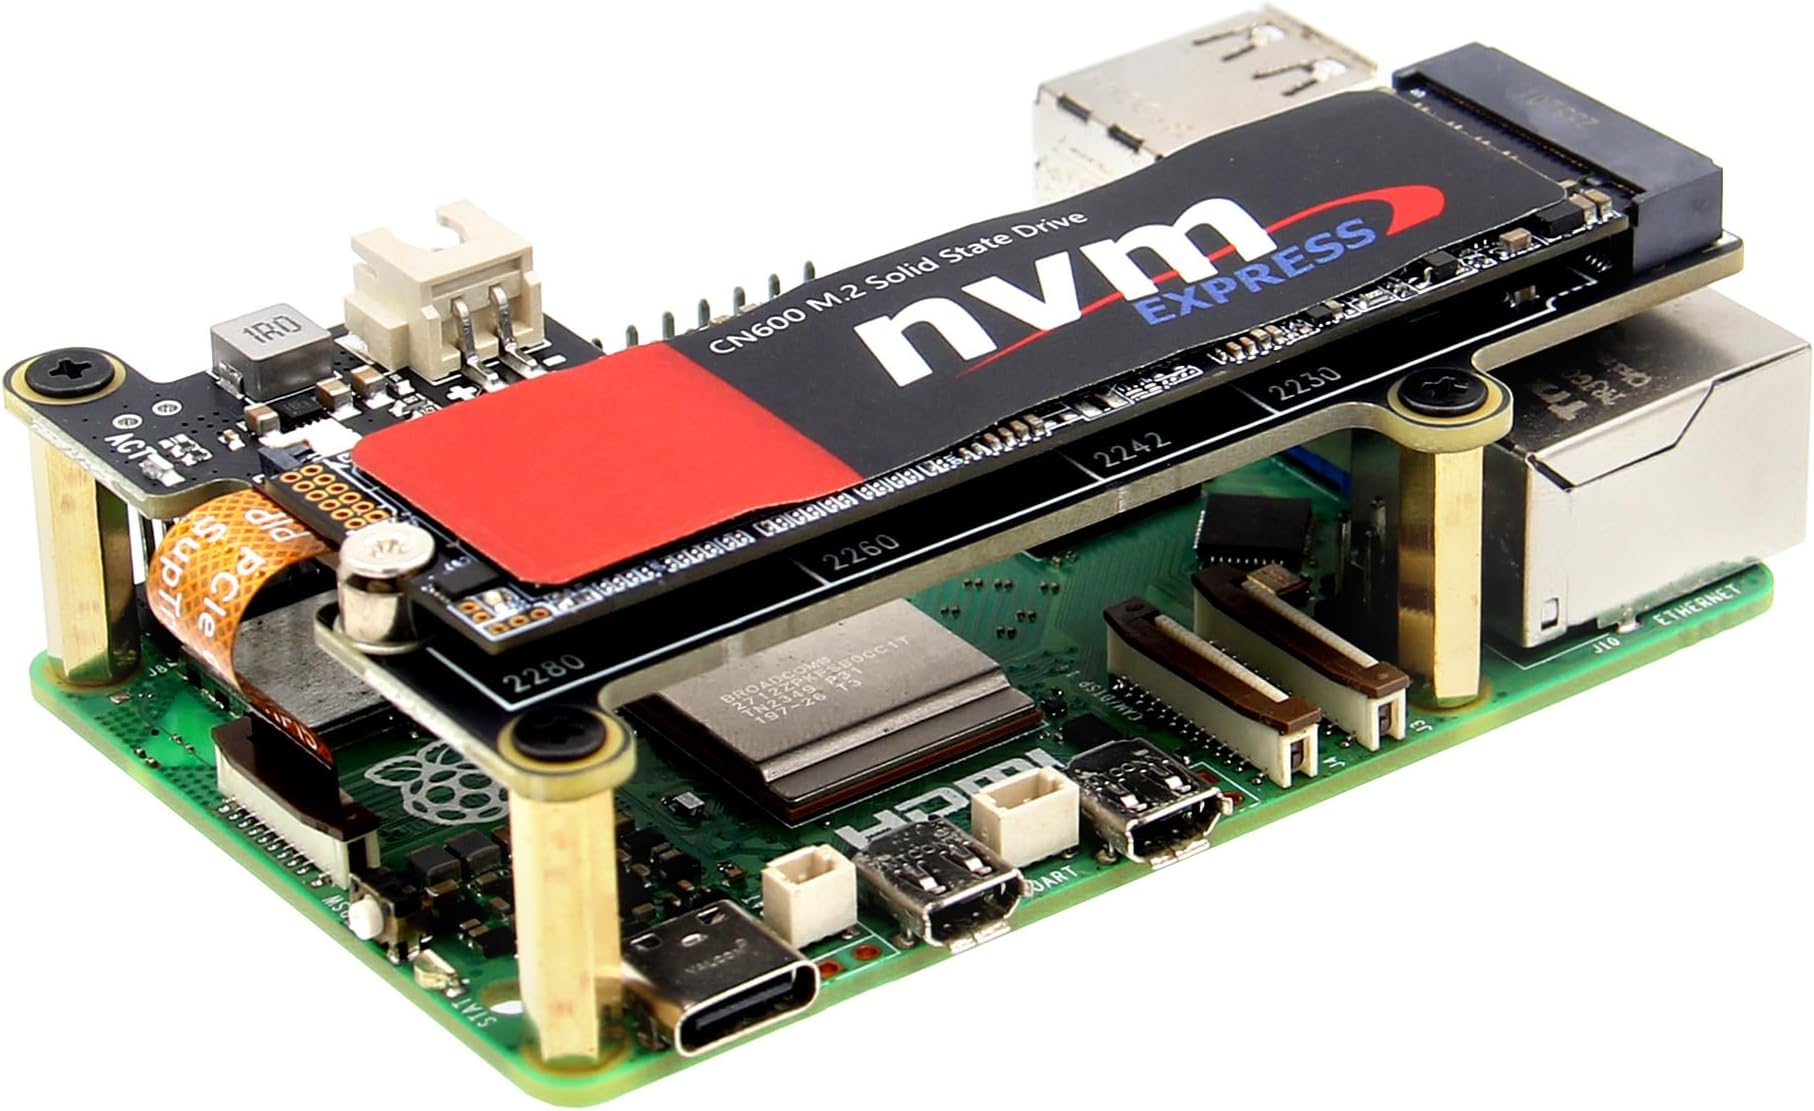
The Geekworm X1001 PCIe to M.2 HAT is a sleek expansion board tailored exclusively for Raspberry Pi 5, enabling ultra-fast NVMe SSD storage with support for multiple M.2 sizes. Its half-width design preserves cooling efficiency while delivering reliable PCIe Gen3 x1 performance. Ideal for professionals seeking a cost-effective, high-speed storage upgrade, it requires proper power supply and OS configuration for flawless operation.


| ASIN | B0CPPGGDQT |
| Best Sellers Rank | #48 in Single Board Computers (Computers & Accessories) |
| Brand | Geekworm |
| Built-In Media | 1 x X1001 V1.1 Shield, 1x Screws Pack Accessories |
| Compatible Devices | Raspberry Pi 5 |
| Customer Reviews | 4.5 out of 5 stars 537 Reviews |
| Hardware Interface | PCI Express x1 |
| Item Dimensions L x W x H | 3.42"L x 2.2"W x 0.04"H |
| Item Highlight | Support M.2 2230/2242/2260/2280 SSD |
| Item Weight | 22 g |
| Manufacturer | Geekworm |
| Mfr Part Number | TB-2023-05 |
| Model Number | X1001 |
| Number of Items | 1 |
| Operating System | Raspberry Pi OS Bookworm |
| Product Dimensions | 3.42"L x 2.2"W x 0.04"H |
| Style | Classic |
| Style Name | Classic |
| Warranty Description | 3 months |
J**G
Simple, inexpensive, easy to install, brilliant!
Brilliant! Easy to install and it worked flawlessly. Fits within this GeeekPi Metal Case for Raspberry Pi 5 with Pi 5 Active Cooler, with plenty of room to spare: https://www.amazon.com/dp/B0CMZ84GM8 For some reason two ribbon cables were included. They looked different from one another so perhaps one is just a spare. The board does not block the fan. The Pi is running as cool as it ever has. I am using this Patriot P300 M.2 PCIe Gen 3 x4 512GB Low-Power Consumption SSD: https://www.amazon.com/dp/B082BJ4679 I followed these instructions, don't know if Amazon allows links but if you search for "Booting Raspberry Pi 5 from NVMe SSD" you will find a simple four step procedure which is really only three steps because the fourth one is to reboot the Pi: 1. format 2. copy the system from SD card to the SSD 3. configure the boot order 4. that's it! There is an enormous speed improvement, as you can see in the pictures (before / after). Very inexpensive. Perhaps the most cost-effective improvement there is to a Raspberry Pi. Don't even think about it. Just buy it.
M**S
Works very well
I already have a โPineberry hat bottomโ for my other raspberry pi 5. I got another pi 5 and decided to try the Geekworm because it was readily available on Amazon and at $16 itโs very well priced. . It mounts on standoffs with three screws. Another reviewer complained about the double female standoffs making it hard to mount in a case, but if you use slightly longer (2.5 x 12mm) screws, you can mount it through the bottom of a standard Raspberry pi 5 factory case. It was easy to install, and unlike the bottom hat does not block access to the SD card. Also, because itโs only half width it does not block the Pi active cooler. Even with my pi overclocked to 2.9 GHz (+20%) temps under stress-ng, cpu/gpu 100% load temps were below 75C and normal temps were in the mid 40s. I used a Kingston m.2 2280 512GB pcie 4x4 SSD because I had one around. The system boots reliably from that drive and I get around 850 MB/s sequential reads and 750 MB/s writes. I have stress tested the SSD at pcie 3 speed with no issues and it did not require heat sink. Some reviewers have complained about an inability to boot from WD drives. This is not a problem with the adapter but instead is a known issue with the Raspberry Pi. Hopefully this will get sorted out over time. There were some other reviewers who complained about power. Most SSDs will work fine from the 5 watts that is available from the pcie cable. That limit is imposed by the raspberry pi, not by the adapter. If you need more power, the connector is a standard 2.54 mm JST, and you can readily buy a cable here on Amazon. But virtually all pcie 3 drives and most pcie 4 drives of 2 TB or below will work within the 5 watt window, especially considering that only one pcie lane is a use. My only complaint is that the activity light stays on all the time. unlike the Pineberry, it does not blink when the drive is accessed. Other than that Iโm perfectly happy with it.
S**P
Excellent Five Star Product and Performance Improvement
This item was purchased as part of a bundle which also included the GeekWorm P579 case and a 5A Pi5 power supply. The case also included the official Raspberry Pi5 active cooler. Installing the active cooler, hat, PCIe extension cable, and M.2 2280 drive onto the hat were all straight forward. The GeekWorm case has plenty of room at the top to install a full length heatsink on top of the nvme stick. On my system running TwisterOS the storage throughput using the linux command hdparm: mmcblk0 (SDcard) 83.03 MB/s /dev/sda (2.5 in SATA SSD in USB 3 enclosure) 337.MB/s /dev/nvme0n1 739.5 MB/s. Fear not, for there is plenty of help available online with the hardware assembly and the parameters that have to be enabled or changed on the Pi5 in order to access and boot to the M.2 stick. All of the products in the bundle are of the highest quality at a reasonable price. No junk there. Highly recommended as a solution that brings the Pi5 closest to it's full overall performance potential. The video demonstrates the 10 second boot time that begins when the boot screen turns from gray to dark. Whoa Nellie! dtparam=pciex1 and dtparam=pciex1_gen=3 added to the bottom of config.txt doubled the speed of the nvme drive and has not caused any system stability issues.
S**E
Easy Install, Works with WD Black SN770, Does Not Block the Cooling Fan
At more than half the price of the Pineberry with shipping (which I waited 30 days for, compared to Prime's free next day shipping of the Geekworm X1001), this little board installed flawlessly and worked on the first boot. It isn't as picky with M.2 NVME drives as the Pineberry, so I can standardize on the WD SN770, which the Pineberry is incompatible with. So far in testing, I've received the same internal writing speeds as all the other YouTube reviewers of similar products (850MB/sec, but since I write to my device over the network, LAN speeds are governed to about 115MB /sec. It also does not block the cooling fan, as the Pineberry does. If I could return my Pineberry, I would, as I'm not going to purchase special compatible drives to make the board work. Unfortunately, Pineberry is manufactured and shipped from Poland, so it would cost more to ship it back than I would get refunded. I plan to purchase more of these boards and so far, I'm very impressed with them. Simply image them direct, edit the boot files before installation, install and boot. Load times are so fast, the boot process can't be read because they appear and disappear so quickly!
D**T
good item but connector too fragile
It mounts well. The NVMe runs at version 3 speed after changing the Pi 5 config file. The only problem is that the connector for the cable is much too delicate compared to the connector on the Pi 5 board. One of the tiny plastic clips broke off. Instead of sending the X1001 back I placed a shim under the NVMe heatsink purchased separately and tightening down the NVMe applied pressure on the connector holding it down. I will never know if this was necessary. Everything worked first try and I'll leave it that way.
C**S
Useful M.2 add-on for a Pi 5 build
This M.2 HAT has been very useful with my Raspberry Pi 5 setup. It fit properly, arrived in good condition, and was packaged well. I used it as part of my Pi setup for local/offline AI and maker-tech work, and it did exactly what I needed. The fit was clean and it made the build more useful than running the Pi by itself. I would buy it again for a Raspberry Pi 5 project where M.2 storage support is needed.
S**R
Bye Bye SD Card - MUST HAVE upgrade if your RPi5 runs anything you depend upon
Recently upgraded old Rpi2B to a RPi5 2GB, to host HomeAssistant, PiHole, Unbound, ddclient, Samba, and more - integral to my home lan. But, crashing several times a week, leaving SD Card FS in unbootable state. Problem was HomeAssistant has way more disk writes and even a good SD card isn't up to it. This X1001 NVMe HAT + a 128GB Hua.... 2280 SSD made a $50 solution to the SD card problem. I did basic research, which made it seem difficult, but in the end, it was a trivial 10m upgrade to get the HAT installed and working (on top of official cooler fan, no prob), 5m to clone the SD card to the SSD, and a few minutes to change the boot order, upgrade firmware to 'latest' , and boot with SD card completely out of the system. 30m total, max. Pi, and all apps, are MUCH faster. System is MUCH more stable. I got it running with gen.2 PCIe lane speed (default), and noted 414 MB/s, then after it was stable, tried the experimental gen.3 (google it...) speed - no problems, reliably running 841 MB/s (reads). ONLY PROBLEM I'VE NOTED is dmesg shows undervoltage warnings, particularly in the first 15s of boot - I have a 5V/5A supply order (also from Geekworm), which should get rid of that warning. CONCLUSION: If you use your RPi for anything marginally critical, this is a MUST HAVE upgrade. I am fairly expert, though not so much at Linux, and I found the upgrade simple. For a novice, Google 'NVMe SSD boot with the Raspberry Pi 5' article on Jeff Geerling's site, read about rpi-eeprom-update, visit Geekworm's site - Call it Novice++ level.
S**.
Wouldn't power on. Probably needs external power but they dont supply that cable.
Could not get this Hat to work tried multiple SSD's even low power consumption ones, nothing. Finally ended up buying a different SSD hat and it worked right away. My suspicion is that it did not have enough power via the ribbon cable to power the SSD but they do not provide a connector to use the 5V port so you can power it externally. I Ended up going with a hat that has a connector that plugs right into the Pi's 5v GPIO pins and it worked out of the box. If you buy this be aware you might have to power it externally and be prepared to buy an of the shelf cable solution or make your own.
L**M
Good
New Edit: This drive randomly disconnects while transferring larger files. Anything over about 6GB the device disconnects and no longer works. I do not recommend this. I was a bit dumb installing this. Here is a guide that worked well for me: # Copied: ## How to setup mount / auto-mount USB Hard Drive on Raspberry Pi Follow the simple steps in the order mentioned below to have your USB drive mounted on your Raspberry Pi every time you boot it. These steps are required especially if your are setting up a Samba share, or a 24x7 torrent downloader, or alike where your Raspberry Pi must have your external storage already mounted and ready for access by the services / daemons. Step 0. Plug in your USB HDD / Drive to Raspberry Pi If you are using a NTFS formatted drive, install the following ```sudo apt-get install ntfs-3g``` Step 1. Log on pi using ssh terminal and execute: ```sudo blkid``` You will see something like the following: lrwxrwxrwx 1 root root 10 Jan 1 1970 0AC4D607C4D5F543 -> ../../sda1 Note down the value of the UUID --> 0AC4D607C4D5F543 Step 2. Create a location for mount point: ```sudo mkdir /mnt/volume``` Give proper permission: ```sudo chmod 770 /mnt/volume``` Step 3. Get the uid, gid for pi user and group with id command (usually 1000) Step 4. Mount the USB Drive and then check if it is accessible at /mnt/volume ```sudo mount -t ntfs-3g -o nofail,uid=1000,gid=1000,umask=007 /dev/sda1 /mnt/volume``` Or: ```sudo mount /dev/sda1 /mnt/volume``` Note: ntfs-3g for NTFS Drives vfat for FAT32 Drives ext4 for ext4 Drives Step 5. Now, we will configure RasPi to do this after every reboot: Take a backup of current fstab and then edit ``` sudo cp /etc/fstab /etc/fstab.backup sudo nano /etc/fstab ``` Add the mount information in the fstab file (replace UUID with your own): ```UUID=0AC4D607C4D5F543 /mnt/volume ntfs-3g async,big_writes,noatime,nodiratime,nofail,uid=1000,gid=1000,umask=007 0 0``` Or: ```/dev/sda1 /mnt/volume ntfs defaults 0 0``` Step 6. Reboot ```sudo reboot``` Step 8. (Optional, required if using as data storage for owncloud) If you are configuring ownCloud's data directory on your NAS drive, it should be having a 770 permission for www-data user. You can simply add user www-data to pi group, since its already having 770 as permission as set above in fstab. ```sudo usermod -a -G pi www-data``` ## Alternative 2 This is a short guide on how to connect an External Hard Drive to the Raspberry Pi! Most external Hard Drives are quite juicy and will require a USB Hub to run in a stable manner, so please do check this before trying to install your drive! First step is to plug it in, and then switch on your Pi! It should boot up as normal, so go ahead and log in to Raspian as usual. Step 1. Is it there?! If you want to check for the current storage devices attached to your Pi, simply run the command: ```sudo blkid``` This reveals that we currently have our โSeagate Expansion Driveโ attached. Step 2. Check the Partitions We now need to check the boot name of our Seagateโs partition. ```sudo fdisk โl``` Reveals that our drive is located at /dev/sda1 Step 3. Mounting it. Now we know where our drive is, we need to mount it: ```sudo mount /dev/sda1 /mnt/volume``` The folder โ/mntโ is the standard location for mounting permanent media, but you can always create your own folder if required using the โmkdirโ command. Thatโs it! Our drive is mounted. Step 4. Permissions. As our drive is formatted in NTFS, we might need to change the /mnt drive permissions in order to enable proper access. Simply run the following command: ```sudo chmod 775 /mnt/volume``` This will change your permissions and allow you to access the drive. To test this, letโs try to create a folder. . . ``` cd /mnt/volume mkdir IMAFOLDER cd IMAFOLDER ``` Great! So we can read and write to our hardrive! Step 5. Automounting our drive. If you want your Hard Drive to mount from boot, we need to set this up! First step is to edit our "fstab" file ```sudo nano /etc/fstab``` This will open up the file in nano text editor: We need to add the following line to have our hard drive mount at boot! ```/dev/sda1 /mnt/volume ntfs-3g uid=1000,gid==1000,umask=007,nofail,x-systemd.device-timeout=30 0 0``` You can now reboot your Raspbery Pi, and your Hard Drive will automatically mount! Step 5. How to unmount. To unmount the drive, simply run the command: ````sudo umount /mnt/volume```` As long as youโre not currently accessing the drive, it should unmount successfully.
B**N
Works great with a gen 3 NVMe SSD
After following the instructions I was able to set this up fairly easily. I have a USB-C NVMe enclosure so I used raspberry pi imager to install the Raspberry Pi OS on it and then edited the config.txt on the bootfs partition to add the line for PCI-E. Instructions for that is easily found on Google. I have the case from 52pi which holds the active cooler and NVMe board but note that I had to purchase smaller 2.5 standoffs to get it to fit in the case. But it boots up significantly faster and has a noticeable increase in speed. I recommend it. I bought this one because I had a 512gb M.2 2280 SSD so I needed a board that supported the 2280, which this one does. Note - please don't leave a bad review just because you get upset when you can't get it working. I was hesitant to buy this because of a bad review but thankfully I got it anyway. If you have trouble, there are several videos and KB articles available to help you.
K**C
It just works without issues
It's a tricky install but that's because of the design of the Raspberry Pi itself. This board fits on very nicely and works very well. I do have to get a different case as it doesn't fit in the official case - no big deal I wanted a better one regardless. I did have to image my drive twice to get running. This is again a Raspberry Pi issue not this board. Speed of the drive is phenomenal!
A**R
kind of essential
aside from a fan this is the second best pi upgrade, easy to install and massive improvement
B**2
Works flawlessly
Works flawlessly as part of my Raspberry Pi 5 Home Assistant server system. Easy to install.
Trustpilot
5 days ago
1 month ago