
Desert Online General Trading LLC
Dubai, United Arab Emirates
Desert Online General Trading LLC
Dubai, United Arab Emirates
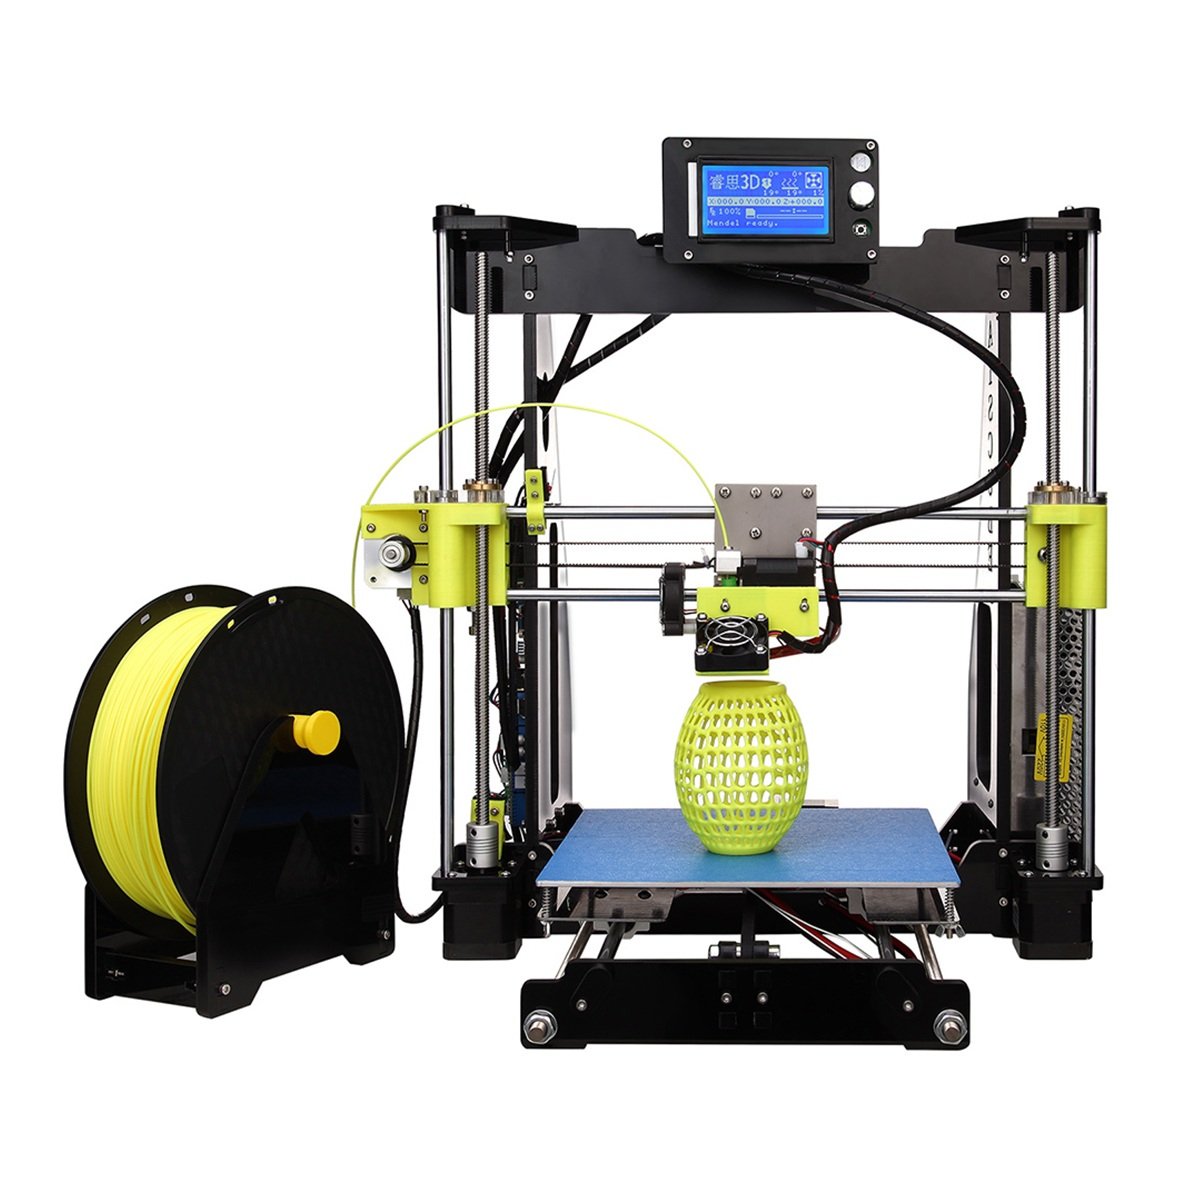
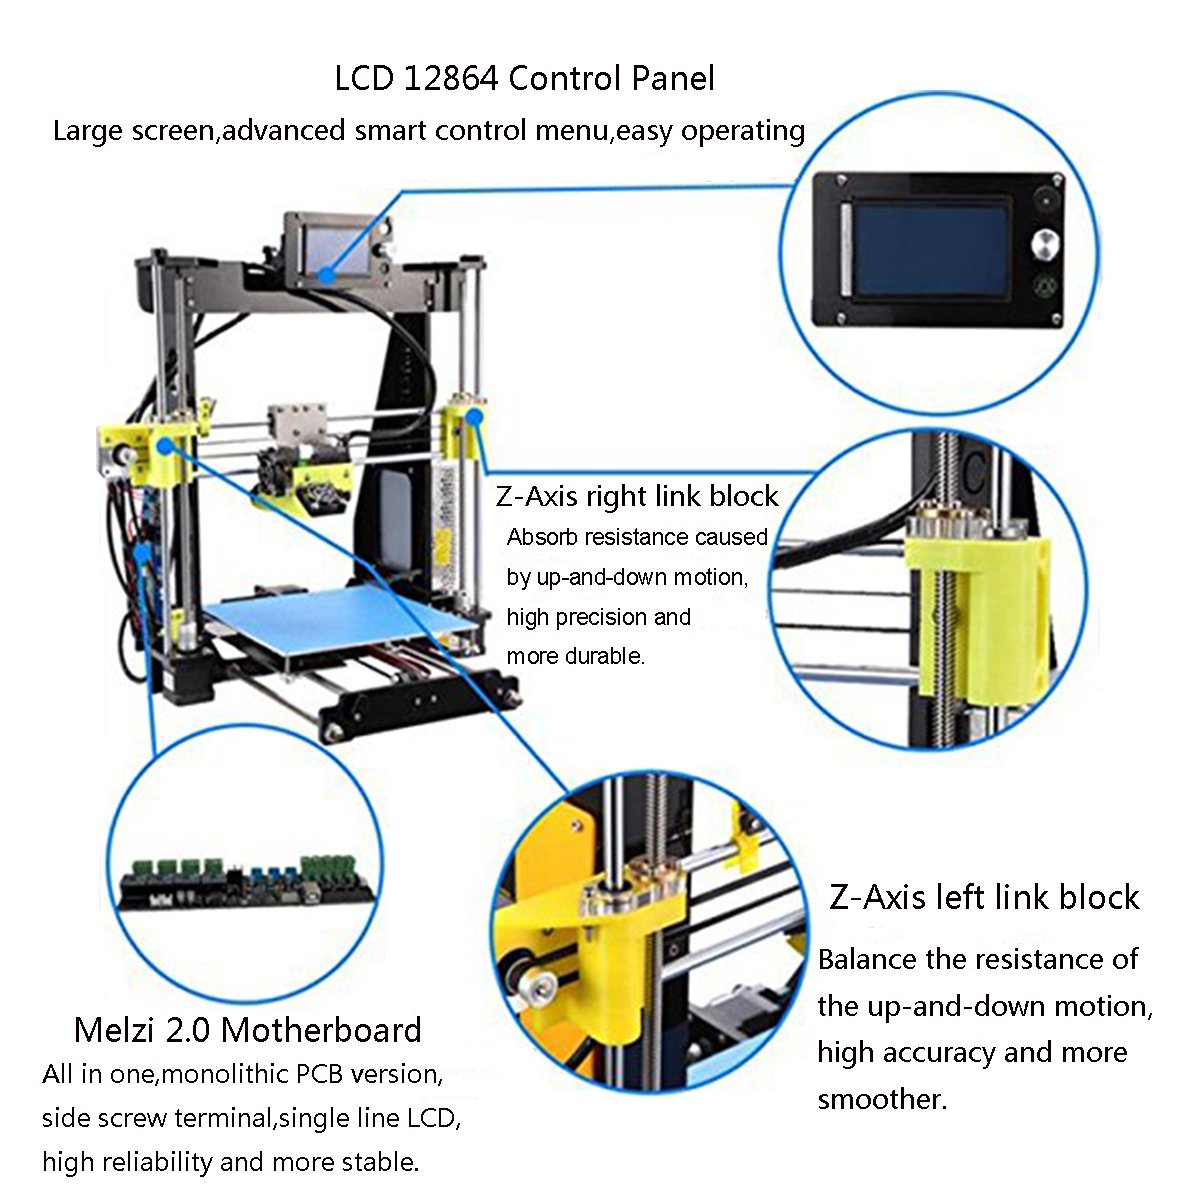

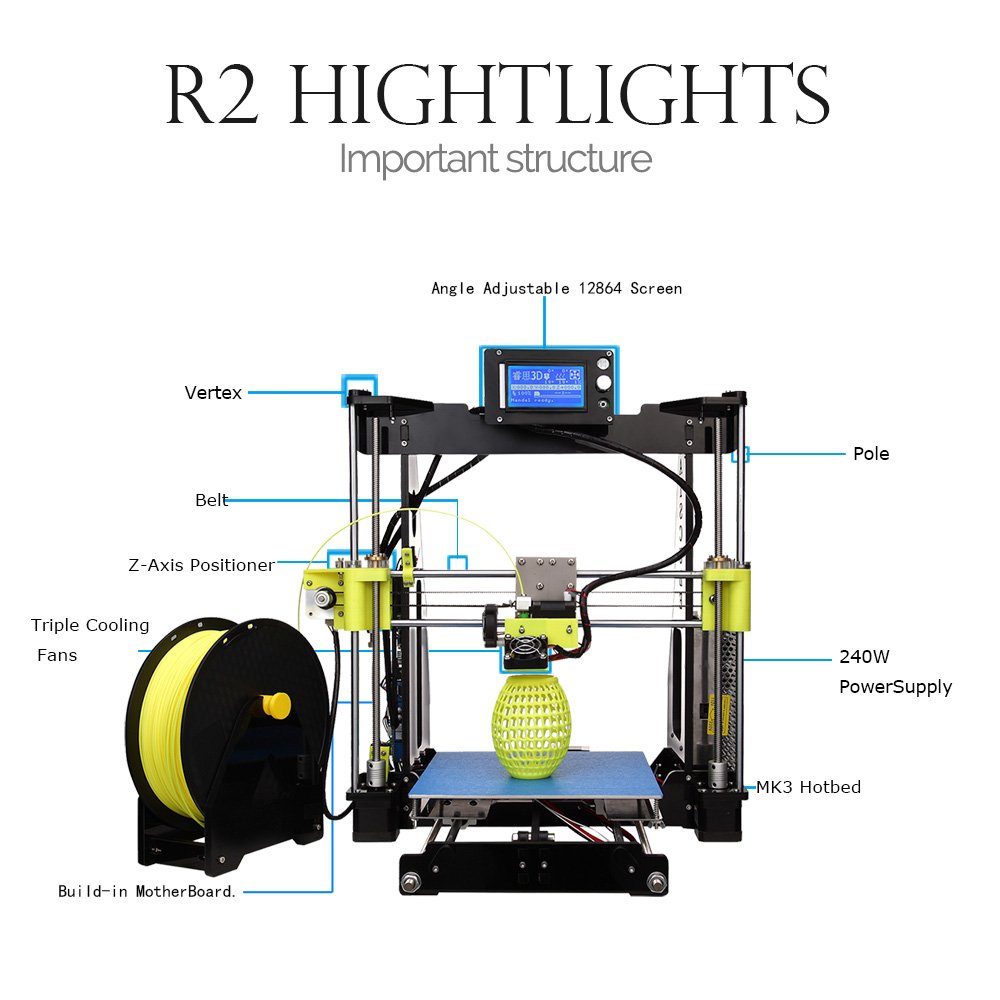


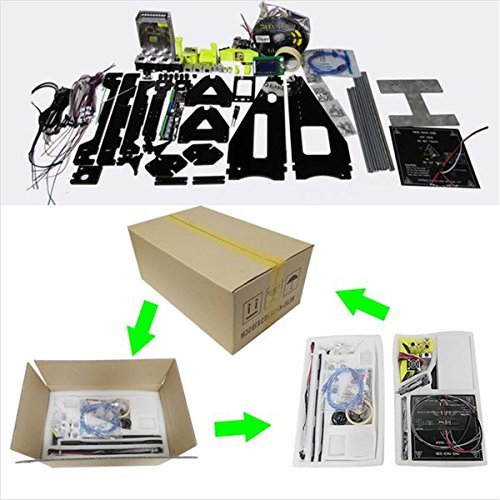

Yopu Fangzhou is one of a authorized company by RAISCUBE, we are a technology company which is committed to providing high quality products and high quality services. Upgrade 3D Printer for you to print funny models, toys. Development of intellectual. I believe you will find a suitable 3D printer for yourself. Have a fun time. Basic Information : Brand : RAISCUBE Model Number : R2 Printing specifications: Print technology: FDM (Fused Deposition Modeling) Supported print materials : ABS, PLA, HIP, PP and Nylon etc. Printing Size : 210 * 210 * 225 mm Filament diameter: 1.75 mm Nozzle diameter: 0.4 mm Print Speed: 10 - 120 mm /s Printing Precision: 0.05-0.3mm Locate Precision: Z axis: 0.004mm; XY axis: 0.012mm Basic Components Mainboard : Melzi 2.0(May not the best but most stable.) Display:LCD 12864 Electrical and Temperature: Power Supply: 110/220V, 240W Max Control Temp. Extruder: 260 °C Max Temp. of HotBed: 100°C Recommend Temp. : ABS: Nozzle:235 °C , Hot Bed:100 °C PLA: Nozzle:200 °C , Hot Bed:50 °C Software and System: Operating system: XP/WIN7/WIN8/Mac/Lunix Software : Cura/Repetier-Host Supported file formats : STL / OBJ / G-code Connectivity :USB online or SD card (support off-line printing) Basic physical parameter data: Machine size(Built) : 443 * 420 * 498mm Package Size : 475 * 295 * 195 mm Machine Net Weight : 8.0 kg Machine Gross Weight: 9.0 kg Package Including: 1 x RAISCUBE R2 3D printer 1 x SD Card-8GB ( There is some installation instructions, software and some 3d print files ) 1 x 10 meter 3D Printing filament
| Product Dimensions | 17.44 x 16.54 x 19.61 inches |
| Item Weight | 19.8 pounds |
| Manufacturer | RAISCUBE |
| ASIN | B074V54LD4 |
| Item model number | R2 3D Printer |
| Is Discontinued By Manufacturer | No |
| Date First Available | August 16, 2017 |
R**S
small ball bearings were falling out and forget about the instruction manual which is useless picture wise and instruction wise
I would give this zero but its not available this product is made wrong and a key peice will not line up at all because they designed it in a way that you CANNOT get the threaded post in unless you find your own bolt and nut did not include a 4th Allen wrench for the 4th size they apparently didnt want to mention ...small ball bearings were falling out and forget about the instruction manual which is useless picture wise and instruction wise .....overall its a big turn down for me I have wanted a 3d printer since they came out way to discourage me yet again
C**K
Mechanical issues - failed on 5th print
Although I have never built or owned a 3D printer before this one, as an electronics engineer, I have built lots of prototype devices from scratch. So I think I do have some basis on which to write this review. And my first comment is: oh boy, this is so bad I don't know where to start.Let's give benefit of doubt first. What is good? It's an inexpensive RepRap style printer you can tinker with to your heart's content for people that love to tinker and get their hands dirty. And if you can get it to work, it can produce decent (not awesome) printed parts. The problem is getting it to work, and keeping it working.Moving over to the bad stuff let's start with the worst offense. If you are in the US and follow the wiring instructions provided, this thing could kill you. This device as shipped would never pass any regulatory approvals for electrical safety. The AC power cord is incorrectly color-coded. The green wire, which should be connected to ground, is appropriately green on the cord that came with my kit, but the pictures show a cord with a yellow lead for ground. This on its own would not be so bad, but read on. The other two wires are supposed to be white for neutral and black or red for hot (line). This is the standard for grounded 110 VAC cords in the US to ensure safety. Instead they are red and blue, and red is wired to the neutral side of the plug (backwards), while blue is connected to hot. But here is the worse part: Since most people don't know that, they will probably follow the pictures in the manual that ships with this disaster, and that shows the red wire being connected to the line (hot) side on the power supply and, in one picture, the blue wire carrying the high voltage being connected to where the neutral should go. In a more dangerous picture, the blue wire is connected to the ground lug. This would cause the case of the power supply to be connected to 110 VAC!!! This means that if you happen to touch something that is supposed to be at neutral (0 volts or ground) and another part of your body is touching ground (like your bare foot on the ground) you could get yourself electrocuted. I suspect the power cord is probably not consistent from unit to unit, so I would recommend testing what wire goes to what lug so you can wire this thing up safely.Moving on to the less serious, the parts and their assembly are also disastrous. The parts are basically garage-shop-made quality. The frame is acrylic (Plexiglas) as other inexpensive RepRap i3 type printers are. This is not terrible, so long as the material follows some minimal standards of consistency. These do not. The thickness of the acrylic can vary as much as 1mm. The Z axis "link blocks", extruder assembly and a couple of other minor parts are 3D printed parts -- not manufactured parts. This is the idea with RepRap I guess, except for the fact that two of the parts had mechanical interference problems. The display panel part that is supposed to fit into the top of the frame did not go in because one of the acrylic pieces on which the display is mounted is almost a whole 1mm thicker than the other acrylic parts, with the consequence that the part does not fit into its slot on the top brace of the frame. I had to grind down some of the excess. The right-size Z "link block" that is moved via a threaded rod or screw, had a mechanical interference caused by the head of the screw that holds the rollers, and which prevented the threaded rod from going into the threaded insert in the “link block". I am attaching a photo that shows the interference. So I had to substitute this screw with something else.The next issue is sure to make some of your prints completely fail. This printer will not stay calibrated from one session to the next. Another reviewer complained about this, and I can confirm this. The right side Z motor gets out of sync with the left one between power ups, misaligning the horizontal X guides. Maybe if you remember to always home to extruder before turning the thing off would alleviate this, but it's undesirable at best. The Z limit screw adjustment is almost at the extreme of its range when you adjust the bed so that it clears the Y motor. If you want to add some thickness to the bed, you will not be able to adjust the Z home at all with the hardware provided. If you put the screw in a comfortable operating range, the bed will hit the mount for the Y motor.There were additional mechanical interference and adjustment problems. If routed as per the instructions, the wires from the hot plate will easily interfere with the Y motion of the print bed. There is no clear way to avoid this, depending on how the wires twist. Your best bet is to route the wires differently.The hot bed leveling screws are another very deficient design. Basically each corner is adjusted via a philips screw, a spring spacer and a wing nut. When you turn the wing nut, the screw turns and vice-verse. Consequently, leveling is very cumbersome, and every time you adjust one corner, other corners get misaligned. Another formula for failure. Adding this to the right Z motor getting out of sync, this thing will take more time to get it ready to print than it takes to make the print.Another interference issue is that the USB receptacle on the side PC board is placed such that the cable can interfere with the Z axis mechanics. I have not found a good way to avoid this. A very short plug or right angle plug would be needed.The instructions are spotty and incomplete, and you have to have some idea of how everything needs to go together to succeed. Better instructions would cut assembly time at least in half. Then there are completely missing steps.When you put all these problems together, and add the fact that wiring can lead to additional undetectable faults, your chances of success with this device is small. It might be a good platform to learn about 3D printing, but if you plan to do anything serious, I fail to see how this device can perform as expected.Once I got everything properly aligned, I managed to get about 4 successful prints of very small objects, and then the extruder stopped working in the middle of a 5th printout. The extruder stopped extruding, and the printer kept tracing the part right along but with no output. Testing the extruder manually through the front panel, it was evident something failed that made the extruder motor stop working. Troubleshooting this, I was able to verify the cable was making a good connection, the motor was still good, the driver was good, but some other control component failed because the extruder axis will not operate any more.I am so disappointed with this thing that, especially in view of all the other inexplicable positive reviews, I felt compelled to put this out. I bought this printer because it specified it can go down to a 50 micron resolution and handle many types of materials. I was looking for a starter device to prove out a mechanical part design, trying to avoid paying a high price until I could be sure I could succeed 3D printing my project. I know you get what you pay for, but I did not expect something so deficient. I expected a decent DIY kit with parts that fit, some basic safety compliance, and reliability beyond just 4 printouts. This thing is junk in my opinion.
A**N
Finished building all works great but the motor feeding the plastic wire won’t go ...
Finished building all works great but the motor feeding the plastic wire won’t go through. It goes in but not through the hole. Something is jamming it. All works great if you just want to look at it pretending to print. Filament cannot teach nozzle.
M**.
Overall I think it's a good printer and is made up of some good parts
Overall I think it's a good printer and is made up of some good parts. My 12yr old son put together most of it on his own. The instructions are OK but leave a lot of unanswered questions. The video is very fast and you have to keep pausing it to really see the build and understand how it's being put together. We had issues with wires not making good connections in which case I had to strip them further and then try again. You definitely will have some troubleshooting moments but in the end you should have a nice 3d printer at an excellent price. If you don't want the hassle or to spend the time troubleshooting then buy a 3d printer that will come assembled. Definitely purchase a printing surface such as the Anycubic Ultrabase 3d because prints will NOT stick well to the metal surface on the heated bed as it comes.
J**N
Amazing starter/intermediate 3D printer
This printer has gotten a lot of bad press. Few are inclined to tinker with the presets of the machine. It's best to do some homework if you expect to plug it in and start printing after the build. If you enjoy a tediously fun build with modifications for later, this is for you. If you're a beginner don't be discouraged, you just have to have patience and time to understand your 3d printer.The time it took to get this was within a week, not shabby considering I ordered it during Christmas week. The instructions may not be the best but they have definitely improved from what was being issued earlier in 2017. They also have videos on YouTube showing the build. It's important to remember the files included in the USB/SD card for reference or print instructions.Be conscious of the wiring and how they are secured to their appropriate home. A simple switch will cause it to malfunction. More importantly, assure the power cables are secure. I would recommend buying a power strip to individually run this printer. If you're feeling up for it, you can upgrade the power supply with something fancier.Great item, just have patience with it.....you paid less than $220 for this. There's a lot of cheaper brands out there but they're not a value buy compared to this nor as efficient. There are also more expensive printers that will bring down the excitement to dive into 3d printing. All in all, its a great little machine and has a lot of potential for mods and tweaking for increased performance for those perfectionists out there.- Check out Thingyverse for cool STL files- Browse for a MOSFET on Amazon to help with power intake- Purchase a spacing/ gap tool to check nozzle to bed clearance (not necessary but helps)- Have small micro drill bit pins handy to clean your nozzle before and after prints. (Purchased mine from Amazon)I'll post some photos later on!
Trustpilot
3 days ago
2 weeks ago
5 days ago
1 week ago