


🎨 Create, Play, and Level Up Your Crafting Game!
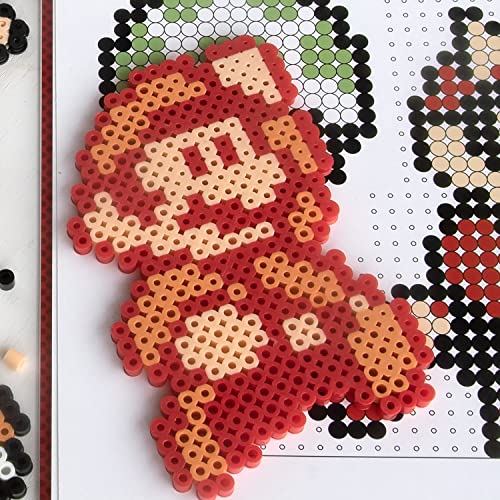
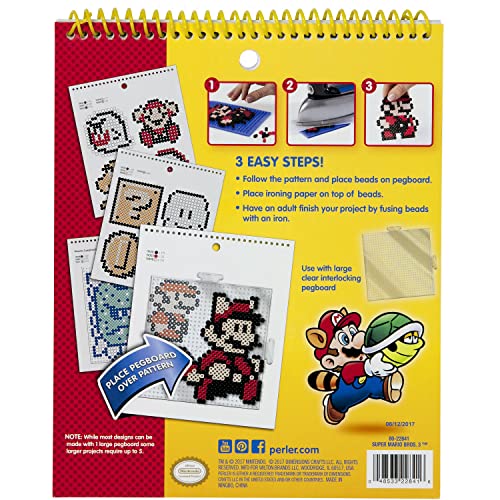
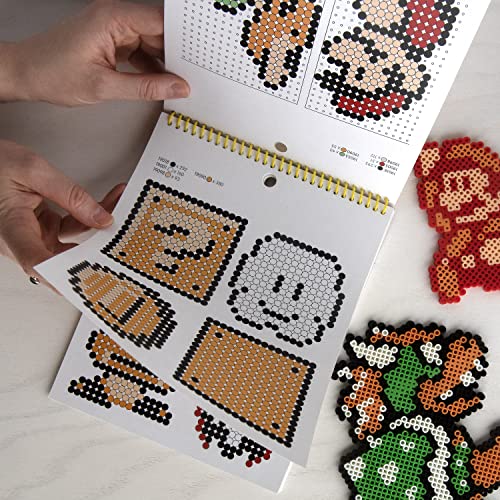
The Perler80-22841 Beads Super Mario Bros 3 Fuse Bead Pattern Pad features 14 double-sided pages filled with 61 unique patterns inspired by the beloved Super Mario franchise. Perfect for both beginners and seasoned crafters, this pad allows you to create iconic designs using clear pegboards and your own Perler beads. While the pad does not include beads or pegboards, it serves as an excellent guide for endless creative possibilities.


| ASIN | B074S4YPDM |
| Assembly required | Yes |
| Batteries required | No |
| Best Sellers Rank | #11,491 in Arts, Crafts & Sewing ( See Top 100 in Arts, Crafts & Sewing ) #30 in Fuse & Perler Beads |
| Brand | Perler |
| Color | Super Mario Bros 3 |
| Customer Reviews | 4.7 4.7 out of 5 stars (6,377) |
| Global Trade Identification Number | 00048533228416 |
| Is Discontinued By Manufacturer | No |
| Item Weight | 0.16 ounces |
| Item model number | 80-22841 |
| Manufacturer | CSS Industries, Inc. |
| Material | Paper |
| Number of Pieces | 80 |
| Product Dimensions | 0.5 x 7.38 x 9.24 inches |
| Shape | Cylindrical, Round |
| Size | Small |
| UPC | 048533228416 |
T**R
Amazing Designs, Great Quality! :)
This was the perfect gift for my little Mario lover! The 8 included bead designs were all super realistic and good size. The price was spot on. $20-$30 for HOURS of fun!? Yes, please! :) I loved being able to do something with my kiddo that created fun decorations for his room, rather than just random, made-up designs. It was great for building fine-motor skills for a 5 year old, but was also fun for me! He was able to read the diagrams for the designs, but we also did a lot of me picking out the beads and setting them in order for him to put on each row. The ONLY downfall to this set was that there weren't enough sections for all of the bead colors, so we had to sort a bunch of them at the beginning that were all mixed together and put them in individual baggies. That was definitely a pain, but still worth it! :)
A**.
An Excellent Kit for Mario Fans
I loved this kit a lot! I had a great time making these and the end result was great! Minor irks (that really only bother me, and don’t warrant me taking off a whole star): do these affect the end result? Not really. 1) The tan color looks different on the box and online than it does in person. The color on the box looks closer to another color (butterscotch) than it does to the tan color provided. 2) I wish the pegboard provided was clear instead of blue. I’ve used other kits (like the Super Mario Bros. 3 one) where this was the case & you could essentially use the provided pattern as a template. You could lay down the pegboard over the pattern and still see the pattern underneath. Overall, I’d recommend this kit to any Mario fans who like doing Perler bead art (like I do). It’ll keep you busy for hours doing all of the designs. :)
J**N
Excelente
Excelente producto
T**D
They're beads that melt together.
Well made kit with appropriate colors and a good assortment of mario characters. Lots of fun.
M**W
The kit was good, but could be better... TIPS IF UR NEW TO PERLER BEADS (w/Ironing Instructions)
Some of the patterns were a bit off, and i felt like the green was a bit too light, but no biggie. Board is a quality board that connects with other perler boards if you have some of the clear or yellow ones at home. Could have been more patterns, but i think they wanted to provide enough beads for all the patterns, so I get that. I haven't finished them all, but I've moved on to other projects. For most ppl, i think a clear board would be preferred so they can place it over the pattern (which is scaled to actual size, so easy to do) but the blue boards are more durable, so it's a bit of a toss up. TIPS FOR NOOBS: tweezers are optional. i find that the older (and more arthritic) i get, i like them more and more, but didn't when i was younger. Picking thru the multi-color bag for the last of whatever accent color is always a pain. I find it easier to just take 30-45 mins to give them a basic sorting while i watch watch TV or something beforehand. saves the headaches later. Don't be afraid to make changes/alterations to the pattern when you are making the design. The colors arent affected by the heat when fusing, so you can have a pretty good idea of what the finished product is going to look like before you iron. Don't be afraid to mix it up and try different things when you're placing the beads. Until you iron, you can always change it back to the original design. IRONING: You can iron you designs (the first side) directly on the blue board provided in this kit, but you may want to take some precautions to ensure that you don't warp the board over time and your design comes out nice. 1. Don't use high heat. My iron goes from 1-7 (7 being for cotton garments) and I put my dial right between the 3 and the 4, so like "half-heat" 2. Use the butcher paper in the kit, or ACTUAL butcher paper from the store for an even, "eggshell" type finish. Don't use wax paper. It will make a mess. If you're set on a glossy finish, you can get special ironing paper that gives a glossy finish, and it's inexpensive, but the sheet of butcher paper that comes with the kit is fine and you can use it over and over, until it gets holes. (you don't want the iron to come into direct contact with the beads, even in the smallest of areas, or beads will fuse to the iron... learn from my mistakes lol) 3... and this is important... DO NOT APPLY DOWARD PRESSURE WHILE IRONING! I know it's tempting, and it feels like you're gonna speed up the process by pressing down... and you will... but it will also make the indentations in your final project and make the ironing in general super uneven. The weight of the iron itself is enough. Just gently "float" it along the surface, keeping it flat, all the way to the edges. 4. Move in SLOW even circles, to avoid the hot-spots on your iron heating unevenly. Make sure you go all the way to the edges. "Float" the circles around your work so that the edge of the iron is going past the edge of the project as you circle, while still keeping it nice and flat (easier to do when u follow #4, and you're not pressing down) 5. (optional) You see the beads starting to melt, I like to take a little break for the work to all cool down to avoid any areas becoming "overcooked," but this is just me being a perfectionist. If you want to just get er done, you can keep going till it's fully fused. If you are a perfectionist like me and you want to take a break, just make sure to put something flat and heavy like a big book on it while it cools, so it doesn't begin to warp and pop off the pegs. 6. With the butcher paper, it's not super easy to see, but once the beads start to look more like bold O's, and you can see them all thru the paper (including the ones on the edge, look closely to make sure all the O's are touching their neighbors. When they are all touching, they are fused. Sometimes I like to take a break and check back after they have cooled a little bit, but you do run the risk of the paper lifting when you do that, so just be careful. PLEASE NOTE: you don't need to melt the beads until the holes fill in. As long as they have melted enough on the very top so that they are touching all their neighbors, that's fully fused. If you want melt it more, that's fine, it won't hurt the beads, but do make sure to place something heavy on your board right away after removing the beads, so as not to warp it, as this does add extra heat. 7. Double check that all of the beads around the edges are fused to their neighbors. Once you flip your work, it's easy to replace a bead or two in the middle of your work, but trying to get the edges to line up again is impossible, so make sure they are staying in place before you move on. 8. Once you have the first side fused, place something flat and heavy , like a big book, on the whole thing (including the board and the butcher paper) for 3-5 min. If you have asbestos fingers, you can skip this step for your project, but you will want to place a book or something on the board itself while it cools to avoid warping from the residual heat. 9. Once you have the first side fused, GENTLY peel back the butcher paper. If a bead or two comes loose, you can replace the butcher paper and iron it again. The beads will not be harmed by re-heating as many times as you want/need. If you have an extra sheet of butcher paper, you can leave the top sheet in place, which is my preferred method, and then I can re-iron the front easily if I decide to, but if you're just using the paper in the kit, that works fine, you will just have to peel it off between sides. 10. Once you've checked that your front side is fully fused, place a piece of cardboard or something similar over your work, and then flip if over while supporting the board with your hand. then slide your work to the ironing surface and lift the plate away. This should keep your design intact while it's in the somewhat delicate state of being fused on only one side. 11. Put something heavy, like a big book, on your plate while it cools to avoid warping. 12. Place the butcher paper of the back of your work (now on top) and repeat the ironing/fusing process. You can make the project 2-sided by carefully ironing on low heat like before, or, if you want to make your design super durable, you can crank the heat up on your iron and fuse the back until all of the beads are completely melted into the surrounding beads. I personally don't like the "overcooked" style, but if the project is for a child, you might want them to be a bit more durable. 13. Lastly, and I know I've said this a ton already, but always put something flat and heavy, like a book, on both your project and the pegboard while they cool to avoid warping. It doesn't have to be an encyclopedia, just a little bit of pressure will do it, but skipping that will result in warping. Maybe not the first time, but, over time it will happen. Ok, hope that helps, :)
W**T
Awesome
A good project to do
K**8
Hard to find retro Zelda merch
It’s so hard to find the old school Zelda merch! Our whole family is a bunch of Zelda super fans, so when I saw this I HAD to get it for my son for Christmas. I’m so glad I did because he loved it! He typically doesn’t like to do these kinds of crafts but since it’s Zelda he was stoked. It’s good quality, colors are on point, and I thought the price was fair. He is almost 13 so he’s had no struggles using this. It’s a good activity for winter time when it’s too cold to go outside. Definitely recommend!
A**A
Great projects, and easy to use for kids
When kids are bored, this really makes things fun. Great value, and variety. My kids have made quite a few of these already, and love them. Just need an adult to do the ironing part.
C**N
La.base para figuras es de material más rígido que las transparentes que compré por separado. La base es la cuadrada grande. Los soportes para exhibir las figuras están muy bien hechas. Buen producto en general. El mejor producto de los tres de Super Mario 3 de perler que he comprado
D**A
Muy buena calidad de las piezas, me gustó mucho el resultado se ve hasta en 3D :')
C**R
This is soo cute. Bought at a discount at $14++and my kids love it. Keep doing and ask me to iron for them.
R**S
Me fascina zelda, y no podía dejar pasar este producto, es buena terapia para realizar algo manual y no estar viendo tele o un monitor o celular. La calidad es buena pero solo tengan cuidado al planchar ya que poco calor o mucho calor pueden dejar disparejo el resultado final.
A**ー
子どものクリスマスプレゼントに購入しました。 大変喜んで、一日中作っています。 とても良い買い物ができました。
Trustpilot
1 week ago
1 month ago