


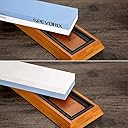
Review: Takes a little practice but works well - Did the job and got a good edge back on my knives. Takes a bit of practice. To start off, draw diagonal hatches on both side of the stone with a pencil. Then soak for 15 mins. You then use the smaller stone to go up and down each side of the stone until the hatchings are all gone. This is called 'lapping' and is needed to get the stone faces perfectly flat before sharpening begins. This step isn't needed every time, but definitely do it when it arrives. The high points of the stone will stop the hatchings being worn off on the low points. So with gentle 'lapping' you wear down the high points until flat. If you think about it, you can't get a sharp edge if the stone isn't flat, the knife won't touch the stone properly. Once flat/lapped you use the 1000 side to get a bevel on each side. There are instructions for this provided. But, you should be able to get the knife reasonably sharp on the 1000. If you don't there's little point proceeding to the 6000 side at that just polishes up a sharp edge to a sharper one. After 10 mins on 1000 stone, go to 6000 stone. Note that on both 1000 and 6000, drop a bit of extra water on the stone as you sharpen. If you look closely you'll see a 'bow wave' at the front edge of the knife as you slide it up the stone. If you keep a close eye, you can make sure the blade edge is flat on the stone, as the wave will go across the stone. You'll also notice the water go grey into a slurry, this is good, and shows metal is being worn away. Finally, after the 6000 you want to put the finishing touch on the blade. Use the back side of an old leather belt. Attach the belt to a door handle (for example) and pull the belt taught towards you. 'Strop' the blade up and down, trailing the sharp edge as you go along the flat of the belt. Note, trail the edge, don't try to lead with it or you will cut the belt and ruin the sharp edge. Do about 50 strops up and down, go slowly and carefully, turning the blade over (blade up) each time. That should do the job and you'll have a super sharp knife. It's quite satisfying and enjoyable actually, I dare say you'll be doing all the knives in the house over the weeks that follow. You can keep the knife sharp by 'stropping' regularly. This will mean you don't need to go to the stones so often. Or .you could get a knife 'steel' to keep the blade in shape for longer that way. 
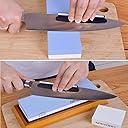
Review: good product - looks much better than on the photo - quality item, with a handy blade holder that helps get the right angle for sharpening. Pleased with the effect of just a few minutes' sharpening using this.
| ASIN | B073GZTXJN |
| Brand | SPEVORIX |
| Brand Name | SPEVORIX |
| Colour | White |
| Customer Reviews | 3.9 out of 5 stars 124 Reviews |
| Grit Type | Fine |
| Grit type | Fine |
| Material | Stone |
| Material Type | Stone |
V**N
Takes a little practice but works well
Did the job and got a good edge back on my knives. Takes a bit of practice. To start off, draw diagonal hatches on both side of the stone with a pencil. Then soak for 15 mins. You then use the smaller stone to go up and down each side of the stone until the hatchings are all gone. This is called 'lapping' and is needed to get the stone faces perfectly flat before sharpening begins. This step isn't needed every time, but definitely do it when it arrives. The high points of the stone will stop the hatchings being worn off on the low points. So with gentle 'lapping' you wear down the high points until flat. If you think about it, you can't get a sharp edge if the stone isn't flat, the knife won't touch the stone properly. Once flat/lapped you use the 1000 side to get a bevel on each side. There are instructions for this provided. But, you should be able to get the knife reasonably sharp on the 1000. If you don't there's little point proceeding to the 6000 side at that just polishes up a sharp edge to a sharper one. After 10 mins on 1000 stone, go to 6000 stone. Note that on both 1000 and 6000, drop a bit of extra water on the stone as you sharpen. If you look closely you'll see a 'bow wave' at the front edge of the knife as you slide it up the stone. If you keep a close eye, you can make sure the blade edge is flat on the stone, as the wave will go across the stone. You'll also notice the water go grey into a slurry, this is good, and shows metal is being worn away. Finally, after the 6000 you want to put the finishing touch on the blade. Use the back side of an old leather belt. Attach the belt to a door handle (for example) and pull the belt taught towards you. 'Strop' the blade up and down, trailing the sharp edge as you go along the flat of the belt. Note, trail the edge, don't try to lead with it or you will cut the belt and ruin the sharp edge. Do about 50 strops up and down, go slowly and carefully, turning the blade over (blade up) each time. That should do the job and you'll have a super sharp knife. It's quite satisfying and enjoyable actually, I dare say you'll be doing all the knives in the house over the weeks that follow. You can keep the knife sharp by 'stropping' regularly. This will mean you don't need to go to the stones so often. Or .you could get a knife 'steel' to keep the blade in shape for longer that way.
K**A
good product
looks much better than on the photo - quality item, with a handy blade holder that helps get the right angle for sharpening. Pleased with the effect of just a few minutes' sharpening using this.
D**L
I didn't really know how to use the whetstone like it should be used but I went and found ...
Really impressed with this whetstone. I have a number of different types of knives and it has been some time since I've been able to sharpen them properly and I've spent years ruining the edge by not sharpening them very well. When I first used this whetstone, I didn't really know how to use the whetstone like it should be used but I went and found some videos online which explained how to do it properly - I would recommend anyone who's unsure, doing this first (it's worth the 10 minutes of time). The difference is sharpness is amazing, I have another whetstone which is lower grade and can be used well for getting the initial edge if, like me, your knives have been badly sharpened for some time. The 1000 side is then good for getting a pretty sharp edge anyway but the 6000 side really does give it a polished razor sharp edge. It does take some time to use this properly, a good 10-15 minutes on each stone to get them really finely honed but it is well worth the effort. The 2 knives I use the most are sharper now than when I bought them.
S**M
It's okay
Its okay, i don't know if its just me or if its the whetstone but i just can't seem to get a hair shaving edge with this stone, even after using a strop! It is my first whetstone so it maybe its because i'm just not that good. I'll update this if i can get the edge i'm after with some more practise!!
S**L
Embedded rust/ foreign object in stone cause damage to my knife.
The block arrived and looked ok, I sharpened a couple of cheaper kitchen knives on it with reasonable results to test it. Then I tried one of my good knives, and as I started to use the 6000 grit side, I was conscious that the smooth action was being interrupted by the sound of the knife snagging on something - and two VERY hard brown pieces lodged in the stone became apparent - and they were causing nicks in the edge of my expensive knife. I've looked closely at them and they appear to be pieces of rusty metal or very ragged stone chips. Either way - this is totally unusable and I'd warn anyone to be really really careful using one of these.
Z**N
Sharper knifes
Easy to use and worked well on my kitchen knifes. Instructions very simple to follow. The anti slip on the bottom is brilliant.
M**E
If this is your first attempt at using a whetstone I would recommend spending 15 mins searching out instructional vidoes - definitely ...
Does the trick. Had a couple of old blades that needed reinvigourating and after about 15 mins they were demonstrably more effective. After a couple of uses a corner from the block fell off - however it is still perfectly usable. If this is your first attempt at using a whetstone I would recommend spending 15 mins searching out instructional vidoes - definitely worth your time - there are a tonne of them out there.
A**R
Good for beginners
Very soft stone that quickly wears away. Needs lots of work to keep it flat. I won't get another one. I'll be investing in Bester for 1,000-6,000 grit and Naniwa for 12,000. The 6,000 grit side has been fine for getting a good edge, but needs a 10-12,000 grit stone to get a razor sharp, mirror edge.
V**Y
A savoir...
Très bon produit. Mais attention cette pierre 1000/6000 convient pour des couteaux déjà en bon état pour des pros. Le grain 6000 est très fin et permet d'aller dans le détail. Pour des couteaux ménagers un peu abimés, il vaut mieux prendre des grains plus gros comme 800/1500, sinon il faut 1 heure pour aiguiser 1 couteau...
O**E
Gehört in jede GUTE Küche !
Dieses Wetzsteinset ist ein MUSS für jeden Hobbykoch, ich schärfe damit immer wieder zwischendurch meine hochwertigen Messer, damit bleiben diese super scharf und eine Generalüberholung auf der Nass-Schleifmaschine, die natürlich aufwendiger und Material raubender ist bleibt mir erspart. Ich bin sehr zufrieden damit und kann das Set nur weiterempfehlen - schleifen darf damit natürlich jeder selber, von alleine geht das nicht! Die mitgelieferte Anleitung ist zu klein geschrieben und auch dadurch schlecht und unscharf lesbar - die Bilder sind dafür aussagekräftig. Bei youtube und anderen gibt es zum Thema Messer und Werkzeuge schärfen sehr gute Anleitungen. Wie sich die Haltbarkeit des Messerhalters erweist wird sich noch herausstellen. Ich selber bevorzuge als "Geübter" die Handhaltung. Der Polierstein für den Schleifstein ist gut brauchbar nach mehreren Schleifeinsätzen zur Reinigung und sollte immer wieder nach längeren Schleifeinsätzen hergenommen werden. Weiterhin empfehle ich eine gute Qualitäts-Uhrmacherlupe (hier bei amazon gut zu kaufen) zur Eingangskontrolle (Scharten, Schläge) vor dem Schleifen und die Feinkontrolle nach Grobschliff, Feinschliff. Auch ein Lederabzugsriemen mit Polierpaste sollte zu einer pefekten Messerpflege gehören - hier im amazon-Shop erhältlich. Vor dem Schleifen muss der Stein mindestens 30-40 Minuten im Wasserbad gewässert werden. Die Messerklinge in einem Winkel von 10-20° auf den Schleifstein aufsetzen. Mit der blauen Seite (1000er Körnung) erreicht man schnelle Schärfe. Dabei immer wieder den entstandenen Schleifschlamm zur Unterstützung der Schleifwirkung unter die Klinge einarbeiten! Mit der weissen (6000er Körnung) schärft man sorgfältig und super scharf. Zur Qualitätsprüfung der Schärfe empfehle ich den Tomatenschnitt - ein gut geschliffenes Messer sollte von alleine ohne Druck durch die Tomate gehen, hauchdünne Scheiben sind dadurch möglich - mit einem gut geschliffenen Messer ist die Verletzungsgefahr am geringsten bei der Küchenarbeit. Hinweise: Spätestens alle paar Wochen (je nach Benutzung) sollte man seine Klingen überprüfen und bei Bedarf frühzeitig schärfen, das ist damit schonender für das Material. Oft reicht hier schon das Polieren. Eine Kontrolle mit der Lupe muss schließlich auch geübt werden. Guter Stahl hält seine Schärfe bei pfleglichem Umgang länger. Billiger Stahl ist die Zeit für das Schärfen meist NICHT wert! Mit guter Qualität macht die Küchenarbeit allen MEHR Spaß. Beachte: KEINE Keramikmesser darauf schärfen! SEHR WICHTIG: Scharfe Messer gehören nicht in Kinderhände !!!
T**.
Ein Anfängerstein
Um zu Lernen wie man Messer schärft sehr gut. Man bekommt sie auch rasiermesserscharf. Was nicht zu empfehlen ist, ist damit einen neuen Klingenwinkel einzuschleifen, da sich die Raue Seite relativ schnell abnutzt und uneben wird. Bei sehr harten Messern stößt man ebenfalls auf dieses problem. Der stein ist aber gut um damit seine Haushaltsmesser Instand zu halten. Um Werkzeuge zu schärfen würde ich diesen Stein nicht empfehlen, da die oberfläche dafür sehr eben sein muss (für Hobelklingen und Rasiermesser zb.)
O**M
Moyen
Il faut y passer des heures pour avoir un résultat efficace
L**A
Bonne pierre
Bonne qualité, fait bien son boulot. Après plusieurs utilisation j'en suis satisfait. Mais il faut savoir l'utilisé. aiguisé un couteau n'est pas aussi facile que l'on ne voie sur Youtube. Mais une fois qu'on a attrapé le coup c'est super. Es
Trustpilot
1 month ago
2 weeks ago