Desertcart purchases this item on your behalf and handles shipping, customs, and support to Japan.
๐ See More, Stress Less โ Your Ultimate Nighttime Parking Wingman
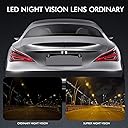
The AUTO-VOX OEM Rear View Mirror Camera features a 4.3โ LED monitor with a 170ยฐ wide-angle CMOS sensor, delivering crisp 720p video. Its one-wire installation connects directly to your reverse lamp, freeing up your cigarette lighter port. Equipped with 6 adaptive LED bulbs, it offers superior night vision, while the IP68 waterproof rating ensures durability in all weather. Designed with an OEM-style bracket, it integrates seamlessly into your vehicle, providing a stable, lag-free wired signal for real-time rear visibility and enhanced parking safety.


| ASIN | B075CY6CFR |
| Best Sellers Rank | #27,940 in Electronics ( See Top 100 in Electronics ) #242 in Vehicle Backup Cameras |
| Brand | AUTO-VOX |
| Built-In Media | MOUNT |
| Compatible Devices | NO |
| Connector Type | Wire |
| Customer Reviews | 4.3 out of 5 stars 1,672 Reviews |
| Display Technology | LED |
| Field Of View | 170 degrees |
| Installation Type | Surface Mount |
| Item Dimensions L x W x H | 11.8"L x 5.1"W x 3.3"H |
| Item Type Name | Mirror Backup Camera |
| Lens | Wide Angle |
| Lux rating | 0.1 lux |
| Manufacturer | AUTO-VOX |
| Mfr Part Number | T2 |
| Model Number | T2 |
| Number of Items | 2 |
| Optical Sensor Size | 1/3 inch |
| Optical Sensor Technology | CMOS |
| Product Dimensions | 11.8"L x 5.1"W x 3.3"H |
| Real Angle of View | 170 degrees |
| Screen Size | 4.3 inches |
| Video Capture Format | H.264 |
| Video Capture Resolution | 720p |
| Voltage | 12 volts |
| Warranty Description | 1-year |
M**Y
Toyota Tacoma great install and good camera
I installed this in a 1999 Toyota Tacoma extended cab. The length of the cable was perfect! After installing the camera at the rear and wiring into the brake light wiring, I ran the cable alongside the existing wiring up to the cab. Under the driver seat is a big grommet that you can pass the cable through. You'll need to remove the seat to get access to the grommet inside. Then up the A pillar to the top of the windshield and over the mirror. This Tacoma had the mirror mounted to the cab above the windshield. I had to buy the metal mount and adhesive. Then the mirror/monitor mounted just fine. In the end, it's a nice clean install. The white balance is a bit strong. But not too bad. The mirror when not being used as a monitor appears to be tinted which might be great at night with bright LED headlights following you. It's nice to have the camera and I'd recommend it.
G**A
feels like great quality
Im very happy with my purchase, installation was not hard at all and the quality of the camera is almost OEM The quality is very good and its easy to see, the image is crystal clear and at night its easy to see. I'd def recommend to other that dont want an extra screen on their windshield or on their dash, the rear view mirror screen is excellent.
B**G
Good value for the cost.
I have used this for about two months now and overall am pleased. Installation was very easy and I am particularly pleased with the rearview mirror(different brackets supplies for different vehicles). It is well built and actually looks almost identical to the stock mirror(I have not experienced any vibration). What I wasn't so pleased with is the washout on a bright day and the grainy night vision but it did an adequate job of providing a clear enough picture that I could tell if there was anything in my path. Also I covered the sensors with a small piece of electrical tape and that brightened the picture in the daylight. And the warranty is 12 month and customer service is excellent with providing any help if needed and I would purchase this again in the future. I gave this 4 stars only due to the night vision and the wash out in the sun but all in all a good value.
K**A
Works great, easy install. I would recommend this in a New York minute
OK, I watched a couple of Youtube videos on installing backup cameras (this one on a 2015 Nissan Xterra) and it looked tons easier than when I put the OEM camera in my wife's Scion xB. That was no fun at all. This one looked like a 2-hour job to me, no special tools except plastic trim removers, which I have. I was a little skeptical of the price, however.I had previously ordered, and returned, a similar system from another vendor. It cost double what this one does, and showed up battered and missing parts, obviously somebody's return. I expected this to be cheesier. I was wrong, it is much, much nicer appearing, and a snap to install, relatively. Mostly, it's a matter of removing a bunch of plastic panels in the rear cargo area to fish the wire through. Note I said "wire". Unlike many other systems, it gets both power and turn-on signal from the backup light, so there's no running separate power wires to the front or tapping into fuses or things like that. Just tap the two wires from the camera into the backup light wiring (easy, red is red and black is black), plug the signal cable in and run it up to the mirror. Which, by the way, is slightly bigger than the OEM mirror, not a bad thing at all. This might seem minor, but it's not. It makes the installation go much, much faster and easier. It took less than an hour and a half, start to cleanup. Again, it's probably easier to install than a wireless unit, which would require finding power at both ends. Unlike other license plate-mounted cameras, this one is cantelevered back from the frame so I can keep my custom frame. Another minor but satisfying point. A couple of minor issues. The mirror might be a bit wobbly, I'm not sure, I might put a dab of silicone on the mount. Or I might not; you want mirrors to be fragile so they snap off in a crash instead of punching holes in your skull. Also, the backup display on the left side of the mirror takes getting used to. You can either focus on the display, or focus on the image in the mirror, but not both at the same time. It took all of 3 times to figure it out, so not a big deal. It comes with clear instructions and an extra 10ft or so of cable, which I did not need. In fact, I bundled up about 3ft of cable and hid it under the passenger kick panel. There's plenty of wire for even the longest vehicles. The image is clear, dims at night. the default is red and yellow markers and a blinking "STOP" in the display, which I left. You can disable that by clipping a wire, but I like the markers. If I had anything at all I'd recommend to the vendor to change it would be to add some kind of manual brightness control so people like me, who like to fiddle with things, would have another thing to fiddle with. Edit; more information. Direct sunlight on the display washes it out some, but it's still legible. I suppose this could be more of an issue in a convertible. In bright daylight, the video gain is a bit high, probably in an attempt to overcome the potential washout problem; the display is actually too bright. Again, not a serious issue; I've never seen a backup camera that I would watch movies on. It works fine for its purpose. If I had to do this again, I'd run the video cable along side the wiring to the license plate lights, which on an Xterra, go to the driver's side rather than the passenger's side, reason being it would give me something under the bumper to cable-tie that vulnerable wiring to. In general, I'd look a little harder for an existing wire run to follow rather than just pushing through. Not a real problem, just an installation note. Also, there is a plastic trim tool included in the box, suitable for removing the plastic trim for routing the wiring. It's not the best trim tool I've ever used, but it does the job and it's free, another little plus. And the mirror is not at all wobbly, so that worry is gone. All in all, I'm very pleased. Easy installation, works great, very reasonable price. What's not to like?
A**R
I am delighted with this great backup mirror
I installed my new Auto-Vox T2 backup camera and mirror in my 2006 Honda Element, wired to the backup light for power. Everything functions perfectly and I am very happy, despite the work discussed below. One very important, inexpensive tool for installation is a cigarette lighter plug with a long cord ending in small alligator clips. Use this to power your Auto-Vox at every step of installation to make sure that you have not damaged a wire (or possibly Auto-Vox camera or mirror) before you proceed to the next step. At my local hardware store I bought a plug with 12' bare end cord for about $3, then crimped on a pair of alligator clips. Installation in the Honda Element is a substantial undertaking if you desire an elegant, OEM look (Honda's design issues, not Auto-Vox's). I found several YouTube videos for each stage of routing the cable from camera to mirror; each video described a single task taking from 1/2 hour to all day. Dismantling the tailgate was a straightforward job. However I did damage some plastic body panel snap connectors, since my vehicle is 13 years old. Replacements are readily available from Honda. Routing wires out of the tailgate to the body took an hour to figure the best path for threading the Auto-Vox resistor, with its cover removed, through the dismantled tailgate. I went through an existing, unused 3/4" rubber gasket by slitting the rubber enough for the thin Auto-Vox lead to slide in. The gasket is critical to prevent a bare metal edge from chafing through the wire by vehicle movement. Attaching power leads to the backup light power was the simplest part. Be sure to match your vehicle's wiring polarity to the clearly marked Auto-Vox power leads hot and ground. Your voltmeter will read 12+ volts when polarity is correct, or null if polarity is backward. All paths to completely hide the Auto-Vox cable from license plate frame to rearview mirror appear quite laborious - removing seats, interior side panels, sills, and driver's column cover, snaking from the column over to the mirror opening. Videos suggest a full day's work. I took a shorter, less elegant rout by tucking the cable under the edge of the headliner, along the driver's side weatherstripping. This is, after all, a sports UTILITY vehicle, so I can live with a little Gorilla tape here and there. I secured the standard Auto-Vox mirror base directly into the Element's 5Mx0.8 plastic threaded ceiling base, originally there just to keep the stock mirror from rotating, with a 90mm M5x0.8 machine screw and flat washer. This is not as sturdy as the original Honda mount but I think it should be ample for my non-abusive care of my 13 year old Element. Was all this work worth it? YES! I first purchased a wireless camera which was claimed to work with its own Android app. It did not. A lot more research lead me to the Auto-Vox T2. In the course of reading about many products I realized that a) using a wireless WiFi or Bluetooth camera, I would need either an additional screen on the dash or my phone mounted in its dash holder at all times; b) rear view would require me to activate the app; c) the view, if it worked, would require more head movement, not less, to see side mirrors, rear mirror, windows, and phone. So, after several days exiting parking spaces in sun, rain, and darkness, I am very happy with the Auto-Vox T2. It's automatic, immediate, right where I need to look, bright and clear. I recommend it highly.
N**N
Too Easy not to do itโฆ
Awesome and too easy to install in my older car. I did use Posi-Tap connectors which are easier to install and more durable. I will buy another.
A**R
Poor choice for the Subaru Forrester
I thought that I had done a sufficient amount of research on this product prior to purchasing, but now see that I missed the boat on some things. After purchasing this Auto-Vox T2 rear view mirror kit I had it professionally installed on my 2009 Subaru Forrester. As soon as I started driving the car with the new rear view mirror, it started vibrating like crazy. Every little bump (and I mean little bumpsโฆ..), caused this mirror to shake and quiver in an annoying and distracting way. I tightened the Phillips screw and the hex bolt on the slide bracket as much as I could, but the problem remained. So I went back to the internet to search for solutions and it turns out that other Subaru owners had the same problem with this model. Several people suggested various โfixesโ (such as superglue, and the addition of 2 more screws in the adapter plate), but these seemed very unpractical. I finally found one guy who suggested a jury-rigged rubber band system which I have now used. It seems to correct about 75% of the problem โ on a smooth road. The recommendation in the โuser manualโ is to use โadapter #3โ for installing the monitor bracket on a Subaru. I contacted the vendor and the customer service rep could not have been nicer. She mailed me what she called a โthickerโ adapter, but it turned out that it was the same one that was already in the original package. So I am sticking with the โrubber bandโ solution for now. If the problem comes back, and I canโt fix it with another rubber band, I am going to put the whole thing in the trash and look for a more suitable and workable. It is clear to me that there is a significant design flaw in this adapter that makes it a bad choice for Subaru vehicles. I am very, very disappointed. Unfortunately the reviews that I found before purchasing this device all said great things. Wish that I had stumbled upon reviews from Subaru owners before purchasing this camera kit โ as I would never have gone to the trouble and expense that I have now incurred.
J**.
They make the installation appear easier than it is.
Bought this backup camera system for my daughter's 2013 Toyota Camry, as a Christmas gift. Before purchasing I look at videos online. Very few actually showed the process of installing the system, only the general how-to information. Looked easy enough so I purchased it. Reality was a different story. Toyota Camry has the license plate on the trunk lid. Backup lights are fortunately also on the trunk lid. Instructions say to install the system mirror first, then camera, then connect to backup lights, but to test the system prior to running the wires. So, how do you not run a wire from the license plate to the mirror in the front in order to test?? So I had to disconnect the mirror to bring it back to the trunk to test. [Added steps not documented]. Also, nothing in any video or instructions tell you how to get the wire from the license plate to the interior side of the backup light. Gee, auto manufacturers make their back ends water tight to protect from rust. That means there are no holes to pass the wire through. So I contacted customer support and they send me a video for a Toyota Corolla. But their example video was a person talking about how he installed it, but he had already put the car back together. So you could not see how he got the wire from the license plate to the backup light. Only him talking about running the wire to the light. No help at all. I contacted customer support again and said that there is no hole. How do I get the wire to the light? Then and only then did they say, "You may have to drill a hole through the trunk lid." Well, that is a whole different skill level of installation. It requires a power drill, a 3/4" sheet metal drill bit, rubber grommets and silicone sealant. Oh and be sure to choose a location where there is no other metal behind where you drill the hole, because the plastic wire connector has length and cannot bend. If you cannot get it between the metal sheets, you'll be drilling a another hole. {This almost happened to me. Fortunately, it wiggled through.} Then, the wire connector clips are for a 20-22 Gauge wire (RED), the smallest they make. Auto-Vox's wire is smaller than that. It worked OK for the positive "hot wire." (Lucky me.) But when I tried to connect the ground to the ground wire coming from the light, the connector never got a good cut through the insulation (wire too small.). I had to un-splice the wire. The connector clip is trashed when you do that. They give you no spares. Fortunately, on the Camry, the light is secured by a metal bolt. So, I was able to strip the wire sufficiently to wrap around the bolt and tighten the nut. This made a common ground. Oh, had a hard time stripping the wire because the wire was smaller than the 20-22 Gauge slot in my strippers. Finally, I got a good test of the system. The rest went as planned. The mirror installs tightly on the Toyota bracket. There was plenty of wire length to run the wire along the roof to the back seat and down the side door stripping, underneath the rear side airbag and into the trunk. The back seat folds down, so getting the wire into the trunk is no issue. When I ran to purchase the grommet and the chalk, I also purchase some flexible plastic tubing. This was used to protect the wires around the hinge of the trunk. When all was said an done, the video quality in the mirror was excellent. My daughter was very pleased with the system. I believe it will last a long time. But be sure to seal the hole and the wire in a manner that the wire will not chafe on the sharp edges of the hole you drill. Oh, I am an amateur installer. I have an engineering degree, but little experience in actual installs. If you install a lot of stuff in cars, you're probably laughing at this review. It took me 4-5 hours, mostly thinking through how I was going to do everything. About 2 1/2 to 3 hours hands-on work, mostly drilling the hole and troubleshooting the faulty ground. Needed a voltage meter in troubleshooting.
A**R
Nice upgrade for an older vehicle
I like the quality of the the components and the ease of installation. I'm pleased with the features of this unit and clarity on the screen. This looks like a factory system.
A**K
Good bang for the buck
Great value for the money and the installation was easy as could be .
M**E
Not reliable
I gave them a 4 because their customer support was very good. Quick replacement and refund. The quality of the product isn't the best. It works for awhile then failed.
B**T
Easy installation
Liked the fact that the only power required was from reverse light tap
D**C
ONLY GOOD FOR A YEAR AND A HALF
Definitely not a durable camera works well for about a year and then starts to give trouble. Better off sticking with a name brand for longevity
Trustpilot
2 weeks ago
3 weeks ago