🚽 Upgrade your flush game — because your throne deserves the best!
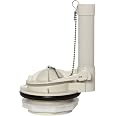
The American Standard 738921-100.0070A Selectronic Flush Valve Assembly is a durable, easy-to-install replacement part designed exclusively for Cadet 3 toilets. Featuring a powerful 4.5-inch flush valve and certified to ASTM, UL, and WaterSense standards, it ensures efficient water use and reliable performance. Its compact 4.5 x 5.5 x 8.7-inch design with 2-port barb connections guarantees a perfect fit and hassle-free upgrade, backed by a 1-year limited warranty.
| Material | Plastic |
| Brand | American Standard |
| Item dimensions L x W x H | 4.5 x 5.5 x 8.7 inches |
| Exterior Finish | Plastic,Rubber |
| Inlet Connection Size | 3 Inches |
| Inlet Connection Type | Barb |
| Outlet Connection Type | Barb |
| Number of Ports | 2 |
| Outlet Connection Size | 3 Inches |
| Specification Met | ASTM, UL, WaterSense |
| Valve Type | flush valve |
| Global Trade Identification Number | 00012611401299 |
| Manufacturer | AMMM9 |
| UPC | 012611401299 |
| Part Number | 738921-100.0070A |
| Item Weight | 8.8 ounces |
| Product Dimensions | 4.5 x 5.5 x 8.7 inches |
| Item model number | 738921-100.0070A |
| Is Discontinued By Manufacturer | No |
| Size | 4.5 x 5.5 x 8.7 inches |
| Color | White |
| Finish | White |
| Item Package Quantity | 1 |
| Included Components | flush valve assembly |
| Batteries Included? | No |
| Batteries Required? | No |
| Warranty Description | “*1 year Limited warranty from date of purchase” |
R**Y
Flushes like new
Replaced with aftermarket because original is not offered in stores. Flushed ok but not like it used to. Found it on Amazon. Works great and original part.
C**5
Easy to install, no leakage
Just as described! This was easy to install, has been working great since installation. I haven’t noticed any leakage, so the seal is strong. Great price, would buy again !
J**Y
Fast and reasonable, but you'd better know how to install it
It arrived one day early, which was most welcome, and it fits and is much cheaper than the better alternative American Standard fancy flush valve.However, it came without a word of instruction. Nothing. It's easy to install but possible to screw up, like how tight to tighten the lock nut? Remember, this is part of a porcelein toilet, and it can crack.
K**0
Repair American Standard Cadet 3 commode losing water
I have an American Standard Cadet 3 commode. The past month or so it has been slowly losing water between flushes. The water level will drop about an inch then it will refill. Since there was no water on the floor I determined that it must be the flush valve seal. I checked Home Depot and Lowes and could not find the right parts.On Amazon I found the appropriate flush valve assembly. Since replacing the flush valve requires taking the tank off, I also had to purchase the tank/bowl coupling kit.American Standard 738921-100.0070A 3-Inch Flush Valve AssemblyAmerican Standard 7301021-0070A Tank to Bowl Coupling KitTotal cost for both parts together was around $20.Both parts were shipped quickly. The flush valve kit did not have instructions (I like instructions). The coupling kit had some instructions. I checked on YouTube and found several videos but none that were pertinent.>> Here’s what I did to change the flush assembly.1) Turned off the water.2) Flushed to get most of the water out of the tank.3) Used a rag to get the rest of the water out of the tank.4) Unhooked the water line where it connects to the tank.5) Used a tool that came with the coupling kit (it looks like a metal tube). I used it to unscrew the tank from the bowl. One end of the pipe looks like the end of a socket. It just fits over the bolt on to the nut. It has a hole in the pipe that you could use to slip a screw driver through for more leverage. I was able to just unscrew the bolt with my hand. I did not have to use a screwdriver to hold the bolt on the inside of the tank but could see where some people might have to. I unscrewed the nuts on each side of the bottom of the tank.6) I then lifted the tank of the bowl and laid it on its side on a rug on the counter.7) In order to remove the two tank bolt and rubber inserts, I used wire cutter to trim off the flanged tips of the rubber inserts. Once I did this they easily pushed through the holes.8) I was able to hand unthread the large plastic nut that held the flush valve to the tank.9) I removed the old flush valve.10) Then I cleaned around where the flush valve and bolts go through the bottom of the tank. I also cleaned where the flush valve sits on backside of the bowl.11) I then removed the plastic nut on the new flush valve and left the gasket on the valve. I put the valve through the hole in the bottom of the tank. (The gasket sits in between the bottom of the tank and the bottom of the flush valve.) Then I attached the plastic nut. I positioned the flush valve the way I wanted to sit inside the tank. I then hand-tightened the nut. I did not have anything large enough to get around the nut so I used the handle of some large channel lock pliers. The handles had rubber on them and I just them to get a little leverage to tighten it a half turn. Since everything is plastic you basically don't want to over tighten anything.12) Then I took the 2 black bolt rubber inserts and stuck then through the screw holes inside of the tank at the bottom. Then from the inside of the tank I pushed the bolts through the rubber inserts. Note: You have to put the inserts through the tank before you put the bolts through them.13) Next I put the large green hard rubber gasket/seat over the flush valve large white nut. The inside of the gasket is the same shape as the large nut. It should fit snugly unto the nut.14) I then placed the tank unto the bowl. As I placed the tank on the bowl, I watched to make sure that my bolts & rubber inserts and the green flush valve gasket fit into the appropriate openings on the back of the bowl.15) I then attached the water line to the bottom of the tank and hand tightened it.16) Next I put the nuts on the bolts that anchor the tank to the bowl. Then I used the provided tool (metal tube) to hand tighten them. I used a level to make sure the tank was reasonably level. The tank sits on the rubber gaskets and not directly on the bowl. That means that once the nuts are tight that they is still some give with you push on the tank. Over tightening can cause damage to your tank.17) I attached the flap chain to the tank flush handle.18) I turned on the water and checked for leaks.As long as you purchase both items (see above), changing out the flush valve is a relatively simple process. Everything that was provided in the two kits was exactly the same as the factory original parts that came with the Cadet 3. Both kits were in packaging that appeared to be original "American Standard" parts.I really did not have to use any tools. Everything was hand loosened and hand tightened. You can create a lot of problems if you use tools and over tighten. Hand tighten then check for leaks. The whole process was under 30 minutes.I am happy with my purchase. The downside is it appears that I have not completely resolved my issue. It seems that I may be still losing a little water. Since there is not an obvious leak, the only two potential places for the water to be seeping is the flapper or the seal under the flush valve. If it continues, I might have to remove the tank and try to tighten the flush valves large white nut.
D**W
good quality, perfect fit for American Standard
The only thing I would prefer on this is that the overflow tube were a little higher. I replaced the original stopper which was the taller design that leaves 3 inches of water in the tank--that was problematic and often required a second flush...this is a lower flap and does the job nicely
P**.
Very specific toilet application, check the tank lid.
Ordered this after seeing the part number on a label under the tank lid. The generic Fluidmaster wasn't working right (actual valve diameter was too small to produce enough force to clear bowl). This fixed everything. Again, you just have to know exactly which one you need.
G**.
Poor product quality
This is the third time that I have changed this review. Each time I thought that I had solved the problem with an American Standard part only to be disappointed. My son had a problem with a leaking toilet. The first thing that I did was get a replacement American Standard flapper. It's the same one that comes with this complete flush valve. That didn't solve the problem so I assumed that the flush valve gasket was the problem. I replaced the whole unit and it had a worse leak. I didn't have any wide mouth pliers so used a screw driver and hammer to tighten the nut. I then packed the gasket voids with silicone grease and tried again. The leakage dropped a lot but still unacceptable. I assumed that the nut needed to be tightened more so I spent $42 on a pair of 16 inch Channellocks. This allowed me to get an excellent grip on the nut and thoroughly tighten it up. Unfortunately, I still had a leak problem which led me to believe that it must be the flapper although I don't like the design of the gasket. After trying another OEM American Standard flapper and a Korki, I still had a leak that caused the water to come on every 8 minutes. Only after replacing the new flush valve assembly with a generic 3 inch Home Depot unit did the problem finally go away. I wasted a lot of time and money assuming that American Standard OEM parts were the solution but was proven wrong. I'm very happy that I do not have any American Standard toilets in my house.
A**N
Perfect match for 4021
Needed to replace my flush valve on American Standard 4021. Generic valves were all to small as OEM was 3.25" on threaded part. This valve fits that need.3 stars because it did not come with tank to bowl gasket and being an obscure size it really should be included.
Trustpilot
1 month ago
5 days ago