Chill Out, Control In! ❄️
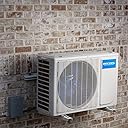
The MrCool DIY-24-HP-230A Air Conditioner is a cutting-edge, user-friendly cooling solution designed for the modern homeowner. Featuring a Quick Connect Line Set for easy installation, smart remote app control, and advanced leakage detection, this unit ensures optimal comfort with low ambient cooling and a restful sleep mode.
| ASIN | B01EJWCJYO |
| Additional Features | Remote Controlled |
| BEE Star Rating | Energy Star Certified |
| Brand | MRCOOL COMFORT MADE SIMPLE |
| Brand Name | MRCOOL COMFORT MADE SIMPLE |
| Capacity | 2 tons |
| Color | Black, Red |
| Compressor Type | rotary_scroll |
| Control Method | App, Remote |
| Controller Type | App Control, Remote Control |
| Customer Reviews | 4.5 out of 5 stars 102 Reviews |
| Efficiency | 16 |
| Form Factor | Mini-Split |
| Global Trade Identification Number | 00853962006944 |
| Included Components | Mrcool Do It Yourself 24,000 BTU 2 Ton 16 SEER Ductless Mini-Split |
| Installation Type | Packaged |
| Inverter Type | Has Inverter |
| Item Dimensions D x W x H | 8.9"D x 42.52"W x 13.19"H |
| Item Type Name | Air Conditioner |
| Item Weight | 185 pounds |
| Manufacturer | MrCool |
| Model Name | DIY-24-HP-230A |
| Model Number | DIY-24-HP-230A |
| Number Of Circuits | 1 |
| Power Source | Corded Electric |
| Product Dimensions | 8.9"D x 42.52"W x 13.19"H |
| Refrigerant | R 410A |
| Seasonal Energy Efficiency Ratio (SEER) | 16 |
| Special Feature | Remote Controlled |
| UPC | 853962006944 |
| Voltage | 230 volts |
| Warranty Type | Full warranty |
| Wattage | 822.67 watts |
R**E
Impressed so far. Expect it to stay cool & warm for years to come.
I had my doubts about these simple DIY units, but after installing two of them, one of which ran very well for the entire summer, I'm a convert now. A year ago, I "gambled" on a smaller unit (Gen1 DIY 12K BTU unit) and managed to get it to work (and it works well). After an almost entire summer of using it, I felt confident enough to get another one, this time Gen2 DIY 24K BTU unit. As simple as these are to install, good preparation is never a bad thing, so here are some things I also purchased to get them installed. There are million different ways to do this, so consider my experience as a reference only. First, you'll need two fairly large crescent wrenches. Some sort of a reasonably powerful power drill is needed as well. I managed with an old battery powered DeWALT unit, but I literally ran down a full battery pack getting through the wall. I had an extra battery as well as a corded drill as a backup, so no big deal. Of course, it'll all depend on how strong your wall is. I used DiversiTech UC3636-3 UltraLite Concrete Equipment Pad as the base. I picked up some expansion bolts and washers at a local hardware store to secure the unit to the pad. Although the new unit came with rubber pads, I added some of my own Rubber Vibration Absorber Set for Ductless Mini Split Systems . Not strictly required, but I wanted it raised a little so I could get the condensate pipe (for the heating mode) hooked up. If securing it to a concrete bed, I'd use something like The Hillman Group 370980 Wedge Anchor, 1/4 X 2-1/4-Inch, 40-Pack . Of course, you'll need some drill bits specifically meant for drilling into concrete. There are wall mount options, too, but I've no experience with that. After using Bosch HB25M Bi-metal 25-Piece Hole Saw Master Set to drill the wall hole (3"), I used THERMO 44002 44002 ROUND LINESET WALL THIMBLE to keep the hole nice and clean. I did trim away the flared portion since I wanted the contacts to be flat against the wall. Add some caulk and you should be good to go. It was quite difficult to push 26 feet of the piping through the little hole because I did it by myself. I highly recommend you get at least one other person to help. Pushing out the last part while hooking the indoor unit to the wall was a feat. I do think it's a good idea to slant the indoor unit ever so slightly so that the condensate drains better. One interesting note here. The old 12k BTU unit had quick connectors on both sides, so I didn't have to push in long lineset through the wall then, but the new unit had the lineset pre-attached to the indoor unit. Two less connections is certainly good for reliability, but boy, pushing the lineset out the little hole wasn't easy. On the outside, I used Rectorseal 3.5" 12' WALL DUCT KIT WH 92 White . For this unit, it's barely wide enough, so maybe 4" one would be easier to work with. The 3.5" one worked fine for me. Obviously, one set wouldn't be enough to cover the whole thing, but in my case, I ended up with leftover piping at the outdoor side, so one set of duct was barely enough. I didn't use the 90-degree duct at all. From my understanding, the straighter the pipes are, the better. Also, I read that if you have leftover, you should loop them horizontally, but that wasn't practical for me, so I did one giant vertical loop against the wall. I don't believe my big loop will cause lubricant to pile up at the bottom. Multiple tight vertical loops are supposedly bad for the system. I punched a hole at the bottom of the duct cover right outside the indoor unit and dropped the condensate drain straight down, then pushed it into a PVC pipe I picked up at a local hardware store, along with a 45-degree bend at the bottom to direct it away from the wall. I fastened them all up with hooks and painted the whole duct & PVC pipe so it blends in with the wall. For the magical refrigerant quick connections, I went out of my way by using some Refrigeration Technologies RT201B NYLOG-GASKET/THREAD SEALANT to clean and lubricate what I could before hooking them up. There are o-rings (I believe neoprene type) in there, so as long as you keep them straight and tighten them well enough, they shouldn't leak. Funny, this was the easiest part of the install. Now for the electrical connections. Mine was relatively easy because I was reusing the connections to the old unit. However, the old unit was hooked up to 60A fused disconnect, and there're no lower value fuses to fit that disconnect, so I purchased Siemens WF2030 30 Amp Fusible AC Disconnect to completely replace the disconnect. It doesn't come with any fuses, and for some strange reason 20A fuses are really expensive from Amazon, so I picked them up at a local hardware store. I also picked up some THHN/THWN 12 AWG wires (black & red for the lines and green for ground) and made my own liquidtight connection using end connectors also picked up from the LHS. I made sure to get everything right and double-checked. I even replaced the breaker from 50A 2-pole to 20A 2-pole even though it's not necessary because the wires from the breaker box to the disconnect are proper 6 AWG and the rest are protected by 20A fuses. I used a 90 degree connector for the power and straight one for the control wires into the outdoor unit. No, the plug for the control wires won't go through the liquidtight conduit, but I redid the wire so I could use the nice liquidtight connection. I really wanted this one to be as perfect as I could get it. I used some foam cover + HVAC specific duct tape to cover as much of the exposed refrigerant line as possible (right down to the connections at the outdoor unit). It fired right up and is cooling my big master bedroom like Mr Cool (for about 2 weeks now). I used a clamp meter to measure the current while it's running (cooling at low setting) and I got 2.5A, so with 240VAC, it's only 600 watts. The only time I saw it go past the low setting was when I first turned it on with the room temperature past 90F. I don't feel the need to test the turbo mode. Maybe when we hit 115F, I'll see it kick up to medium. I'm not so sure about the extra-quiet mode. I don't want to run the compressor at too low of a setting because I'm afraid of lubricant getting trapped in the pipe. I haven't tried the heat mode. Maybe I should before the winter comes, but if I found it it doesn't work then, it probably won't make any difference because from my understanding, there's no warranty unless a licensed HVAC technician signs it off. Oh wait, my neighbor is a fully licensed HVAC technician and he liked my install after looking it over. Maybe I can get him to sign the thing for the warranty. ;-) With it all done, I'm not sure which makes me happier, the big $ savings or the satisfaction of doing it yourself (and a darn fine job at it if I may say so myself). I guess I can't really finalize this review until I keep using the system for at least a few years, but so far, I'm impressed with the package. UPDATE after one cooling season and one heating season: General complaints: * Indoor unit's scroll fan bearing isn't the best quality. It makes some noise, especially at the super-low speed (silent mode for cooling or stand-by mode during heating). * Indoor unit creaks and cracks due to the plastic pieces not being padded against the big temperature swings. This is particularly noticeable in heating mode. Probably not a big deal for living rooms, and I have mine in the bedroom. I might be able to do something about it using some foam insulation. We'll see. Cooling season: * No complaints. Excellent cooling capacity and efficiency (as rated). Heating season: * When temperature falls below around 37-38F (3C), the efficiency drops noticeably. At the same power level, it produces luke warm output vs. nice toasty output when the outside is 40F or higher. In the climate I live in, I can count the number of freezing mornings in a year in one hand, so it's not a deal breaker, but if you have many freezing to near freezing days during a year, you might want to consider units that are rated higher for heating or think about alternate means of heating. * The unit has no back-up heating element, so when ice forms on the coil, it runs the compressed gas into the outside coil to heat it. Obviously, there's no heating the indoors during this cycle. Indoor unit's fan will stop and you'll hear some slushing sound during this. I'm still very happy with the unit. It is meeting my needs very nicely.
E**T
1.5 year update
1.5 year update... Pros-Heats and cools, all at a low cost (thats what heat pumps do) -no HVAC person needed for installation (SAVE MONEY) -so far works pretty darn well... this 24K unit heats and cools an 1,000 sq ft workshop/out-building -still works great over a year of use heating and cooling Cons -a couple of times the unit went wacky and cooled down the building to 40-deg F in the middle of summer. The remote was unresponsive so I turned everything off and pulled out the batteries from the remote, put them back in and turned everything back on and it worked normally again. ...so hopefully this is not an indicator of a larger problem. Original Review... Bought one of these units (24K BTU) from Amazon to heat a 16x32 foot 2 story insulated shed/out building I built myself over the past 2 years to use as a workshop / storage. Wow, it does a great job cooling and heating the entire 1,000 sq foot building! Its Dec 1st in Ohio and so far the outside temp have gotten down to the low 20's ...not sure how it will do when the temperatures get below 0 (I do have a couple of kerosene heaters as backup and might install a cheap 5,000-KW electric garage heater for below zero days since the kerosene heaters will eventually make the shed smell like kerosene).... but so far the mini split is doing it all. Instructions manual and pretty much all of the youtube videos were not as detailed as I needed but still helped (would be great is someone made a very detailed instruction video on how to install) ...after taking out the unit to see what I am dealing with, reading instructions and watching several videos on youtube, I eventually figured it out and installed it myself (I didnt have time to work on it during the week so took me 2 weekends moving very slowly and cautiously since I am not use to electric and HVAC). A more experience person could probably do it in a day. If you are going to attach it to the side of a building (instead of putting it on a concrete pad) Amazon does sell a very good bracket for this which worked perfectly (see link for this bracket): https://www.amazon.com/Mounting-Conditioner-Universal-9000-36000-Condenser/dp/B00LDU9R2I/ref=sr_1_16?ie=UTF8&qid=1512139881&sr=8-16&keywords=ac+bracket All in all so far (I have had this 2 months) I am extremely pleased with this unit and glad I saved money installing it myself. I have not used the fancy wireless control app just the remote control and set the temp at 62 degrees F and keep it there so far this fall. Note: Instructions say to use a hole saw that is slightly larger than 3.5 inches which I could not find so I used a 3.5 inch hole saw bit and it worked.
D**R
This was the best purchase and project I've ever done
This was the best purchase and project I've ever done! That's why this is the first review I've ever taken the time to submit. Fantastic product - and the packaging was amazing - I'll bet these are NEVER damaged in shipping. We have a 1800 sf home - open floor plan with 17 ft ceiling that peaks in the center. The calculation says to install a 36K btu unit. But we're in central CA with a very moderate climate so we went with the 24K. The other night it hit 35 degrees F outside and we were 74 inside. Silent operation. Haven't gotten an elec bill yet - but our firewood costs will disappear, as a woodstove was all we had before - and based on research I don't expect a big increase, though we keep it on way more than I thought we would - keeps the place "cozy" as my wifey says. I'm certain we'll love the AC when we get to those 100 degree days next summer. The install was a LITTLE more difficult than I thought it would be: the part about hanging it on the wall bracket. Next install I would make the hole in the wall more eliptical rather than round, so that it could be lifted an inch higher to clear the lip of the bracket. Anyway, a little ingenuity is usually required with any DIY project. I'm gonna volunteer installation to my neighbor - once he sees/feels this he's gonna go for one for sure. MrCool is an American co., though they have the units made in China. Still, I'd put this unit up against the big Japanese co's (Fujitsu, Mitsubishi, etc.). And those others require professional installation, which GREATLY increases the total cost.
O**E
This Is The Company to Buy From Ingram's Water Is The Best
This is more of a review of the company that sells this unit. If you are worried that a company won't stand behind this DIY unit rest assured. John and Ray at Ingram's are the best! These folks went above and beyond providing service on my unit. I did have an issue with my heat pump but Ingram's made it right and made it right fast. Anyone can have a problem but Ingram's was there to make sure that I was satisfied and completely happy. I have bought a lot of things over the internet and you always have that feeling that you hope that the company will stand behind there products, this should never be a concern with Ingram's! The unit was relatively easy to install but you need to do some upfront work. You'll need a pad or wall mount to set the outdoor unit on. I used solid concrete blocks grouted together to form a 24" x 36" pad to mount too. I drilled into the blocks and used lead anchors with 5/16" lag bolts to hold the unit in place. I had run wiring when the house was built so all in needed to do was install a breaker in the panel and a disconnect switch on the outside of the house. I think that a outside disconnect is mandatory all across the US. This provides a place for service tech's to turn off the power if your not home to let them in to turn off the breaker. Then a I ran flexible waterproof plastic conduit from the disconnect to the outside unit with my wires inside. Mounting and installing the inside air handler is straight forward. Using the supplied template, mark and drill your holes. I had to buy a large hole saw blade for this protect since my set didn't have the specified size. Attach the air handler bracket with supplied screws and anchors. Once that's done slip the supplied plastic thimble thru the wall and then carefully roll out the refrigerant lines on the back of the air handler and thread them thur the wall thimble (this step really needs two people). And hang the air handler on the supplied bracket. Now all that's left is to connect the refrigerant hoses to the outside unit and open the valves in the correct sequence. Then test! If you are comfortable drilling holes and installing the correct electrical service for this unit its very easy and well within the reach of an average DYI home owner. On a DIY scale of 1 to 10 its a good solid 5 or 6. Just take your time and follow the steps. If you have any problems Ingram's is there to handle those and they will do it fast. Super happy with this unit! its 97 degrees today and I am sitting in a window lined room at 72 degrees! Love it! Plus, you can't beat the cost savings on this DIY unit. I would have had to wait until late September and pay over 2X as much for a commercial install. One note: I didn't want to use a wall mounting bracket just in case there was any vibration from the compressor. Silly me this thing is very quiet. Both the inside and outside units are very quiet. If you can think of falling rain as a noise this unit would not get even close in noise. I am glad that I used a concrete mounting since I needed to turn the outside unit 90 degrees to the house so the prevailing wind would not interfere with the units operation. Joe C.
D**N
Great Value, Working Well
Unit is installed and working great, tested the heating function but so far have only used the cooling mode. Installation was straightforward but make sure you have some help when running the tubing and wiring between the inside and outside units, need to be careful to make sure there are no twists or kinks. The WiFi accessory installed easily and provides rudimentary control. I only need it to drop the temperature from a high setting I use when I’m not actually in the workshop. I was concerned about the pre-charged HVAC lines but followed the install instructions carefully with no issue, checked for leaks using soap and water mixture and was good to go. I had been quoted a similar unit with install for nearly $4500, this is a really great value assuming the quality holds up. I had a minor issue with shipping but the company was very quick to get it sorted.
S**M
Great kit at a good price
I purchased this unit to cool/heat my insulated garage to keep a comfortable temperature when working or playing (ping pong) in the garage. So far I’m impressed. Things you’ll need to purchase separately: • 3.5 inch hole saw and arbor • 25 amp 2 pole breaker (for 24,000 btu unit) • Wire (10-2 with ground) to run from panel to disconnect. • A/C disconnect • Hookup whip (10-3) • Bolts to hold the outside unit to the concrete. •(Optional) Decorative line cover I bought this line cover kit: Decorative PVC Line Cover Kit for Mini Split Air Conditioners and Heat Pumps https://www.amazon.com/dp/B00CWNQL4C?ref=yo_pop_ma_swf This is a bit of a tight fit, but it worked for me. This is the whip I purchased: https://www.amazon.com/dp/B0080KC6RW/ref=cm_sw_r_cp_awdb_t1_AzAgBbBEHDMGX This connects the AC unit to the AC disconnect. I did the electrical work myself because I’ve had experience. I’d recommend hiring a professional. They can supply the wire, disconnect, whip, and breaker (if they do supply them then you don’t need to order them here) I did the install over the course of a few evenings after work. Instructions with the unit are sufficient to walk you through the install. I also watched some YouTube video. I hope this info is helpful!
H**M
Ordered 10/2018 - Installed in end of March 2019 runs faultlessly Updated 4/9/2025
Ordered 10/2018, installed 2 24K and 18K units in end of March 2019, has been running faultlessly. Had to supplement previous central more powerful system in old office building with other portable heaters all over. Now with these units working, no other equipment cluttering the floor space. More than enough for north east winter and summer has not been cooler (yes even in the heat wave) 2 incidents were promptly addressed: faulty wireless USB fob and remote control. items were shipped out without question. ********* UPDATE *********** Still 5 stars. Running still in the coldest of winter and hottest of summer in PA. Small wish if it had horizontal sweep adjustment of air instead of just vertical up and down. Remote management of systems via smartphone working really great! Will be ordering a couple more systems in the future. Cancelled propane heating system service and completely discontinued previous Tane central heating system that was not doing the job well. If you have an older building don't think of retrofitting it with central heating/cooling system. Strategically place these systems depending on your space and done! Update 9/2024: Both Units 18K BTU and 24K BTU started being less efficient. by winter stopped getting any heat or cold. Checked refrigerants. gauges show full. another 3 ton Universal MrCool installed at home stopped providing heat and cold in 2 years. Contacted MrCool and all units were under warranty. Started an ongoing email back and forths for diagnosing units. They have no supporting vendors in any area in PA, NJ, DE, MD. All supporting vendors they listed were only resellers and no other traditional HVAC companies wanted to come and tackle the problem. Lost a couple of months of winter. Luckily survived with 2nd furnace system at home. Finally, found a HVAC company to come and troubleshoot and solve problems. The problem with the 3 ton universal was with faulty gaskets in linesets. Paid a bill of $2700+. MrCool said they only cover parts. Did not take the trouble to troubleshoot the 18K and 24K BTU units. Figure spending good money after bad. These MrCool units are only good as use and throw units. They last about 2-4 years. Bought 3 systems, 18K, 24K and 3Ton universal units. All 3 units went bad from 2-4 years. Don't expect to service them! Just install and throw out when bad. Would give zero stars if possible.
J**G
Pretty happy so far
Pretty happy with this unit so far..... I had to pull out a old wall unit and put this in its spot. Install was very straight forward, the only thing I didn't care for was the through wall sleeve, when you drill your 3 1/2" hole through the house at a slightly pitched angle out, when you put the wall sleeve in it doesn't sit flush to the interior wall. Other than that, I ran a new 220v to a nonfused disconnect box and poured a concrete slab to sit the condenser on. Wifi was a pretty easy setup and seems to be working well, blows ice cold.
Trustpilot
3 weeks ago
1 week ago