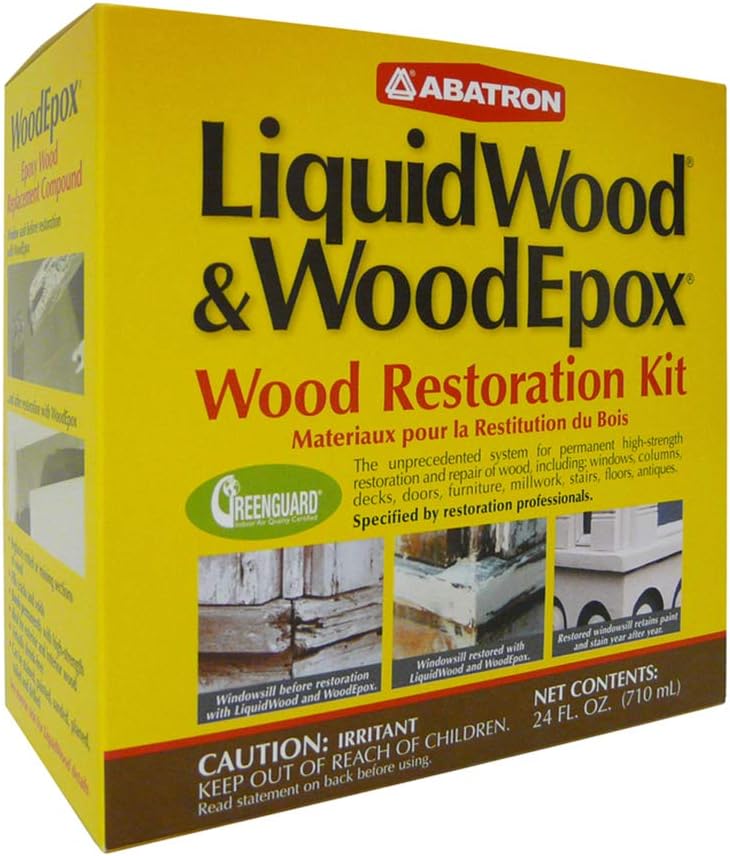


Buy anything from 5,000+ international stores. One checkout price. No surprise fees. Join 2M+ shoppers on Desertcart.
Desertcart purchases this item on your behalf and handles shipping, customs, and support to Japan.
๐ชต Bring your wood back to life โ restore, reinforce, and reclaim your space!
Abatron Wood Restoration 24 Ounce Kit combines LiquidWood epoxy hardener and WoodEpox filler to permanently repair, strengthen, and rebuild rotted or damaged wood. This solvent-free, waterproof, and pest-proof system cures in 8 hours, creating a durable, sandable, and paintable surface ideal for historic preservation and modern wood restoration projects.

| Asin | B00JWRLO7A |
| Best Sellers Rank | #171,267 in Tools & Home Improvement (See Top 100 in Tools & Home Improvement) #220 in Wood Filler |
| Brand Name | Abatron |
| Color | Transparent |
| Compatible Material | Wood |
| Container Type | Can |
| Customer Reviews | 4.5 4.5 out of 5 stars (1,228) 4.5 out of 5 stars |
| Full Cure Time | 8 Hours |
| Global Trade Identification Number | 00051191331008 |
| Included Components | Abatron Wrk60r Wood Restoration Kit, 24 Oz |
| Item Form | Liquid, Paste |
| Item Package Quantity | 1 |
| Item Type Name | Abatron Wrk60r Wood Restoration Kit, 24 Oz |
| Manufacturer | Abatron |
| Material Type | Epoxy Resin |
| Model | ABATRON - WRK60R |
| Number Of Pieces | 6 |
| Other Special Features Of The Product | Solvent-free, Liquid Epoxy Resin, Structural Reinforcement, Waterproof, Pest-proof, Shrink-free, Non-sagging, Moldable, Machinable, Sandable, Stainable, Paintable, Low VOCs, GreenGuard Certified |
| Part Number | EMW7330006 |
| Specific Uses For Product | Woodworking |
| Unit Count | 24 Fluid Ounces |
| Upc | 051191331008 |
| Viscosity Level | Medium |
| Volume | 24 Fluid Ounces |
| Water Resistance Level | Not Water Resistant |
User
Great product, easy to use.
This was a good product and very easy to use. I used it to fill a cavity on the upward side in a 6x6 beam which supported my crib dock. It had started to rot. I dried it and filled it with no issues. Sure beats replacing a large beam. Water will not pool there now and it is hard and strong and should not rot again.
User
Worked for us every time!
We live in an older log home and I was intrigued that this product was used by historical preservation societies to shore up and repair damage that can happen over the years. We have used this product both inside and outside to repair damaged logs, and even an interior bathroom floor that had a bit of damage around the base of the toilet.The product is easy to use, but you will have to wear gloves, especially for the liquid wood part of the treatment. It's a two part process, and even with the most practiced hands and careful use, it can be messy. The wood filler portion is also a two part process. There are gloves and a spatula included to make the process easier. Frankly, I found just getting into the filler with your hands and working it till it's even is the best approach.The product dries beautifully, it can be sanded, stained, and it is extremely durable. We always make sure we have tis product on hand for what may happen. Follow the directions, allow both the liquiwood and the filler to dry thourughly and you can't go wrong.
User
Excellent restoration material for wood
Used this to restore my mother-in-law's old wooden sign for their house. Has sentimental value so it was great to be able to do so.The resin made it waterproof and protects it against further rot while the paste was great for rebuilding the rotted parts and takes paint well so it could be matched.
User
Great Stuff!
Excellent product but expensive. Also the putty was much easier to work with than the competition. I bought some craft syringes from Amazon to get the epoxy deep into the cracked wood.When project completed it dried rock solid, so happy!
User
I swear this is the best product out there:) Saves one a lot of $
I had purchased this product from this seller November 22, 2016 but the 'leave a review' button is gone but I wanted to leave one now bc I just used the product:)So it took awhile for me to get the courage to do this project but today, I didn't think about it I just did it. I looked at the online videos a few times, read the instructs a few times and then got started.I'm repairing a wood floor from 1946 (I know this is original bc I've taken out a couple of walls and the floor was underneath and already stained). This was a previous doorway before someone else took out that wall. When I bought the house there was carpet down so I didn't know about it. Took out the carpet and HORRORS! I thought I would have to have the wood cut out and maybe put a perpendicular long piece in w supports under the floor etc. Research always gives more than one solution:) I found this and I knew I could do it and save a lot of $.When I got the Liquid Wood painted on I realized I didn't know when to put the Woodepox in... wait or immediate? So... I took a chance (it's Sunday), several ppl answered:). The seller gave me really good advice and the one following him in the post. 5-20 minutes said the seller and the other guy said he waited about an hour. I'd already waited about two hours but my stuff was soaked and just right... tacky to the touch. So I mixed up my play doh and started squeezing it into all the rotten crevices and smashed and smashed it in then leveled it off as best I could. I did all the holes, one after the other then went back and smoothed a bit with the alcohol. I poured some alcohol into a plastic cat food dish (I save these bc they are so great for painting on canvas and small jobs) and smoothed out the surface with the mud knife. It had already started getting firm but the alcohol made it pliable a bit again.When I painted on the Liquid Wood I used a paintbrush from my art set, a 1/2 inch across brush. Some of the crevices were under the wood so I couldn't see how far back or big so I poured the liquid on top of the brush next to the hole and just dabbed everywhere the brush would go and then I wouldn't waste the liquid trying to scoop it up into holes. This worked great. I coated everything about three times. I had mixed one ounce each of A and B of the liquid and had trouble using it all. There was more than enough even though I had a lot to cover. There's lots left over too. I did use all the Woodepox though. I realized it was best to take smaller amounts of each, mix them together then add some more bc the color has to be one color when the mixing is done. With the larger amount it seemed to take forever to get it to be one color. I just put it out on a plastic grocery bag and put my feet at either end of the bag to hold it down. Some pieces would fall out of my ball of play doh and I would just dab it up with the ball in my hand. Super easy to work with. I used the gloves but they must have been super man's:) Huge! I could have used my hair coloring gloves and the fit would be better. It did the job though. I'll try and post some pics of my pitiful floor. I know this is extremely amateurish but I wish I'd seen something similar while I was trying to work up the courage to start. Had no idea except the directions on what to do and I did just fine:)
Trustpilot
1 month ago
4 days ago