Desertcart purchases this item on your behalf and handles shipping, customs, and support to Japan.
🔥 Elevate your cooking with timeless French steel mastery!
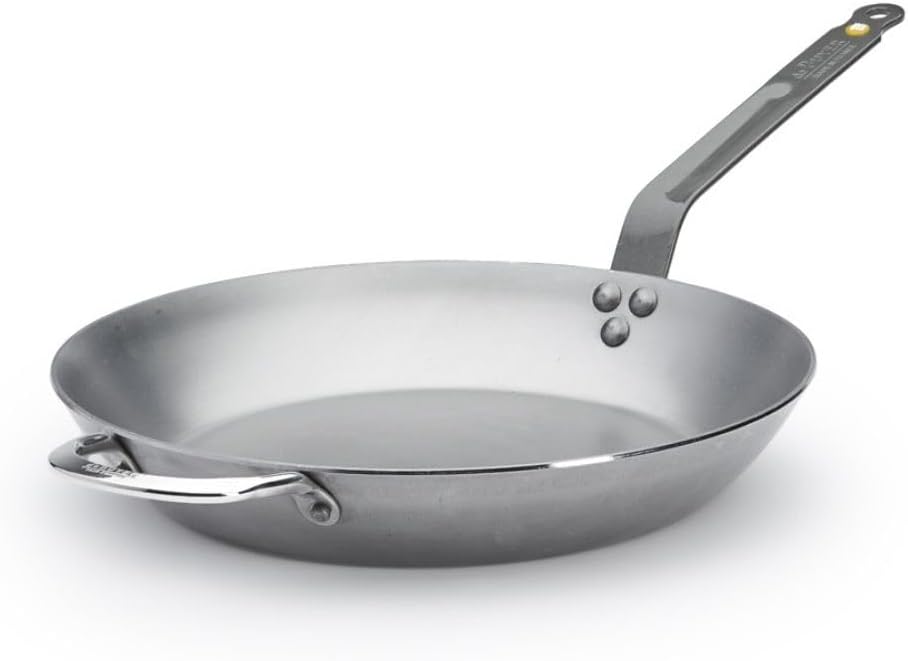
The de Buyer MINERAL B Carbon Steel Fry Pan (12.5” diameter) is a professional-grade, naturally non-stick pan made from high-quality carbon steel. Designed for superior heat responsiveness and durability, it excels at searing, sautéing, and reheating. Crafted in France since 1830, it requires seasoning to develop its non-stick surface and is oven safe up to 400°F. With a lifetime warranty and a weight that ensures stability, this pan is a must-have for serious home chefs seeking performance and longevity.


| ASIN | B00462QP1G |
| Additional Features | Non Stick, Oven Safe |
| Best Sellers Rank | #23,352 in Kitchen & Dining ( See Top 100 in Kitchen & Dining ) #39 in Woks & Stir-Fry Pans |
| Brand | de Buyer |
| Brand Name | de Buyer |
| Capacity | 2.7 liters |
| Coating Description | Washable Protective Beeswax/Natural Nonstick |
| Color | Silver |
| Compatible Devices | Smooth Surface Induction |
| Customer Reviews | 4.4 out of 5 stars 15,738 Reviews |
| Global Trade Identification Number | 03011245610326 |
| Handle Material | Carbon Steel,Stainless Steel |
| Item Type Name | Pan |
| Item Weight | 2.88 kg |
| Manufacturer | De Buyer |
| Manufacturer Part Number | 561032 |
| Manufacturer Warranty Description | Life time warranty |
| Material | Carbon Steel |
| Material Type | Carbon Steel |
| Maximum Temperature | 400 °F |
| Metal Type | Carbon Steel |
| Model Name | MINERAL B Round Carbon Steel Fry Pan 12.5-Inch |
| Model Number | 5610.32 |
| Number of Items | 1 |
| Product Care Instructions | Hand Wash Only |
| Recommended Uses For Product | Searing meat, sauteing vegetables, reheating leftovers, cooking eggs, and various meal sizes based on pan diameter |
| Shape | Round |
| Special Feature | Non Stick, Oven Safe |
| Specific Uses For Product | Searing, sauteing, reheating, cooking eggs, making pancakes, searing steaks, simmering sauces, and frying lamb chops. |
| Unit Count | 1 Count |
Z**E
7 Steps to Seasoning
First off: If you cannot lift heavy pans, don't get these. Instead, I'd opt for high-quality stainless. And if possible a stainless/copper. With that said, these are truly a lifetime investment item if they are taken care of. Once it's seasoned, you cannot cook a better pan-fried steak. One of the best pans I've used thus far, and I've owned a restaurant. There are a few suggestions for seasoning. The company's seasoning method is fine, but it's more ideal for a restaurant environment where the pan is being used multiple times a day...thereby creating a very quick seasoning layer from cooking alone. I have found though that cooking at home is different, and the maturation can take much longer. So, I want to share with you what I do to achieve the best and most successful seasoning of my Debuyer iron pans without the sticky residue or uneven seasoning. I'm certainly not the authority on seasoning, but I hope this helps. What you will need: Water, 3 potatoes washed well, flax seed oil, sponge, and a spare dry towel(s). Currently, Amazon sells cast iron flax oil - just do a search and you should find it. Otherwise, you can find flax oil in your local Whole Foods or other markets. INSTRUCTIONS: 1. Once you receive your pan, place on burner and fill nearly to the brim (leaving about 1/2" from the top) with water. 2. Next, add peels from approximately 3 potatoes. Make sure the potato is washed really well so that you don't get dirt form around the edge of the water. Let boil for 15-20 minutes. You'll notice the water beginning to darken after about 10 minutes, which is normal. This step helps remove the beeswax that is added before shipment more effectively. 3. Pour out the water. You may notice a black line where the water level was, that's also normal. Use a sponge to lightly scrub the pan under hot running water, focusing on the sides and around the rivets. You are just finishing off the beeswax that was left over after boiling. BTW: If you have dark spots from the potato peels at the bottom of your pan, no worries...it's normal and not necessary to remove completely. Towel dry and return to burner. 4. Turn your burner to high heat, and then place up to 2 tsp. of flax oil (depends on the size of your pan) in the center of your pan while it's cool. Make sure to turn on your exhaust fan if you have one. 5. Rub a very thin layer of the oil around the entire inside of the pan with a towel. Make sure to soak up any excess oil, but don't soak up all of it. This is very important, because too much oil will ruin the seasoning process. And not enough will make the process seem like its achieving nothing. Heat until it smokes oh so slightly. *Since the timing is so different from one stove to the next, I suggest you allow it to smoke slightly only as a visual to know that it has reached a hot enough temperature. *Do not leave your pan on the burner without watching it carefully. Again, allowing the oil to smoke a lot is not a good thing and can ruin the seasoning. You will notice it darkening to a dark caramel color, maybe even a reddish-brown tone, but not yet black. 6. Allow to cool. 7. Repeat steps 4-6 until your pan is nearly black (approx 5-7 layers). Finally, begin cooking! If your pan is really sticky after seasoning, you have added too much oil, the pan didn't get hot enough, or you need to repeat the process. You may have a slight stickiness after seasoning is finished, but that's fine. It's the thick residue you don't want. NOTE: Your pan may not be a perfectly even tone once you're finished, and that's okay. Just cook. It'll be fine. These pans tend to vary slightly from one to the next in terms of their finished color. The only thing you should be worried about is if there are strange smudges in the pan. If that's the case, then you may need to scrub off those smudges and start over. Because over time those smudges may flake off. It means that too much oil accumulated in those spots and caused a truly uneven seasoning layer. BAKING THE SEASONING: I do not find seasoning by baking a good idea unless you are experienced at doing it. For most that aren't it ends up failing. This can cause a lot of unnecessary frustration and wasted time. I really want people to have the easiest experience and not be discouraged, thereby switching to non-stick inferior pans for sake of ease. I also don't suggest switching oils during your seasoning process as some tips may suggest, because it's not necessary when you use flax-seed oil. You have to take into consideration that each oil will have a different burning or smoking point, therefore mixing the oils is not a good idea in my opinion. SEASONING MAINTENANCE: You can repeat one layer of seasoning after each batch of food in the first month or so, or intermittently. This will ensure a nonstick surface that is sure to last through just about anything. The more you use your pan, the more the non-stick surface becomes. Your pan should be completely matured, depending on quantity of use, within two or three years - sometimes less if you use it a lot and properly. BTW: You'll know when your pan has matured when hardly anything sticks to the pan, and you don't have to clean it with anything other than a paper towel after cooking. Sometimes you may have to use hot running water and a soft sponge if you cooked something sticky. Other than that, the pan is very low maintenance once it has matured. And as with all pans, just watch the outside of your pan making sure that it doesn't get a thick layer of buildup. This outside buildup affects the heating aspect. It can cause uneven cooking in some cases. So, just be mindful of that. You can clean the outside of your pan with Bar Keeper's Friend if necessary. ***Always remember to oil your pan after each use*** LET'S COOK! Your first batch of food should be a meat as this will speed up the maturing process. Most will start with eggs to see if the seasoning is working. This may be disappointing if you don't allow a crust to form on the eggs before flipping, so just be mindful that it may not act like T-Fal initially. And remember the seasoning hasn't fully matured yet. The maturing process takes time. However, once it's achieved your pan should be completely non stick only requiring a paper towel and maybe some hot running water to clean it up. DEEP FRYING: Deep frying food can quickly season the pan, however there is a possibility that the seasoning will begin to flake off around the middle of the sides of your pan if you deep fry often. This is caused by very high heat. If this happens, don't panic. Just take a non abrasive sponge under hot water and lightly scrub off the small bits of loosened seasoning. Then, return to the burner and add a few layers of seasoning to the exposed area to keep any rust from forming. IRON AND HEAT: Remember that iron continues to rise in temperature, thus you can easily burn your food. You will need to get to know your pan in order to find out when to adjust the heat. Regardless of what I'm cooking, I almost never set my heat to HIGH unless it's stir fry. It just doesn't drop in temperature fast enough before burning something. Also, if you add anything cold to your pan it will be stuck initially. Like I mentioned with the eggs, you should wait until it forms a nice crust in which it can be easily removed or flipped. CLEANING AND COOKING UTENSILS: Wait for several batches of food before you use a metal spatula. If you notice small scratches in your layer of seasoning after cooking from your cooking utensils...don't worry. It will darken over rather quickly and should not cause any issues. Flax oil seasoning isn't real soft, but it isn't indestructible either. So, just be graceful at first. To clean your pan do not use soap and water. The good thing about seasoning initially with flax is that the layers are very hard, and even if you happen to use soap and water, it shouldn't completely destroy your seasoning. With that said, I still do not recommend cleaning your pan with soap and water. Hot water is perfectly fine. Do not use metal scrubbers - only the basic sponges with the more gentle scrubbers is recommended. Clearly you will have times when it is necessary to be more aggressive, and that's fine. Just don't feel that you haven't seasoned your pan enough just because you have some sticking. Remember... true seasoning doesn't occur immediately. It takes time. If really stubborn food is stuck to your pan after cooking add HOT water, bring to a boil for about 30 seconds and scrub stuck particles with a wooden utensil. Dispose of the liquid, rinse and towel dry. Afterwards you'll need to place a light layer of oil in your pan and heat the pan just barely to the smoking point. It's not a good idea to boil water often as it will slow the maturing process. Additionally, one tip suggests to place course salt in the pan to sanitize it. However, this can scratch your surface rather quickly if it's the beginning stages of your seasoning, so use that tip cautiously. I really hope this helps you. Good luck, and happy cooking!
B**S
I wish I'd found this sooner.
UPDATE 7/23/2015 - I've used this pan for several years now and it's worked well. I've also learned a lot about seasoning. I now season with flax oil. I've just gotten the relatively new de Buyer omelette pan which I've reviewed here de Buyer 5611.24 Omelette Mineral B Element Fry Pan. 9.5 in and I go into my new seasoning process. I've used the 10" Mineral B pan for almost a week and have to say that it has lived up to my expectations. Thoughts on weight and design: This pan is much heavier than a similar-sized stainless steel pan and everyone I've handed it to has been surprised at the weight. However, after using it a while, it just starts to feel normal. The weight helps the pan stay fixed on the burner when you are stirring and the long, steep-angled handle actually helps in allowing you to lift the pan off the burner and let it kind of hang in your hand instead of trying to lift it up off the burner with your wrist. The steep angle of the handle also makes it possible to not have to turn handles out of the way when you have a range full of other pans. The handle rises up and over other pans where you can get to it easily. Thoughts on performance: After seasoning the pan (see my thoughts below on this) I fried some bacon and sauted some mushrooms. It worked as expected with no sticking to speak of. I then fried an egg over easy and except for one tiny bit that stuck at first, the egg slid around like it was on ice. Over the next few days I fried some pork chops, browned chicken thighs and then cooked them in the oven. I cooked some hash browns and scrambled eggs next. I was afraid that the scrambled eggs were sticking but after gently stirring them they always released from the pan. So far I'm very happy with the performance of this pan and its non-stick properties. Thoughts on seasoning: I made some mistakes in seasoning and would do things differently now. I followed the de Buyer video on youtube which recommended boiling potato peels. I don't think I put enough water in the pan and I boiled while I was cooking other things and let a lot of the water boil off which left a dark residue in the pan. I would recommend putting at least an inch of water in and only boiling for the 15 minutes that the video recommends. This process really darkened the water in the pan which I didn't expect. Some research suggested that this potato peel boiling is used to pull off the beeswax coating de Buyer applies and any other foreign particles and metal bits from the surface of the pan so that might be why the water turns so black. I couldn't rinse of the black residue so I had to use some Barkeeper's Friend to scrub it off then rinsed it in really hot water. I don't know if this is normal but after boiling the peels and cleaning I did, the surface of the pan was getting dark splotches on it. I then dried and oiled it with bacon grease and put it upside down in a 400 degree oven per adx442's review for 30 minutes. About half way through I peeked at it and could see that the oil had run and left streaks. I tried wiping them off but they had set. They did not feel sticky though, luckily, so I went ahead and seasoned a second time with coconut oil and put in the oven again for 30 more minutes. After this process the oil took on a reddish brown color and was rather streaked. I was worried that I might have to strip this and start over but after use I've had no sticking problems. I would do some things differently though. After doing some more research I've decided that as little oil as I had on the pan it was still too much and that allowed it to streak. Next time I would wipe the whole pan in oil after warming the pan and then really wipe it down taking off most of what I put on. There is still a very thin layer there that you really can't see with your eyes or feel. After cooking the meats I deglazed the pan and I'm afraid I removed a lot of the seasoning I had built up because it stripped off the reddish brown coating and took it back to the steel color. I decided that I should not have deglazed the pans so early in the life of the seasoning. Perhaps later on once a good base is formed this would not be a problem but it may be best to just use a stainless pans for meats when I want to use the fond. Thoughts on cleaning: At first I ran hot water in the pan and scrubbed it with a plastic bristle brush but again I think I was rubbing off my seasoning. Since then I've only wiped the pan out with a paper towel and some salt when some sticky spots appeared. Hot water and brush will probably be ok once a deep seasoning is established and only when necessary. Conclusion: Overall I'm very happy with the pan and carbon steel pans in general. I just bought two multiclad stainless frying pans a month or two ago and slightly regret not being aware of carbon steel pans before that purchase, however stainless steel still has its uses so they won't go to waste. I will however be replacing the non-stick pans I have been using for eggs with this de Buyer pan. While carbon steel is heavy and has a slightly more involved maintenance process, I'm very happy with it and plan to buy more pans in the future.
M**Y
I love my cast iron
When I first got this pan, I was extremely excited. I love my cast iron, and this seemed like the natural step up. So imagine my surprise when I tried to season it like cast iron, and then with the first thing I cooked, the seasoning flaked, the food stuck to the bottom, and my fingertips were bleeding and pruned from having to attack it with steel wool. Naturally I began to hate it. But not wanting to write off my expensive new purchase, I decided to do a little research. Skeptical, I seasoned it by puttting a couple cups of grapeseed oil, a few cups of salt, and a handful of potato peels in the bottom, put it on the heat, and waited for the oil to smoke. Let it cool back down slowly by reducing the heat a tiny bit every few minutes. Let it rest until it was completely cool, then poured off the weird concoction I had seasoned it with into a jug for proper disposal. Wiped it clean with a piece of cheesecloth and then set it aside for a while, not wanting a repeat of the first experience. Finally the day came when I wanted to cook crepes. Lacking a dedicated crepe pan, I pulled this behemoth from the cabinet. For good measure, I filmed it with some oil, heated it to smoking, then turned the heat down to a more appropriate crepe cooking temperature. And holy cow, best crepe cooking experience ever. Being carbon steel, the bottom doesn't warp the way aluminum non stick pans do, leaving me with perfectly flat, thin crepes. No sticking or tearing. Now this beast is my go to saute pan. It is definitely the only piece of kitchen equipment I have ever owned that will let you know immediately, and with emphasis, when you are not treating it right. If you don't film it with oil when you are done with it, it will rust. If you don't film it with oil and heat it to smoking before you cook, your food will probably stick. It looks ugly as it patinas. Acidic food will destroy your patina if it is not sufficiently well established. But if you treat it right, and give it the respect and maintenance that it is due, it will be the last and only saute pan you will ever need. It will not warp, it distributes heat evenly through its thick base, it retains heat like cast iron. Now that I know what I am doing, I can't believe I ever used anything else. For: 1. People who are passionate about cooking 2. People who have the patience to maintain it properly. All in all, this is not any more time than it takes to scrub a traditional pan, but it is different, forcing you to develop new habits around its use. 3. People who cook a lot. This thing is an investment, and will outlast just about anything else in your kitchen. Your great-grand kids will be using this pan, and will likely pass it down to their great-grand kids. Not for: 1. People who lack the time/patience to initially season it and let it develop a good patina prior to making marinara sauce 2. People who can't lift heavy things (seriously, this thing weighs probably 12 pounds) 3. People who don't cook that often. It needs regular use to really begin to shine. 4. People who want super attractive, clean looking cookware. While this thing develops its patina, it is one of the ugliest looking pans I have ever used. Now that I have used it a ton, the bottom is a handsome matte black, but the sides look, well, less than appealing.
R**O
its a fairly good pan. I envision it as a better cast ...
I give this pan a provisional 4 stars. I really have to return and change this later after I can really say if my hopes were fulfilled or not. I can say for what it is, its a fairly good pan. I envision it as a better cast Iron pan with strong non stick qualities and at this moment, its not quite there for me. I want to say that its important to really get the beeswax off before you go any further. I made the error of scrubbing it off and while it got some, it did not get all and the seasoning I began to leave was flaking off. I then scrubbed the pan with corse kosher salt and this finally did the trick, I have had no more issues with the seasoning flaking off and its becoming better and more nonstick as I go. I can fry an egg on it just fine, though you always need to use a lot of oil or fat to really make sure it is nonstick. It cleans up fairly easy. If you are familiar with cast iron pans, you never use soap, usually hot water and a scrapper do the job fine. Then warm it, cover it with oil to get it ready for next time and you are good. Usually not much sticks to mine. Its a heavy pan so if this is a dealbreaker for you, be warned. It also gets very hot. So make sure you always use a potholder when you need it. The handle generally stays fine unless I use the pan in the oven. I feel like I cannot say more about carbon steel pans because I am only a few months into my research, but generally I think the people with more experience are right, this is a very well rounded pan that offers so many advantages. I await the day when I will simply fry a steak, or possibly make an omelet with ease.
D**L
Quite possibly the worlds most perfect pan...
I had been in the hunt for a healthier alternative to my Teflon coated non-stick pans when I ran into these here on Amazon. I was rather skeptical of the non stick ability many claimed possible with the De Buyer Mineral B pans. Reading the existing reviews, it seemed that all stressed proper seasoning and in between use care. Instead of jumping on the Green Earth or Bialetti pan bandwagon, which seemed to be plagued with poor quality, I decided to read up a bit on the seasoning process. I visited a few forums, watched a few you tube videos and placed my first iron pan order. Though not directly recommended by De Buyer for this particular pan, I followed instructions to boil potato skins for 15-20 minutes before starting the seasoning process. I usually would follow the manufacturers specific instructions but the information for pre-seasoning with the potato skins came from a very respected chef on a popular forum who also fancies the De Buyer product. After the boil process I seasoned my new De Buyer pan with peanut oil using the method dictated on the De Buyer website. The process was completely painless and the pans are better than expected. It has now been several weeks since my first Mineral B fry pan purchase, the 10.2" model. I was so infatuated with the original pan that I have now purchase nearly the entire set of the Mineral B line. They are truly non-stick when seasoned properly. They cook like a dream. They heat up so quickly and when I change the heat setting on my stove they seem to adopt the new temperature much quicker than my previous pans. I had a little trouble getting used to not using soap to wash these; instead rinsing with very hot water and wiping/lightly scrubbing out as necessary. The process is just so different than what I was used to but after doing it for a while I find it easier. If you are the type of person that needs a pan to look perfectly clean and spotless, these are not for you. I say this as the interiors darken with age and they blue a bit on the outside. This keeps them from looking brand new for very long (though I think they look even better as they get more use). If you have trouble following directions or would prefer a "maintenance free" pan, this pan more than likely isn't for you either. They do require a simplified method of maintenance but require salt purifying from time to time and should be oiled after each use (again, painless but a tiny bit more work that the average Teflon pan). Also, these pans and the entire line as a whole are rather heavy. If weight is a concern, these pans are probably out of the question. If however you are looking for a healthier alternative to other non stick pans with durability to boot and don't mind a bit more time in the kitchen, these high quality pans are right up your alley. On another note, I have found my favorite amongst the Mineral B line-up. They are the De Buyer Mineral B Country Chef pans. I bought both the 9.4" ( De Buyer Mineral B Element Country Chef, 9.4" ) and the 12.6" ( De Buyer Mineral B Element Country Chef, 12.6" )versions and they are by far my most used pans of the set. They are similar to a deep wall skillet but with the volume and practicality of a saute. The smaller version works very well in place of a saucepan and the larger is perfect for stir fry dishes and meals for larger groups. Well worth looking into. Enjoy!
A**Y
Great quality for the price
After getting this pan I think I'll never go back to cast iron. This is a fantastic, high quality piece. It heats up faster than my cast iron yet also seems to retain heat for longer. It has a smooth finish yet holds seasoning super well. The handle also disperses heat better than short cast iron handles so cooking with it is easier. The handle takes a long time to get hot so in typical day-to-day use i don't need a hot pad at all. There's a ton of info on seasoning these things but let me explain how I do it. Note, this pan has an epoxy handle on it so oven seasoning is not recommended. Although honestly this method is much much faster anyway. Also, note, I find deBuyer's method doesn't really work very well. 1. After thoroughly cleaning the beeswax off, set the pan on a burner set on high. Just leave it there, no oil or anything. Watch as the pan color goes to brown then to blue and then back to gray. This could take 20 minutes or more depending on your burner output. Once this is done you have put a layer of oxide on the pan and it will never rust. This is typically how carbon steel woks are first heat treated. Pan will be VERY hot after you do that, so let it cool down for a while. 3. Once cooled a bit, put a few drops of canola oil in it, spread the oil around and buff it out with a paper towel. This should be a very light coat with barely any sheen at all on the pan. You want to nearly wipe it all out. 4. Put the pan on medium-high heat and let it start smoking. If you see beads of oil on the pan wipe them with the paper towel. Be very careful at this point as the pan is very hot. You might want tongs to hold the paper towel and you'll want a hot pad for the handle. 5. Once the pan stops smoking and looks dry, repeat the process. A few drops of oil and a thorough wipe. The pan will start smoking as soon as the fresh oil hits it. Keep wiping oil beads, and each time the pan gets dry and stops smoking, let it sit a bit on the flame and then add a tiny bit more oil. Each time you do this you'll notice the pan gets darker. That's the seasoning building up. 6. You are probably good after repeating this 3-4 times, but it's so quick that I like to repeat the steps 10-15 times. The pan gets very dark very fast. If you spend on hour on this your pan will be very nearly black. After the final coat I like to let the pan just sit there on the burner for a bit and make sure it really sets that seasoning in and dries out. 7. Once done let it cool off for a while. If you did it right the seasoning will be super smooth, dry and not sticky or oily in any way. Couple of notes: 1. I find that my "big" burner can get too hot and I know this is happening when the paper towel starts flaking and getting nearly charred right away in the hot pan. You'll need to find the right temp but it's pretty easy to gauge based on what the paper towel is doing. 2. I think the main problem with people not getting seasoning right is not getting the pan hot enough. You'll get great results with VERY light coats of oil, and waiting until the smoking stops to add more. 3. This method results in a very durable seasoning that can handle whatever you throw at it. Dish soap is not gonna phase it in any way. Just don't take steel wool or abrasive cleaners to it, and make sure you dry it on a burner if you get it wet. I like to do one round of very light oil and heating on a burner until it stops smoking (just like in the initial seasoning) every time I wash a pan like this.
A**R
It takes some time to build up a coating, but this pan is worth the wait!
Update January 2023: this is still my favorite pan. The coating has built up so that I never need to season it. It's used so much that I just leave it on the stove top. I added a new photo to show how it looks after almost 3 years of constant use. Original review 2020: I have owned this pan for a few months. It took 3 tries to receive an undamaged item: the first 2 pans arrived with sizeable dings/scratches that would have affected performance, and they had to be returned. It looked like the pans arrived from France with these defects, not like the damage occurred during shipment from the Amazon warehouse to my home, so I included this information in my product review as a measure of initial product quality. These pans arrive from the manufacturer stapled inside a thick paper bag, so Amazon would not have been able to easily check for defects on arrival. It took at least 2 months for my pan to develop a good coating. Before use, I baked the pan a couple of times (if you're worried about the silicone piece melting--it can be popped out of the handle, btw--just wrap it with a piece of foil) for about 20 minutes at 400 degrees after coating it with a thin layer of linseed oil. Part of the coating sloughed off the pan, and the things I cooked stuck to it. I wasn't deterred: I decided to use a stovetop method instead, and the results were much better. The best way I found to develop a non-stick coating on a new Mineral B pan: 1. Use the pan for things that are less likely to leave a sticky mess until the coating has built up. Steak? Yes. Fried cornmeal mush? No. The very best food I found for building up a good coating in my pan was bacon. 2. Use a generous amount of oil in the pan, and be sure the oil is near its smoke point before you add food to the pan. Following this rule of thumb will help prevent sticking that may damage the new coating. 3. Leave the pan sitting after use until it feels warm to the touch (not burning hot, not cool). 4. Wash the pan with hot running water and a SILICONE scrubber. (Look for "silicone scrubber kitchen" or "silicone sponge;" it's not the same as a silicone scrubber meant for washing your face.) When I first started using my pan, I used a "non-scratch" sponge that didn't protect my new coating at all. Silicone is much gentler. Remember, never use soap on this pan! 5. Dry the pan with a paper towel (it will leave a residue on reusable towels). 6. Immediately coat the pan with a THIN layer of linseed oil. I usually take the paper towel I dried the pan with and apply the oil, then I gently rub the oil onto the inside of the pan. (Whenever I try to pour a little oil directly into the pan, I end up using too much.) It doesn't take much oil to properly coat the pan, probably only 1/4 tsp or so. 7. Heat the pan on the stovetop until the oil smokes. (You might want to turn on the vent fan.) When the oil is smoking, turn off the burner and leave the pan to sit until it is cool to the touch, and then store the pan for the next use. I know it seems like a lot of steps, but once the pan starts to build up a nonstick coating, it will be worth the hassle. This is a wonderful pan; it performs as well as the 90-year-old cast iron pan passed down to me from my grandmother. There is a plastic-type clear coating on the handle, which other reviewers have mentioned. I haven't had any problems with it. (If you're worried about it melting under a broiler, just wrap the handle in foil. Aluminum foil is a great insulator!) The handle stays cool on the stovetop, unlike my grandmother's cast iron pan, which was a pleasant surprise. Overall, I think this pan is an excellent value. I've paid almost this much for nonstick pans that lost their coating integrity in only a few months despite babying them in every possible way (using plastic implements only, never letting other pans touch the coating, etc). I'm very excited to have a pan that will hopefully last a lifetime with proper care. I've been thinking about buying another one. :)
W**S
DeBuyer Mineral B Element fry pan
I have five DeBuyer mineral B pans and will have a sixth when the new omelette pan is available in the US. I love them all. As noted, they are made of stamped iron (not steel) just under an eighth of an inch thick. They heat nicely and hold heat reasonably well. As you might expect, they are somewhat heavy – not as heavy as a comparable cast iron pan but noticeably heavier than an All Clad stainless and aluminum tri-ply. I just consider them part of a physical fitness routine, though if you have arthritis you may want something else. The 7.9 inch pan, though I use it a lot, is perhaps a bit too small. The rim is indeed about eight inches, but the inside flat is just a bit over five. It’s slightly awkward to get a turner under, say, an egg – an easy task in the 10 inch pan. Being iron, they will rust prior to seasoning, so you will need to take care to oil them lightly as soon as you remove the protective beeswax. They are indeed lovely when they’re clean iron, but they cook a lot better when they’re black. Online you will find quite a lot of conflicting advice about seasoning them, and to each his own. But stove top seasoning methods did not work for me, perhaps because it’s impossible to get the sides of the pan and the bottom of the pan to the same temperature at the same time on the stove top. What did work is seasoning the pan upside down in the oven over a foil-covered sheet pan to catch any drips. I had better luck with Crisco than with liquid oils. Either way, the seasoning coat should be thin, thin, thin. My initial procedure is to pre-heat a clean new pan for an hour at 375, then remove it and give it a thin coat of shortening. Back to the oven for an hour at 400; out for a second thin coat; in for an hour at 425; out for a third thin coat; in for an hour at 450. Allow it to cool in the oven. You will probably need a second round (skipping the pre-heating), though I find it useful to cook something in the pan first. Subsequently, an hour at 450 is an adequate touch up when you think you need it – as, for example, when you’ve deglazed the pan with red wine after browning some meat. Once seasoned, they are virtually non-stick – not as non-stick as a Scanpan (at least not yet) but good enough that you can easily loosen a fried egg without tearing it or having parts of it stuck on the pan. Actually that slight adhesion can be useful if you fry an egg by tilting the pan once the egg is set and spooning oil over it to cook the yolk. As a final note: in my experience, iron pans are not a good choice for any tomato-based sauce. Go for stainless steel.
N**Z
Excelente producto
Es un buen producto, funciona bien ya realizando el curado correspondiente, aproximadamente en 15 días o menos según el uso, funciona muy bien, si son pacientes el sartén se convertirá en su mejor aliado en la cocina
O**V
Really good!
I'm so happy with this little pan! It's off a superb quality. But you need to be aware that it needs to be properly "seasoned" to be non-stick. It took me a while to build up enough of good seasoning layer, but now the pan is so non-stick that eggs are rolling around freely on it when cooking. No more need for a Teflon nonsense, which is quite frankly a scam. Just watch some YouTube videos about how to season and use a carbon steel pan and it will last you a lifetime. And you will pass it onto you children.
M**M
IH使用でも
もうテフロンのフライパンの剥がれてきたテフロンにイライラするのも、 何度も何度も買い換えるのも、やめたいなと思い鉄製のフライパンを購入。 しっかりオリーブオイルを熱したフライパンで焼くと、目玉焼きですら美味しく感じます。 パンケーキの焼き色も美しいし、大満足。 だんだん色が濃くなっていくのも、愛着が湧いてきていいですね。 もっと早く買っておけばよかった。 フライパンが暑くなる前に材料を入れてしまった時や、 しっかり焦げ目のつくまで待てずに、肉を動かしてしまった時や、 油を控えめにしすぎた時は、焦げたりくっつく事もあります。 鶏の皮などは、剥がれるようになるまで放っておくことが大事なようです。 焦げてくっついた時は、焦げ跡をしっかり、気になる部分はスチールたわしで落とします。 それからきちんと熱で乾かして、油をなじませておけば元通り。 普段は乾かした後に油を塗ったりもしていませんが、焦げた後だけは塗るようにしています。 あと、熱が回りすぎるためIHでは強火ではなく中火までしか使えませんので注意が必要です。 ハンドルも特に熱くならないし、カバーは不要です。 ただひとつ問題は26cmでも片手で持って傾けて皿に移すような事ができない程重いという事。 男性なら問題ないと思いますが、女性だと難しい。 20cmサイズのものも買おうかと思いますが、 二人分の調理で、卵2つとベーコンや野菜を一緒に焼くには26cmがちょうどいい。 重さは如何ともしがたいですが、年とともに衰える筋力に抗って、長く使い続けたいと思います。
M**L
Excelente sartén
Después de 6 meses de uso ocasional, puedo decir que por fin aprendí a cocinar con esta sartén. Sin duda, cuando no tienes experiencia, piensas que no sirve porque todo se pega, pero es un proceso de prueba y error. No se rindan, vale la pena. En esta ocasión estoy cocinando con una pequeña cantidad de aceite de oliva extra virgen, a una temperatura baja para que el aceite nunca llegue a quemarse. Aprende a usarlo y será tu sartén favorita.
T**Z
Season your pan
Przeczytaj instrukcje przed pierwszym użyciem!
Trustpilot
2 weeks ago
1 month ago