ECCPP A/C Compressor Clutch Kit fit for 2002-2006 Honda CR-V EX Sport Utility CO 10663AC Car Air AC Compressors
Product ID: 246323583
🔧Complete 3-part kit
⚙️Precision OEM fit
🛡️Durable clutch protection
❄️ Stay cool, drive confident — the clutch kit your Honda CR-V deserves!
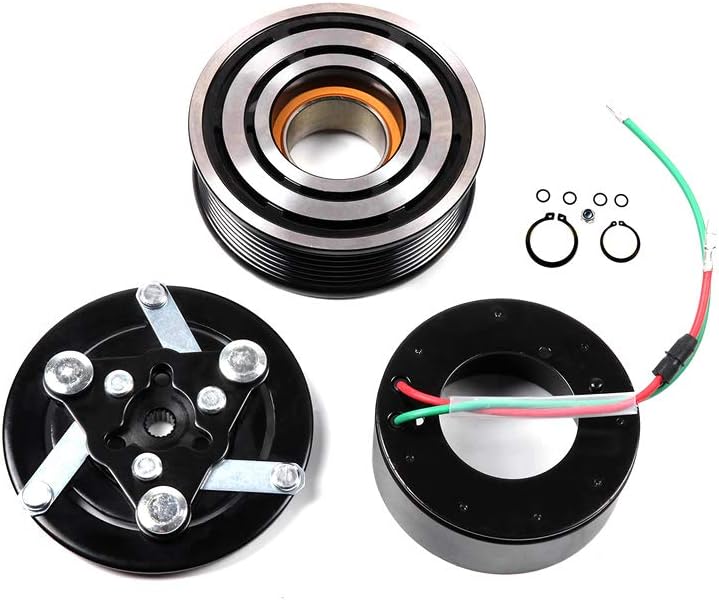
The ECCPP A/C Compressor Clutch Kit is a precision-engineered replacement part designed for 2002-2006 Honda CR-V models. This comprehensive kit includes a pulley with bearing, front plate, and electromagnetic coil, all built to meet or exceed OEM standards. It protects your AC compressor from overload, ensuring reliable air conditioning performance and longevity. Backed by a 1-year warranty and positive user reviews, it’s the smart upgrade for maintaining your vehicle’s climate control system.


| ASIN | B07KXRV86P |
| Brand | ECCPP |
| Customer Reviews | 4.1 4.1 out of 5 stars (16) |
| Date First Available | 28 Nov. 2018 |
| Item Weight | 1.8 kg |
| Item model number | 104174-5211-1746182311 |
| Manufacturer | ECCPP |
| Manufacturer part number | 104174-5211-1746182311 |
| OEM Part Number | 57881,58881,1522110,38810PNB006,38870PNB006,0857,10345240,10349721,3016381,638951,2041612,100065,5511495,6511495,7511495,254041NA,ACP1404000S,255467,274477,TEM255467,TEM274477,2011242,2011242AM,2011242R,2012087,140092,140092C,140092NC,140092NEW,7420642,2555,2555N,CP17741,0610078,C575,C575R,ACC0092 |
| Product Dimensions | 15.01 x 13.49 x 5.99 cm; 1.8 kg |
E**I
Todo excelente
J**.
supera mis espectativas es un producto buenisimo
2**E
- this is what I did with this kit and the repair was a success. I spent a lot of time researching options including even purchasing a new compressor. But after I learned this repair can be performed with the vehicle on the ground and without removing the compressor I was intrigued. (And very much looking to save some $) The kit I received came with two snap rings and two washers/spacers and a nut. On my CRV the clutch came off no problem. (You can use a deep socket on the frame to counter hold the clutch while you loosen the 12 mm nut.👍🏽) Remove the clutch plate and the little washer / spacer behind it (save this washer for Reuse). Then remove the first snap ring (use snap ring pliers to avoid damaging it as I reused both circlips as the AM ones seam too thick) (a cheap but decent snap ring plier set sold on Amazon ((LFSEMINI snap ring pliers set 4 pcs 7” internal/ external Circlip Pliers Kit)) (I used the bent pliers I think for first one and straight for the second one) I also peeled back the right front inner fender liner and turned the wheels all the way to the right. I removed the lower splash shirelds across front lower bumper and below engine. I removed plastic trim behind the grill as well as the grill. (Multiple of the plastic rivits will break upon touching them - a decent kit for replacements (good to have if your going to be working on cars in general ) is (SunplusTrade 240 pcs bumper car clips plastic rivits fasteners push retainer kit) Remove the condenser fan / coolant bottle. Remove top mount brackets for radiator and now the radiator a fold forward slightly. This will give you room to undo the wiring connectors on top of the compressor for the clutch coil. Once first snap ring was removed, I was an able to tap off the old pulley only to find it banging into the body and won’t clear the shaft to be removed. Don’t be discouraged You can remove the four mounting bolts and then slide the compressor assembly around to away from the body to provide clearance to swap the pulley parts. Then removed the second snap ring for the coil. Then removed coil. The AM coil from this kit tested at 3.1 ohms (the factory one tested 3 ohms). ((The old one tested open. 🙃) The AM coil installed and fit well. I had to reuse the old snap rings as I said the new ones proved to be too thick to fit to get into the groove. I couldn’t get the new pulley on and didnt want to damage something by forcing it only to realize just tapping the old pulley back on basically seamed just as time consuming and tedious. (Note if I was doing this again knowing the old pulley is super tight too I would just go ahead and use the new pulley / bearing ) you can use a small block of Wood to tap the pulley back on whichever one you decide to use. I then re installed the (ONLY) the one original washer and new clutch plate. Re installed everything and pressed the button. AC is back! Good luck ! Note. At first I thought this clutch was a bit louder than stock but after driving around I think it’s fine and similar or the same noise level. Lastly, if this thing fails in a manner that I think is prematurely I will for sure update this to advise maybe about using another kit. But so far if you have some time, this is a good cheap option for new parts. Good luck!
A**N
It worked great getting off the old one is a pain in car but doable. Must open up the ground wire a bit I just sniped the o and made it a u. Also when removing the old one keep that washer as you need three washers before the final part (clutch) goes on to have enough space. Then worked beautifully! Remove coolant overflow and rad fan. Hammer old one out with a screw diver from front of car.
Trustpilot
2 weeks ago
2 months ago