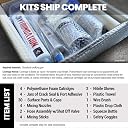
๐ ๏ธ Seal cracks, stop leaks, and block radonโDIY like a pro!
RadonSeal Complete DIY Foundation Crack Repair Kit offers a drill-free, easy-to-use urethane injection system that permanently seals hairline cracks in concrete basement walls. Designed for interior application, it prevents water leaks and blocks radon and soil gases, saving costly excavation and professional fees. The kit includes all necessary components and cures fully in 24 hours, providing a waterproof, expanding closed-cell foam seal that protects your homeโs foundation with a proven, long-lasting solution.


| ASIN | B00II7JOHM |
| Best Sellers Rank | #125,241 in Tools & Home Improvement ( See Top 100 in Tools & Home Improvement ) #380 in Wall Surface Repair Products |
| Brand | RadonSeal |
| Brand Name | RadonSeal |
| Color | Grey |
| Customer Reviews | 4.6 out of 5 stars 189 Reviews |
| Full Cure Time | 24 hours |
| Included Components | Surface Sealer, Injection Foam, Ports, Accessories |
| Item Form | Expanding CLosed-Cell Foam |
| Manufacturer | Novion |
| Material Type | Polyurethane |
| Maximum Gap Fill | 0.5 inches |
| Model | 303 |
| Number of Items | 1 |
| Part Number | 303 |
| Surface Recommendation | Poured Concrete Walls, Leaking Form Ties, Cove Joints |
| UPC | 856255006607 |
| Unit Count | 1 Count |
| Water Resistance Level | Waterproof |
B**F
Relatively easy, permanent fix
This is a great product. If youโre reasonably handy you can DIY it. I repaired two cracks and the results are perfect. No more leaks after heavy rains, freeze/thaw cycles and melting snow. Some tips that helped me: read the instructions several times and watch videos. Then read the instructions and watch more videos. Seriously. This is a permanent fix. Get it right the first time or you could create a permanent mess. Mix the epoxy in small batches. It sets up quick. It also stinks until it cures, so use ventilation. If the crack goes all the way through the foundation to the outside, cover the crack on the outside (above ground) with epoxy or hydraulic cement. This will prevent the polyurethane from leaking out and making a mess. Inject water into all the ports before you start injecting the polyurethane. This ensures the ports are open and the crack is contiguous, and provides water for the polyurethane to react with. Place the pinch valve close to the end of the hose (close to where it connects with the port on the wall). This cuts down on leaks and messes when you change ports. Inject the resin SLOWLY. It doesn't set up real fast, you have time. Watch the next port carefully while injecting. You may see water getting pushed out, or the resin filling the crack before it starts leaking out. Don't place the last port at the very top of the crack and don't completely cover the top of the crack. The resin needs some room to expand. I was surprised that this was something you could DIY. Much cheaper to do it this way and you get a permanent fix. The kit has everything you need. If you need more materials, like an extra tube of resin, you can buy those separately as needed.
W**K
Works really well, but beware of the smell and mix in small batches.
This stuff really works! Stopped leaky basement cracks that were leaking for years. My only suggestion is to mix up small batches of the epoxy at a time. This stuff hardens very quickly and is difficult to work with. I mixed up too much at a time and it hardened on me. Thankfully I had just barely enough to finish the job. The smell is really strong as well, so try to get some ventilation going. But once it was done, itโs solid, stopped all the leaks and seems like it will hold forever. Saved me thousands in waterproofing th basement.
T**M
Awesome Stuff!
This product works amazing and the materials are very high end. I do have to say I am a pretty handy do it yourselfer and this was a time consuming moderately difficult task. I learned why the pros charge so much! My project was a big task however so I bought (1) 20 ft kit and (1) 10ft kit. I had 30 feet of crack to cover with vertical and horizontal cracks on an old foundation with previous old attempts to repair. Watch the youtube video and read the instructions carefully. The mixed epoxy sets up in like 5 โ 10 minutes so mix small amounts. Also the epoxy stinks. One of the jars smelled like sulfur so if you are sensitive you will want to wear a p100 or better mask. I had a window open with a fan blowing out so I had fresh air flowing. The kit does come with safety glasses and 2 pairs of gloves but I wore a more comfortable pair of safety glasses and working with the product I did get splash on them. Also have extra pairs of gloves and mixing trays ready and take the time to make sure your epoxy is spread perfect. I had everything on a covered table ready to go in sequence so I could be efficient. When filling the ports with foam - Pin holes would make the foam come out and it made it more time consuming to make sure I got the crack filled. The foam tube does seem to stop about 3/4 of the way in so it doesn't finish a tube like a caulking tube normally would. I still had enough for my project though. Clean up was easy but the epoxy breaks into sharp shards when removing the ports so have a vacuum ready and wear your safety equipment!
A**R
Good Product & Be Patient
Overall, the product seemed to work well. One box came with all items included. Another was missing a wire brush, a putty knife for applying the epoxy, and a plastic sheet for catching overflow. I recommend wearing a mask because the epoxy has a bit of a stench, You may want to wear two pairs of nitrile gloves. Do make sure you take a wire brush and scuff your surfaces well so the ports adhere. Follow the advice to soak the tubes in hot tap water for 20 minutes. Seems to be a strong product. Have lots of scrap cardboard available for mixing epoxy, wear clothes you are willing to trash, and donโt mix too much epoxy at one because they arenโt joking when theyvsay it quickly hardens.
R**G
First time user, ordered double-kit for 2 cracks, Radonseal rocks!
I order the double kit in order to repair 2 separate cracks. Need: - Radonseal Kit - Plastic drop cloth - At least 10 mixing sticks (HD paint department has 6 in. wooden Paint Stick for 1 qt. (30-Pack)) - Roll of paper towels - Wire brush on Makita drill (or manual wirebrush is fine also, comes with Radonseal kit) - Old rags - Pencils - Bucket of hot water to warm up injection foam (20 min prior to injection) - Stack of Paper Plates (for mixing Epoxy, 3 mixes per plate) - Garden sprayer (to flush ports with water) - Box of gloves (always wear 2 sets at a time, keep bottom layer and switch top layer) - Mask - Goggles (comes with Radonseal kit) - A few old towels Preparation: - Check for caulk tube fitment in your caulking gun before opening tube - Tubes will only compress half its length, due to having 2 chambers - Measure and Mark with Pencil port placement areas (6" apart, not 8") - A dollop is roughly a 5/8" round blob - Use paper plates for mixing - about 3 triangular mixing areas around each plate - Spread plastic under crack work areas Epoxy Steps (the more difficult and tedious of the tasks): - Use separate sticks for A and B Epoxy containers when scooping a dollop on paper plate - Use 3rd stick to mix the A and B dollops together, then also use this stick to apply Epoxy. - Be thorough when putting Exoxy around the port rims (but not in center) - Work quickly to put the Epoxy around the port rim - After pressing a port to the premarked wall, smooth out excess around outside of rim with same mixing stick. - Use up rest of 2-dollop mixture for next port(s). I backbuttered the rim of around 3 ports per 2-dollop mixture. - Always work from lower ports to upper - After placing ports, start from bottom when covering the crack with Epoxy. You don't want to go too wide with crack coverage, you have to judge how much of A and B mixture to use up, relative to the length of the entire crack. - When covering cracks between and around ports, you can scoop slightly bigger dollops - try to evenly scoop the same amount of A and B. - Don't force Epoxy into crack, just paste it over surface and around outside of ports Irrigation Steps (easiest of the tasks): - Have old towels positioned under the lowest port of crack(s) - Wait until Epoxy is fingernail-hard before irrigating - TIP: I used a drill bit smaller than the port diameter to check each port to ensure that there was no buildup of epoxy blocking the center of the port to the wall. You can tell when the drill bit is hitting the cement wall based on depth and also feel of hitting cement versus epoxy. - Using garden sprayer with water, put water into topmost port and confirm that it comes out of all the lower ports. - TIP: Use the port stoppers once water comes out to ensure all ports have water coverage - The idea here is to ensure the crack is wet and that in general most or all of the ports are showing they can leak out water (if water passes through the ports, the resin will also pass through the ports). Resin Steps (the more fun of the tasks, but is also a bit messy - double gloves again): - You should be heating up resin tubes in warm/hot water 20 minutes before dispensing. - Ensure you don't lose the "restrictors" when you open the plastic bag for the tubes. - Put tube into caulking gun before taking off the blue cap and stopper (it may be easier to attach the restrictor and host after the tube is in the gun). - Add restrictor to top of tube, then screw on hose and mixing tip. - Wide end of flexible hose goes over caulking gun tip, smaller end over ports - Use the same flexible hose when switching resin tubes to save the resin in the hose. - Go easy on caulking gun trigger, slowly dispense resin, pausing at times (while foam seeps and expands a bit) - TIP: You can see your dispensing rate (should be slow) by watching the tiny air bubbles flowing through the hose. - Continue dispensing into a port until it oozes out of next higher port, then switch to that port and put a stopper on port just completed. - Repeat until all resin is dispensed from bottom port to topmost port and you can see resin coming out the top of the crack. The foam will keep expanding, even for days after the repair. I found that even with a drenching 2" rainfall a mere 12 hours after repairing both cracks the product still worked flawlessly!
G**S
Concrete wall crack filler to stop leaks.
Ordered to stop leaks in my basement with 10 inch thick poured concrete walls that leaked every rain storm. I cleaned out the crack of loose particles and followed the directions resulting in no leaks after several hard rains. I would recommend this product for vertical cracks, not for use in horizontal cracks.
S**R
Why Hire a Pro?
Walking into my basement one day I saw a bunch of water on the floor ruining all the "treasures" I had stored down there. Removing the insulation blanket, I noted a 1/4" wide crack running from the floor all the way to the base plate. Water pouring in, I panicked. A web search indicated I could expect to pay close to $1000 or more to have a professional repair the crack. Living paycheck to paycheck, I could never afford that kind of bill. I began to despair but continued researching. I then found an article about DYI foundation repair kits. They sounded like what I needed. Further research indicated it was something I could handle. For less than $200 I could buy the materials myself and conduct the repair. Reviews for the RadonSeal were overall good. A common theme seemed to be to make sure to do a good prep for the work. The negative reviews I read leaned towards poor prep work. I can say that by reading the directions a few times to make sure I was clear on what to do, I was successful. My leak is repaired and has been going strong for over 2 years. That said - FOLLOW THE DIRECTIONS! Do the prep work as instructed and you will be successful. I recommend this product unconditionally, The kit contains everything you need to complete the repair, even gloves and googles. I cannot stress enough - follow the directions. You are working with epoxies that have a finite setting time and require diligence. If you putz around, you may end up working past the set time and the product will become difficult or impossible to use. That said, I made sure I understood the directions and had everything laid out where I could easily reach it. Not a difficult job.
M**N
Really good with a few minor 'buts'
Product appears to be doing what it is supposed to despite some obvious user issues during my 'install'. Suggestions: use the gloves, it can get messy fast; take your time; press the gun slowly; double and triple check your fitting seals. My order was missing a few things but I made it work. Order comes as two boxes. One box had 15 fittings, the other only 12. One box had a wire brush the other did not. One had gloves and the drop cloth the other did not. And no, not all missing items were the same box. I made it work but it might be an issue for some. The two-part dries way fast so do what the videos say and only mix a small part. And the gloves, well, despite thinking I could do a clean job I have grey epoxy residue distributed across both hands post mineral spirit rub down. I'll see if it works soon enough. Have had 4 inches of rain overnight so ... 17 Aug Update: Have had a number of really, REALLY heavy rains that have saturated the entire area and the walls are dry. Perfectly dry. Have to admit I am surprised. Happily!
Trustpilot
1 week ago
2 weeks ago