


♻️ Turn waste into garden gold—faster, smarter, and hands-free!
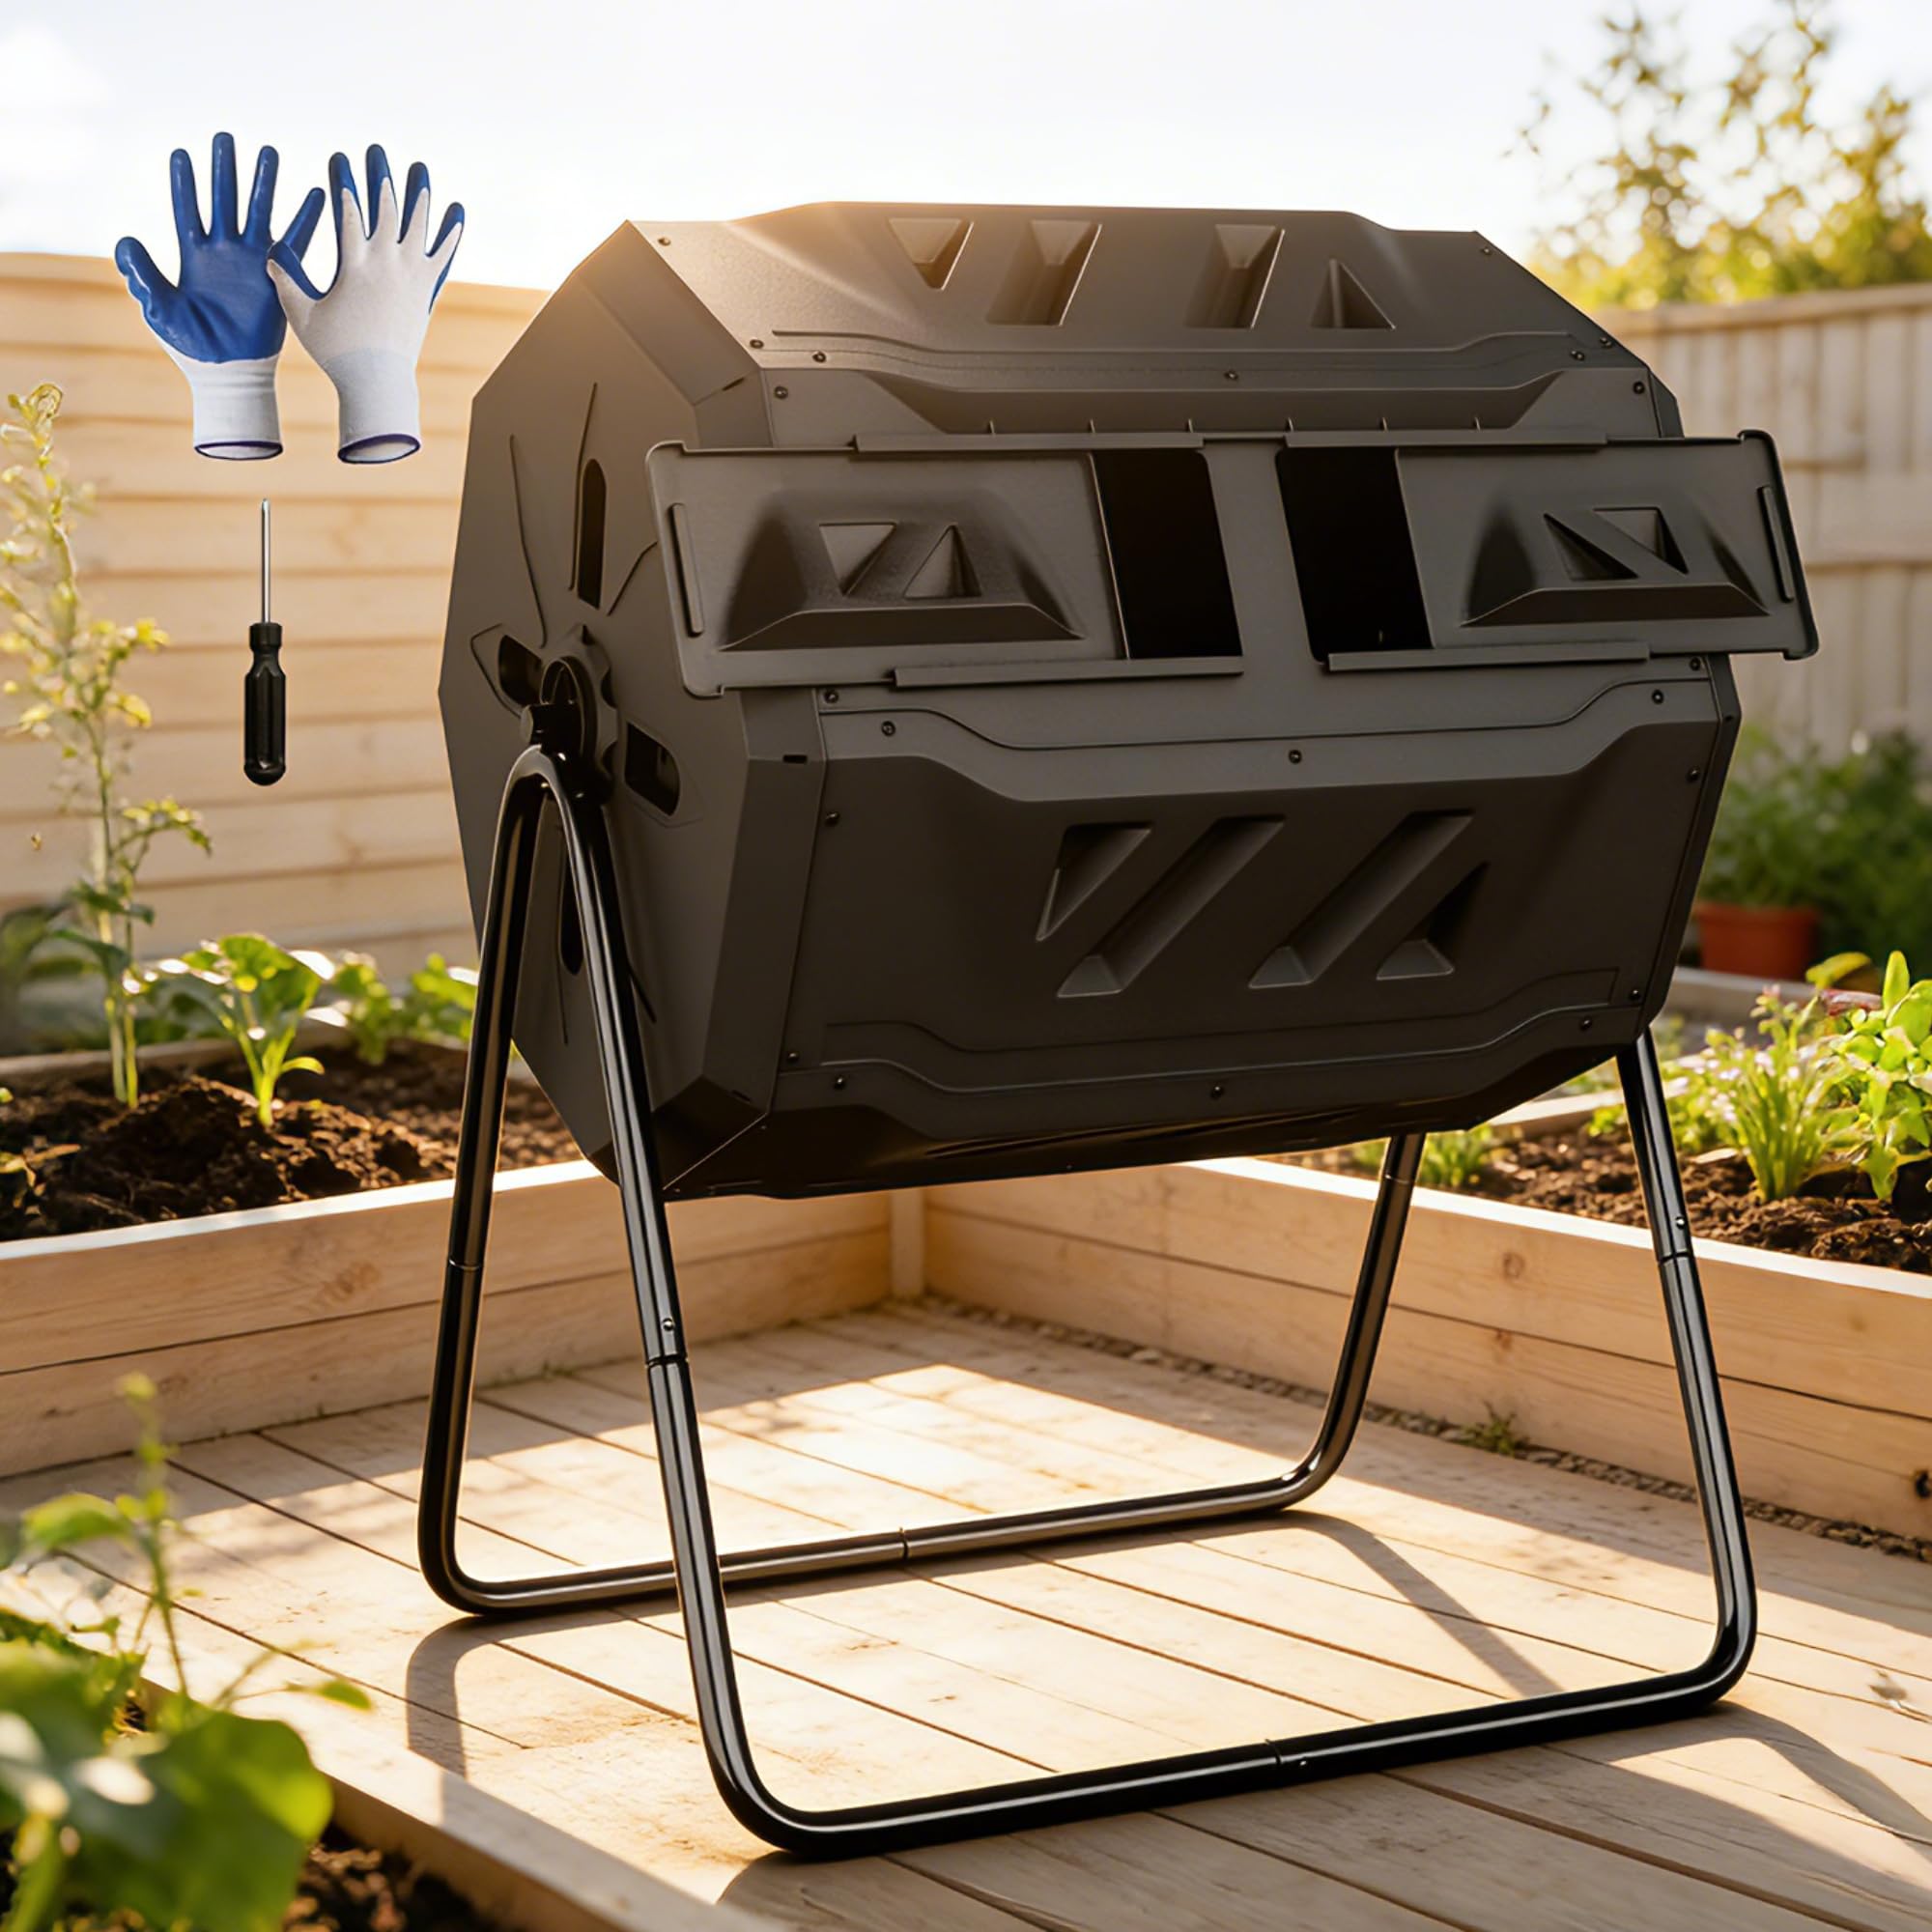
The F2C 43-Gallon Dual Chamber Compost Bin combines durable powder-coated steel and BPA-free PP materials to deliver a weather-resistant, stable composting solution. Its innovative dual chambers enable continuous composting cycles, while the aeration system with deep fins ensures optimal oxygen flow for rapid decomposition. Designed for easy assembly and daily use, this compact tumbler absorbs sunlight to accelerate composting, making it ideal for millennial urban gardeners seeking sustainable, efficient waste recycling.


| Best Sellers Rank | #27,604 in Patio, Lawn & Garden ( See Top 100 in Patio, Lawn & Garden ) #22 in Outdoor Composting Bins |
| Brand | F2C |
| Capacity | 43 Gallons |
| Color | Black |
| Customer Reviews | 4.4 out of 5 stars 2,531 Reviews |
| Material | ['PP', 'powder-coated steel'] |
| Product Dimensions | 28.5"L x 25"W x 37"H |
| Shape | Cylindrical |
S**P
Sturdy, working away and a great value!
Ok, I read reviews, lots of them. I was totally new to this type of composting - and there are a couple existing reviews for this product that answer in amazing detail any specific questions I had (thank you!) so I'm not going to re-invent that wheel, although I recommend scanning reviews if you are puzzled. What I DO want to do is reassure you this is really NOT DIFFICULT to put together although I saw that stated over and over. What it definitely is, is tedious. Boring. Because it's almost solely installing screws. There's a lot(!) of screws and you really need every single one installed. With long pieces, it's also unwieldy at a few points but it was still completely do-able alone for this sliding into elderly woman. I have no attention span at all, but despite that I still had it assembled in about an hour. I recommend a careful final spin to locate the screws that got missed the first time. I also was happy I assembled it inside on carpet, dropped screws didn't bounce away or get buried immediately. I needed all but one of the intimidating bagful. This seems very durable, it's shrugging off high desert sun and winter with equal ease. It remains easy to spin, easy of course being relative to loaded weight. What I mean is the rotation points have remained fluid under all conditions and the design offers plenty of points to grip for rotation even when it's heavily loaded. Another 'negative' I saw a lot was the size of the openings. When I saw it disassembled it's clear that they are as big as possible relative to the design size and structural strength. Bigger openings would have to be a bigger barrel and this is a great size for myself and my husband. When I need compost, it's either a handful or two - or a lot at once. These openings are great for handfuls, and the frame is wide enough that I slide a small plastic concrete tub under the bin and let gravity empty a whole batch at once. Easy as can be, I love this composter. Since I've never done this there was definitely a learning curve, in my case the seasonal ratios for brown/green matter vary hugely. Hang in there if you're frustrated and keep experimenting because good compost is a glorious, glorious thing for a gardener and this will deliver.
T**.
Looks good but assembly is a nightmare
It’s pretty cut and dry how to put it together but it’s a real hassle on assembly. The instructions are simple but it fits together poorly and a lot of pieces have to be forced into place. It’s well priced and sturdy. Only gripe is the assembly was a pain in the neck. If you don’t have a power screw driver, I would never.
A**R
Reviews were misleading so let me give mine
This was *not* difficult to put together. At all. I thought it would take two people to put it together because so many reviews said that, but I went at it alone anyway. For reference, I’m 5’5”, 110lbs., with no upper-body strength and I had absolutely no problem putting it together by myself. The directions were fine. Every part fit perfectly. I did not need another person. I did not need additional tools. I did not need long arms to manage it. I have no idea why people are having difficulty with this. It’s a little tedious because it requires a lot of bolts but it’s not difficult. As for the composter itself, it’s exactly what I was looking for. It’s a decent size, sturdy, and spins effortlessly. I saw someone complain that water leaks out of it but that’s a feature, not a bug. Compost needs oxygen. Without holes, it wouldn’t work. It also arrived shockingly fast. Faster than anything else I’d ordered that day. While this feels unnecessary, here are some tips for putting it together: - If the holes don’t line up, turn the piece around. (This applies to anything you’re putting together.) - The panels are held together with nuts and bolts. Push the bolt through, screw the nut on the other side to secure it. To tighten it, hold the nut and use the screwdriver they provided to tighten. - In the hardware packet, there are two long bolts. Take them out and set them aside. All the little bolts go with the nuts with the flat textured edge, which is most of them, but there are two nuts that go with the long bolts and they *don’t* have the flat edge. If you’re screwing it together and the nut feels weird, it probably belongs to the long bolt. - The edge of the last panel fits under the rim of the first panel, not over it. This is pretty intuitive, but I’m mentioning this in case it isn’t. - The only part that felt semi-tricky was the final one, when you set the composter onto the stand. Push the long bolts through the holes in the center pole, lift it up (it’s light), position the composter over the stand, and guide it so the bolts catch the holes in the stand. Then adjust until the bolts slide through and screw on the nuts. I don’t usually write reviews but I feel like someone needs to mention that it’s actually pretty straightforward to put together. And it’s also an awesome product. I’m buying another one right now.
L**E
Great product, kind of difficult to assemble
I bought and assembled and finally placed this little composter in my backyard exactly 18 days ago. I am still working on the right side to develop compost, but it is working fine. Before this rotating composter, I had a couple of large bins for just dumping stuff into from the top and then, after a year or so, scooping compost from the bottom. This one can rotate, which helps speed up composting. And, it is not as small as the other big one that I had thought at first. It has two separate chambers. I had to watch some videos to help explain it to me, because I've never had one of these before. You build a compost pile in one chamber, and when it is full, you begin to build compost in the other chamber. The idea is that one side will be full but not completely composted yet. So, you start adding green material to the other side to start building that side up. I'm not sure yet about the time sequence, but the idea is to fill up one chamber in about a month. It is not fully composted yet, and so you start to fill the other chamber, and the original one keeps on composting. So, the new chamber takes, say, another month to fill, and by this time the other chamber has been composting for another month. They have mentioned about 3 months for getting total decomposition and composting. I have yet to see it. If that is true, then a proper rotation would be 1.5 months on one side and then 1.5 months on the other side. Then, the original side should be composted completely. Assembly took me all night on this one. It has something like 85 nuts and bolts. I'm used to maybe 5 or 10 nuts and bolts to attach, but 85! And, it's kind of hard to feel your way on the inside to match the bolt to the nut. You have to do it by feel only because it is inside and there's no way to see inside there. Also, I finished it and then realized that I had done something wrong because the last panel didn't fit right. I looked at the instructions, and they mentioned that about halfway you have to do something special. So, I had to unscrew about 40 nuts and bolts and go back to that halfway point. I can't remember exactly. I think it was something to do with the final installation of the panel in the center. I tried just taking off one panel at a time and seeing it it would fit in there, but it would not. The instructions are right. You have to install it after the 4th panel (there are about 8 I think). So, that was the only mishap in my assembly. After taking off those panels, I inserted the center panel and reassembled the other panels, which by that time I had become a master. I like to take a lot of breaks in between working, but it took me several hours overall to complete this assembly. We cook a lot here, and we have lots of compostable material that I have been tired of wasting by just throwing it into the garbage can. So now, in the past 2 and a half weeks, I have added probably 10 pounds of compostable material like banana peelings, egg shells, and such. My problem has been finding the "brown" stuff to add to the "green" stuff. I started with old cardboard boxes and cutting them up, and paper. But, I recently acquired a bunch of old leaves. The mixture is supposed to be 2 to 1, two parts brown to one part green. The right side is still only less than half full. So, I guess that's about right on time. If it goes according to plan, the right side should be full after about 6 weeks. I will dutifully report back here in the next coming weeks and months to register my further review of this great little composter. Oh, I forgot to mention, it has the two chambers with slide-outs that are marked. One has the plus sign on it to show which side is being fed, in case you are too stupid to remember from yesterday. Anyway, it is a plus for this composter.
C**N
Amazing value compared to similar units my local store. Be prepared for ~hr+ of assembly time.
Definitely well assembled because I assembled it! Jokes aside, this unit was a bit of a bear to build but ultimately took me 54 minutes and change to assemble once the box was opened. Not bad, but that time didn’t include the time looming for a more comfortable screwdriver and small socket wrench to attack the dozens of screws needed to be threaded down. Assembly was not hard but was a bit tedious on the last dozen or so nuts and bolts. You can definitely do this without much mechanical aptitude even with the minimal assembly instructions. If you’d rather not assemble these and go with the snap together kits out there then good on yah. We’re new to the composting barrel game again after using on ground piles but we opted for something to keep a little closer to the house recently and on ground just wasn’t gonna work for us with this want of ours. We’ve had it filling up for a week or so now and the kitchen waste material and shredder paper mix is already breaking down wonderfully!!! And somehow those pesky little flys pupae are already in there too! Wierd because the compost is warm every time we feed it and we haven’t noted a bunch of flys lately!!! The world is a wonder! Rotating the drum is kinda fun too as is watering it and then rotating and looking at it again. Who knew watching dirt could be so enjoyable. All (bad) jokes aside, this compost bin is a great value at the time we picked it up but the price seems to fluctuate significantly. I should note though that the local farm store sells these double drum u its but with smaller capacity for more than 2x what this units seems to sell for so that’s a big win.
"**"
A fit and finish challenge that makes IKEA instructions & assembly look like precision engineering.
My wife got this Composting Barrel as a holiday gift. She finally talked me into putting it together today. The process was a little frustrating even though I am an experienced DIY-er/Maker. You should expect to take some time to assemble it right. This Compost Barrel Kit requires long arms, a decent tool-set, and a good imagination, or better yet, the divining skills of The Magnificent Carnac. It will take about an hour or so if you have good mechanical skills. First and before you begin, you will want to find a good Phillips #2 screwdriver, 8mm and 10mm nut-drivers. Handy extras would be a bright flashlight an awl or nail-set for screw hole alignment -or- you could just use the end of the provided Phillips #1/flat blade convertible screwdriver instead. The Instructions are almost useless; a drawing that is only good for approximate assembly, no help at all for the actual alignment of pieces and order of placement of screws. Both matter a lot to ease of assembly. You will still want to keep them near and make sure you are putting the right pieces together… but you will have to intuit which order to place screws and tighten nuts. You will need to back up as you get it down to the final panels. Expect to find a number of extra pieces – including one side panel, nuts, screws, and an end-cap – that is one thoughtful touch to the kit. Once you have 6 of the 8 side panels in place you will need to loosen previously tightened screws to get the remaining pieces to fit properly and you will need a bright flashlight to see that the internal fit is right and where the last few nuts go. The flashlight and long arms will also be handy when you are searching for that hard to start nut that you dropped while trying to get it started. There are numerous protruding pieces of plastic that interfere with positioning and tighten of nuts, which you will have to do by feel . You will need long (and flexible) arms to make sure the center baffle even rests in the grooves of the side panels. The only written note in the instructions tells you “not to worry about the baffle not fitting snugly”. This is a gross understatement! It does not even want to lightly rest in every groove all the way around the inside of the barrel. Placing the axle through the center of the barrel will likely displace the central baffle. You will need the long arms,, flashlight, and patience for this step. Once the entire barrel is assembled and all nuts are tightened (double check all of them) it seems to form a pretty stable structure. I hope the weight of the compost is not so great that the fit is distorted and it gaps apart. Time will tell. Summary: This kit is a “fit and finish” challenge that makes IKEA instructions and assembly look like precision engineering. It appears to form a very usable device once assembled properly.
T**T
Assembly is a nightmare
Since my first review, I have been using this composter. To my surprise, it kinda works. I upgraded my review because it is kinda working. I even ordered another because the price is right for a cheap composter and the supplier was decent enough to respond to my concerns. I have talked someone into assembling it ( never again for me) as that was the worst I have ever done. Maybe it works, maybe it doesnt. I really dont care affer fighting assembly for over 4hours. I regularly assemble items at work and home and this is the worst assembly in years. I ended up going out in the shed to get longer screws for the center because the " panels" did not seat well due to built in misalignment and many panels were bowed. Once the divider went in, there was no way to get a screw into the center hole without needle nose as they were placed too close to the divider. Once at the final piece, disconnect the first panel to slip last under. NOT IN INSTRUCTIONS. The " divider" moves as you assemble and being the people who designed it did not bother to use a couple screws, that might cost 50 cents. Did anyone think when buildling this? If I knew b4 I purchased what I know now, Id continue to toss my house waste in the garbage and buy a few bags of compost a year until I could afford something decent or just build one myself.
J**J
A very solid performer
This was pretty easy to put together and has lasted well. It is so valuable to be able to simply spin it to do the turning over, that makes all the difference for me. Mine has lasted 3 years and counting. I keep it outside in all weather and it's durable as heck. The scoop they included with it has been very handy. I'd recommend it.
Trustpilot
1 week ago
2 months ago