🔥 Elevate Your BBQ Experience with UtheerGrill Parts!
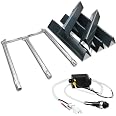
The UtheerGrill Replacement Parts set includes 15.3" Flavorizer Bars, an 18" Grill Burner, and an Ignitor Kit, specifically designed for Weber Spirit E310, E320, and S310 models from 2013 to 2017. Made from heavy-duty porcelain enamel and stainless steel, these parts ensure long-lasting performance, superior heat distribution, and easy maintenance, making them the ideal choice for grilling enthusiasts.


D**R
Great value, easy installation
Removal and reinstallation of new 3 burners was a snap, 20 minutes in total which included scraping clean the grill basin. The parts fit like a champ and my Weber Spirit now preheats much more quickly and I can easily achieve 550F for steaks in a matter of minutes vs waiting almost 30 minutes to reach 550F with 12 year old burners.
D**G
It worked after a little work to install and adjustment.
This product looks exactly like the original "Webber" product. I bought the 3 burner (Natural Gas) grill at Home Depot about 6 to 8 years ago. I have contacted Webber to warranty parts in the past but for some reason I bought this replacement kit. I am glad I did- finally I got my ignitor back again. For the last year or 2 the ignitor just didn't lite the burner. I tried new batteries and bending the electrode, I wrapped a copper wire around the burner near the ignitor but nothing worked.I am a HVAC service tech so I am use to working on furnaces so this wasn't too hard to figure out. I decided to make it more challenging by doing it after dark with a flashlight. Remember to Shut Off the gas supply first. The main thing is to take the front control panel off and let it dangle by the internal gas line while you pull the burners out. A lot of Phillip's screws and two- 7/16" bolts hold panel in place. Also take the gas line support loose on the right side. Don't disconnect or severely bend the internal gas line. The washer headed screws at the back of the burners were hopelessly rusted in place. Fortunately the burners slid out under them I pulled out burners through the front.The left burner has a clip that holds the ignitor electrode in place. The mounting bracket on the new burner had to be pried up to get the ignitor to slide in place. Be careful use a flat blade screwdriver and pry just enough to get it to slide. This tight connection is critical and I think why my old one wasn't sparking right. This provides the grounded connection for the ignitor. It has to fit tight metal to metal. Make sure it pushes tightly and completely into place. Rout the wires just like the old ignitor system. The electric control module fits in place just like the old one and the wires are easy to figure out. While the burners were out I cleaned up the burner bowl and used pliers to grab the 3 rusted screws in the back of the burners and slowly unscrewed them. The kit came with 3 new screws. The screws don't hold the burners tight. They do keep the burners in place. The burners are all different so each of the three fit in only one way. Put the crossover tube and burners together carefully - study them to be sure the flame holes all face the right way and that the crossover tube will carry the flame across the the next burner.After it's all back together it lit with the ignitor but the flame jumps around off the burners and the burners didn't stay completely lit. This is the important tip that the instructions don't mention---- each burner has an air shutter at the front end that may need to be adjusted. The shutters also have a metal screen to keep bugs out - don't remove the screens Just loosen or remove the shutter set screw with the burners working and carefully adjust the shutters to make the flame stabilize. This is easier in the dark so you can see the flame. A well defined blue flame is what you want. I found closing the shutters to 1/4 to 1/3 open worked best for my grill. Watch the flame on the cross over tube as well it should be small but a continuous string of flames. Move the control knobs slowly between hi and low and make sure the burners are blue and stable. Don't just go for the biggest flame from the burners. Look for the largest well defined flame on high without a rolling/ dancing type flame. Tighten the set screws back to hold the shutters in place. Propane has a much higher pressure than natural gas so adjusting the burner shutters will be different but same thing applies look for a strong well defined blue flame on high. Orange tops on the flames are not good and should be adjusted out as much as possible using the shutters. Orange flames are inefficient flames and produce more carbon monoxide they are usually more common in dirty or rusty burner tubes.I've cooked several steaks in the 2 weeks since I rebuilt the burner and it seems to work like new.
I**S
Great Functionality
Ease to install. Build quality works great.
K**R
Nice quality parts
The kit parts had a solid feel, were the right size, fit easily into place and were easy to adjust. They even included the screws. I am looking forward to using my refreshed grill.
M**R
Missing igniter holes for older Q120?
I bought this burner for a Weber Q120. The dimensions and mounting are just fine and the burner seems to be of very good quality of materials. However, it would not ignite with the grill's spark igniter. Upon closer examination, I noticed the mounting end of the burner is missing some essential holes needed for the igniter to work properly. My old (orignal) burner has 5 extra holes near the igniter.I went to the Weber web site and noticed that their replacement igniter for the Q120 doesn't look exactly like mine. This makes me wonder if they changed the design a little at some point. I looked at their replacement burner, and I can't tell from the picture if they've eliminated the need for the extra holes. My Q120 is pretty old and I've had it a number of years.The seller was very prompt in allowing me to return this burner, so I found their service to be stellar. I would certainly consider buying from them in the future. I give them 4 stars for a quality product and great service in dealing with my particular situation.
S**G
Perfect fit
This was a perfect fit for my Weber Spirit II grill. My grill is a couple of years old and the right burner stopped working. I took the grate and burner plates off, thinking it was just out of line. Instead I found a hole in the burner pipe and thought my grill was toast. I thought I’d try to find a fix that would get me to next spring. Instead I found this and figured it was worth a shot instead of buying a whole new grill. It took about 90 minutes to take the grill guts out, clean everything, put this new burner pipe in, top with new burner plates, and replace the grate.These were so easy to install and fit perfectly. The hardest part was prying the starter/igniter off of the old burner bar. I snapped the connector, but I was able to secure it to this burner bar with a bit of wire and it works perfectly. I grilled ribeyes last night and it worked just like a brand new grill. Woohoo, I won’t need a new grill for several more years!
Trustpilot
3 weeks ago
1 week ago