Desertcart purchases this item on your behalf and handles shipping, customs, and support to Japan.
🖼️ Turn nostalgia into digital gold—scan, save, and share your story effortlessly!
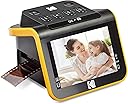
The KODAK Slide N Scan is a 22MP film and slide scanner featuring a vibrant 5-inch LCD for instant preview and editing. Compatible with 135, 110, 126, and 50mm film formats, it saves high-quality JPEGs directly to SD/SDHC cards (up to 32GB). With USB-C and HDMI connectivity, it integrates smoothly with PCs, Macs, and TVs. Its quick-feed tray and easy-load film inserts streamline batch scanning, making it the perfect tool for professionals and enthusiasts eager to preserve and share their analog memories in a sleek, user-friendly device.


| ASIN | B084NVRHYQ |
| Best Sellers Rank | #5,184 in Office Products ( See Top 100 in Office Products ) #1 in Slide & Negative Scanners |
| Brand | KODAK |
| Color Depth | 24 bits |
| Connection Type | HDMI, USB |
| Connectivity Technology | HDMI , USB |
| Customer Reviews | 4.3 out of 5 stars 12,588 Reviews |
| Global Trade Identification Number | 00843812123013 |
| Item Dimensions D x W x H | 5.27"D x 5.35"W x 3.74"H |
| Item Type Name | KODAK SLIDE N SCAN Film and Slide Scanner with Large 5” LCD Screen |
| Item Weight | 16 ounces |
| Manufacturer | Kodak |
| Media Type | Negatives, Slide |
| Minimum System Requirements | Windows 7 |
| Model Name | KODAK SLIDE N SCAN Film and Slide Scanner with Large 5” LCD Screen |
| Optical Sensor Technology | CMOS |
| Product Dimensions | 5.27"D x 5.35"W x 3.74"H |
| Resolution | 22 Megapixels |
| Scanner Type | Film |
| Standard Sheet Capacity | 1 |
| UPC | 843812123013 |
| Unit Count | 1 Count |
| Warranty Description | B084NVRHYQ |
| Wattage | 15 watts |
A**C
Perfect for family photos, good quality and fun to use
I'm so happy with this little device! As soon as it arrived I tested a 35mm color negative. It's really simple to use, as soon as you set up the scanner and slide in the negative, you can see the image immediately on the screen. It's so enjoyable and quick and the quality exceeded my expectations. You do need to buy a 32GB SD card or 32GB SDHC card. It will not work with larger GB or with SDXC cards. Setup: Plug in the USB-C/USB cable (provided) into the scanner. USB-C side goes into the scanner, and the USB side goes into to your PC or to a wall adapter. Insert the SD card in the back of the scanner (right next to the USB-C slot). Open the hinged slide holder and insert the adapter for 135mm, 126mm or 110mm depending on what film you are using, and then snap it closed again. The manual shows you how to align the adapter inside the hinged holder. If you are scanning slides you won't need an adapter, you will just need the slide holder. Insert the slide holder into the slot on the right side of the scanner. The arrow on the slide holder should be pointing toward the scanner. About an inch will still be visible, sticking out of the slot. This is where you insert the film. How to use: Press the power button (it must be plugged in to PC or wall using the USB cable to power on). Press the large OK button on the front to select film type. Use right/left arrows on the top of the machine to select film type and then click OK. Select the film size and click OK. Make sure your film is right side up, and slide the negative into the slide holder on the right side of the scanner. Smile when you see your image on the screen! You will need to adjust the film so that the image is centered on the scanner, and then press the large OK button again. Slide the film further in until you can see the next image. Press OK to scan. Once you can't push the film in any further, you can insert the next piece of film and it will push the first one through and out the left side. I found a few times where the film was curved and wouldn't go in past the first image. If this happens you can remove the slide holder from the scanner, insert the film into the holder while gently pressing down on the first image. It should slide through and you can reinsert the holder into the scanner with film already in it. It takes about 2 seconds for the image to scan. Transferring photos to your PC. You have 2 options - you can remove the SD card and insert it directly into your laptop/PC if it has a slot. If not you can connect the scanner to your PC using the USB cable (provided) while the SD card is still in the scanner. This will bring up a USB device on your PC and you can see all of the images. They are given file names based on the order you scan them. I have scanned over 1,000 images on the SD card so far. Quality: The quality of the images is better than I expected. For sure up to 8x10 prints would be high quality, I'm attaching a scanned image so you can see. Also please note in the scanned image I didn't center the negative properly. If you are moving too quickly through the images this can happen, so it's good to view the images periodically in case you need to rescan anything. Make sure you keep the film dust free, and also make sure the scanner is dust free. It comes with a cleaning brush that can be inserted into the slot where the slide holder goes to clean out dust. Do this with the soft part of the brush facing down. I didn't do this at first and some of the images ended up with some marks from the dust.
M**D
Works great, glad I bought it!
I’m very happy with how well this scanner works. I was struggling a little with the directions, but then found a YouTube video that answered my questions. I’ve scanned slides & negatives, and have been happy with the results. (I do use Photoshop Elements to tidy up the results on some scans.) It’s easy to use and a great way to digitize photos. Very glad I bought it!
N**A
Gets scans done quickly
If you have tons of negative and slides you want to bring into the digital world, this device will get the job done. I hooked mine up to a MacBook via a USB port to power the device. The setup is straightforward out of the box. Plug in the USB cable to the laptop and the back of the device and press the power button. It took me a minute or two to figure out how to open the feed cassette to insert the adapters for different size media, as I didn't want to manhandle the plastic carrier (it hinges along the long top edge and has an over-center clip along the bottom edge that needs a little prying to open). The manual is good for describing step to take to get into scanning quickly. What you have to figure out on your own is how to use the Brightness and RGB options to render best results from your scan. I had almost 2,000 slides/negatives sitting unloved in boxes. In about three hours I had all of them scanned and uploaded into Mac Photos. The SD card (32GB max size) that you install in back of the scanner shows up as a device in Photos. When you select USB upload from the device's screen menu, Photos recognizes the SD card and brings up the Import window, allowing you to preview the images and then import to Photos. Nice feature. Storage size-wise, 35mm slides averaged about 3-3.5MB (jpeg), and 135 negatives about 4-4.5MB. If you're looking for something that consistently delivers archival quality scans, you'll probably be disappointed. Some of the scans were incredibly true to the original media in color, clarity, and detail. Others were average quality, sometimes almost lo rez-like, despite the original appearing of be in good condition. I can understand the sharpness being slightly off-focus if the negative/slide has some curl in the transparency. I haven't figured out why the color is inconsistent. Based on my results, I've decided that this device is good for at least bringing all my old media into the digital realm. I've purchased a pack of slide holders (https://www.amazon.com/dp/B00009R90A?psc=1&ref=ppx_yo2ov_dt_b_product_details) for a binder and sorted the slides by date. If I see a digital scan that looks interesting, I can reference the actual slide and decide whether its worth taking it to one of the few remaining photo stores for a professional print. Considering the time and hassle in using a flatbed scanner, it is unlikely I would have tackled this project. It was $200 well spent, and recommend it, with the caveats noted above.
S**T
Easy to use, quick to set up and intuitive. Everything that one could want.
I am a child of the 1950's. Everyone in my family and in particular my Grandfather used Ektachrome for slides. When I went away to college I studied Art and the fundamental method of conveying images was through slides. it was "standard operating procedure" for a long time. I have a Kodak Carousel slide projector still in use. I took slides of everything because Ektachrome was always in my Pentax Spotmatic F. I have accumulate a great many slides after almost 70 years but many of them have not been seen in a very long time. That is until now. I do not have a place to set up a projector and I have for a long time needed a way to achive this recorded history. I did the search here and discovered this unit from Kodak. I read reviews and have learned to toss the demonstrably bad ones from those with axes to grind (2 ** for no SD card included) . I bought this and fell in love with it right out of the box. It is very easy to set up and use with very little reference to the manual. I am one of those people who don't like using manuals. There were a few things like learning the clock is not designed to be continuous but just a date stamp that knowing in the beginning saved some frustration but for the most part the buttons on the top will explain themselves. I have had a box of slides slides floating around since moving in to my present location that had separated themselves from the bulk of those that I have stored. I have wanted to see what this box contained but it is not that easy to hold them up to the light and see all of the detail. So with new Kodak unit now plugged into the USB port of my iMac I headed into the unknown. With the unit powered on and a quick glance at the manual to see which button to push for review i was away down memory lane. I was initially only going to look at a couple of images to see how the images looked on the 5 inch screen. But i soon was so captured by the quality of what i was seeing that i went went one slide after another until every one of almost 200 slides had been recorded. I owned several slide viewers in the late 80's and early to mid 90's and they were always problematic to use. They were just small projection boxes whose lamps always generated a great deal of heat and were rather cumbersome to use and store. And they were only viewers with not means of recording images. This Kodak unit has solved everything for me. It is small enough that it sits comfortably amongst my other pieces on my desktop and yet large enough to easily see the screen. It is also very stable and will rest comfortably wherever it is placed. This unit has for me been the answer for everything that i have needed. Now I have a reason to excavate my Grandfather's old slides a relive the Christmas gatherings when everyone was still around. I whole heartedly recommend this Kodak viewer/recorder to anyone with similar needs.
D**N
blows away the expensive scanners, IMHO
Years ago, I had a Nikon Cool Scan. It was very expensive, but it was very, very good. It eventually stopped working, after running about 18 thousand slides through it, and Nikon no longer makes them, so I had to find a new slide scanner for my 35mm slides. I tried the most highly reviewed scanner that costs five hundred dollars, but sent it back because it arbitrarily cropped my slide images, I could not scan a full frame slide with it. Ridiculous. I read a lot more reviews (not on Amazon) and one scanner that was consistently praised for its ease of use and relatively high quality output, was this Kodak scanner. Well, its not really a scanner, it is effectively a 22 mega pixel camera. Anyway, I decided to give it a try. Wow! I just plugged it in to my PC USB port and it just worked. At first I tried adjusting the colors (very old slides) with the scanner, but it was too tedious. So I just ran my slides through it and decided to adjust image color using irfranview image editor. I just finished running about 2000 slides through it. The device saves images to a memory card that you have to buy separately. I found an old 32GB SD card and it works fine. Even though it won't save images directly to your PC, it is pretty easy to go into the device menu, then select the option to transfer to the PC via USB. Once you make that selection, the device shows up as a mass storage device on your PC and you can copy or move the images just as if it were a USB storage device. Easy-Peasy Running my slides through the device was easy too. One thing that would be nice would be if Kodak would put very obvious guide lines on the viewing screen that show the left and right boundaries of the image; that would make it easier to ensure that you have the slide properly inserted prior to saving the image. As it is, you can't easily tell that the slide is inserted properly. Overall, I'm very pleased with this Kodak "scanner". You can't print much larger than 8x10 because the images are only 22mp. But that is fine with me. OH, and you need to be sure to clean the dust off of your slides first!
R**Y
THANK YOU KODAK for Bringing Past Memories back to Life!!
Amazed at the quality of the negative film scans and the ease of use!! I ended up scanning over 2K pics for a Christmas project I'm doing for my kids. I tried another product before this and was discouraged by the blurry off color images I was getting and returned it immediately. The Kodak scans were crisp and clear. The product is light weight and portable. I'll be taking it to my mom's this weekend to go thru her negatives and be doing the same for my mother in law. THANK YOU KODAK! I've also recommended this product to several friends who have the same objective of digitizing their images!
S**R
Easy to use. Good for hobby, not professional grade
For the most part it's great, but could be better. First, it would be nice if you could set your film type and it would just remember it or stay there until you change it, but you have to set it every time you turn it on, or come back from the album or do anything. Also, on all film types, it crops the image height so you don't get the full image. I would rather get a little extra and crop it down on the computer, then not be able to get the full image. It cuts about 10% off the top AND bottom so there were many pictures in portrait mode that had arms partially cut off, or heads flat topped in landscape mode, but in the negative you can clearly see them. It would be nice if it had suction cups or something to hold it firmly in the surface and a way to lock the film in place so it doesn't move while it gets scanned. I had a couple time when I pressed the scan button and either the scanner moved or the film got touched just a little and I didn't get a clear picture and I didn't realize it until later when I was on the computer, and so I had to go find that negative again.... Pain in the A$$ when I am dealing with 40 year collection of family photos and all the negatives were just in a box and not a album with contact prints or anything to organize them. It would also be nice if it could save directly to the computer so you could analyze each picture as you took it to know if you got a good scan or if there was a piece of dust or something. As is, you have to scan to the SD card, then swap the SD card to the computer. For the price, I was expecting more. It's not BAD, just not as good as I expected considering there are others that do the same that cost less then 25% what this one does.
F**A
⭐⭐⭐⭐☆ Easy to use and great for preserving old memories
I’m very happy with this KODAK Slide N Scan scanner. It’s a convenient way to digitize old film negatives and slides without needing professional equipment. The 5" LCD screen is a great feature because it allows you to preview images immediately and adjust them before saving. The setup is simple, and the controls are easy to understand, even for someone who isn’t very experienced with scanners. The image quality is good for preserving family photos, old memories, and personal collections. The design feels practical and lightweight, making it easy to use at home. The process is much faster than I expected, and saving digital copies helps protect photos that may otherwise deteriorate over time. My only suggestion is that the results depend on the quality and condition of the original film, so very old or damaged negatives may not look perfect. Overall, it’s a user-friendly and useful scanner for anyone wanting to convert old slides and negatives into digital photos.
J**.
Not difficult to use.
A very decent scanner for old negatives that you have been keeping. Even when all the chemicals melted away, the scanner can still pick up some good images. You may not see colour clearly, but at least good in b/w or vintage.
L**S
Muy buen escaner en su precio
Me está siendo muy útil para recuperar imágenes de hace 60 años que se encuentran en diapositivas de distintos tamaños. Es fácil de utilizar y el resultado es muy bueno sin perder de vista algunas cuestiones: - Sus 22 megapíxels obtienen todo lo que pueden de una diapositiva que como máximo medirá 3,5x2,3 cm, por lo que no podemos compararlo con los 22 Mpx de una cámara que los captura de todo lo que esté al alcance de su objetivo. - En ese sentido, al igual que la lente de una cámara ha de estar limpia para sacarle todo el partido, la diapositiva o el negativo han de encontrarse en muy buena condición para obtener todo lo que se pueda de ellos. Algunas de las mías están bastante mal y los milagros no existen aquí. - Para mejorar los resultados y subsanar las deficiencias de los negativos o diapositivas hay que utilizar un programa de procesado como es el caso de Photoshop. Si no lo manejas mucho, sólo con ponerle los niveles, el brillo y la saturación en automático ya ganan mucho y con el tampón de clonar se arreglan las posibles imperfecciones que tengan los originales. - Y, finalmente, hay que tener en cuenta que estas diapositivas o negativos se obtuvieron con cámaras que no guardaban tanta información de la imagen obtenida como las actuales. Estaban pensadas para imprimirlas posteriormente en papel de un tamaño normal, digamos 10x15 o mostrarlas con un carrusel de diapositivas. Ahora estamos pretendiendo una resolución mayor en la pantalla de un ordenador por lo que probablemente nos encontraremos con algunas imágenes que nos parecen (y posiblemente lo sean) un poco borrosas. No considero que sea culpa del escáner para nada. La calidad del aparato es muy buena y la transferencia de las imágenes al ordenador es sencilla. No se puede pedir más. Es un dispositivo que recomiendo sin dudarlo.
L**Z
Un aparato de muy buena calidad
Lo adquirí con la idea de convertir mis viejos negativos de fotografías pero no con muchas expectativas. Pero al recibirlo y probarlo comprobé que tiene una pantalla de buena visión y botones intuitivos para realizar las acciones que uno desee, al probar con mis primeros negativos, me sorprendió la facilidad de su manejo y rapidez con la que convierte mis negativos a una imagen digital de muy buena calidad. Muy satisfecho con este escáner y su funcionamiento.
C**E
Nostalgia Fun
Easy to use and good fun preserving old photos.
C**3
Scansiona le tue diapositive
Non pensavo fosse così facile da usare. Velocissimo a scansionare e la qualità del risultato è davvero eccezionale. Rapporto qualità prezzo davvero ottimo. Lo consiglio
Trustpilot
1 month ago
2 months ago