


Buy anything from 5,000+ international stores. One checkout price. No surprise fees. Join 2M+ shoppers on Desertcart.
Desertcart purchases this item on your behalf and handles shipping, customs, and support to Japan.
✨ See and be seen: Headlights reborn for life! 🚗
The CERAKOTE® Ceramic Headlight Restoration Kit is a professional-grade, easy-to-use solution that restores and protects vehicle headlights with a durable ceramic coating. Featuring a 3-step process with oxidation remover wipes, sanding materials, and ceramic coating wipes, it requires no power tools and guarantees UV protection lasting as long as you own your car. Highly rated and trusted by over 67,000 users, this kit delivers like-new clarity and enhanced nighttime safety in just 30 minutes.


| ASIN | B084RQKLV8 |
| Best Sellers Rank | #11 in Automotive ( See Top 100 in Automotive ) #1 in Automotive Headlight Restoration Kits |
| Brand | CERAKOTE |
| Brand Name | CERAKOTE |
| Customer Reviews | 4.6 out of 5 stars 69,596 Reviews |
| Included Components | CERAKOTE® Ceramic Headlight Restoration Kit – Guaranteed To Last As Long As You Own Your Vehicle – Brings Headlights back to Like New Condition - 3 Easy Steps - No Power Tools Required |
| Item Type Name | CERAKOTE® Ceramic Headlight Restoration Kit – Guaranteed To Last As Long As You Own Your Vehicle – Brings Headlights back to Like New Condition - 3 Easy Steps - No Power Tools Required |
| Item Weight | 0.3 Pounds |
| Manufacturer | CERAKOTE |
| Model Number | AH-HLKITV |
| Number of Items | 1 |
| Part Number | AH-HLKITV |
| Recommended Uses For Product | Removes Oxidation, Removes Dirt, For Paint Protection |
| Specific Uses For Product | Brake Lights, Fog Lights, Head Lights, Third Brake Lights |
| UPC | 850014615017 |
| Unit Count | 1.0 Count |
| Warranty Description | Warranty |
D**N
An Easy DIY Headlight Restoration Kit with Strong Appeal
This restoration kit is appealing because it offers a way to improve cloudy or oxidized headlights without needing power tools. That makes it accessible for people who want to do the job themselves without investing in extra equipment. Cerakote also has a strong reputation in protective coatings, which gives this kit added credibility compared with generic restoration products. The biggest selling point is the promise of restoring clarity while adding a protective finish to help maintain the results. If the process is easy to follow and the wipes are effective, this can be a worthwhile DIY option for improving both appearance and nighttime visibility. For vehicle owners with faded headlights, this seems like one of the more convenient restoration approaches available.
C**N
Very happy with the outcome, worked perfectly
I was very happy with the CERAKOTE Ceramic Headlight Restoration Kit. The instructions were simple to follow, and the whole process was much easier than I expected. My headlights were cloudy and dull before using it, but after completing the steps, they looked dramatically clearer and much closer to new. The kit included everything needed, and I liked that it did not require any extra tools or complicated equipment. The results made a noticeable difference in the appearance of the vehicle, and the headlights also seem brighter at night. Overall, this is a great product that does exactly what it claims. I would definitely recommend it to anyone looking for an affordable and effective way to restore foggy headlights.
G**A
Highly Recommend – Amazing Results on My Honda Accords!
I recently used the Cerakote Headlight Restoration Kit on both my 2008 and 2014 Honda Accords, and I’m genuinely impressed. The headlights on both cars were badly oxidized, hazy, and yellowed from years of sun exposure. After following the kit’s instructions, they look crystal clear and almost like new again. The process is pretty straightforward and beginner-friendly. It does take roughly an hour per headlight set if you follow all the steps carefully and allow proper air drying time before the final clear coat. There’s a bit of elbow grease involved with the sanding and polishing stages, but nothing overly difficult. The kit provides everything you need, and the instructions are clear. The results are excellent! Both cars now have headlights that look factory-fresh. I’m really happy with how bright and clear they are at night. Best part? I saved a ton of money by restoring them instead of buying expensive OEM replacements. The only minor uncertainty is long-term durability (how well the clear coat holds up after a couple years of sun, weather, and car washes), but for the price and the dramatic improvement I saw, it’s absolutely worth it. I’d definitely buy this kit again if needed. Highly recommended for anyone dealing with cloudy headlights. Great product that delivers professional-looking results at a fraction of the cost!
M**.
Skeptic turned believer
Easy to use, everything you need is in the box minus some microfiber cloths and spray water bottle. Watch the video first and follow it along as you go. Very straightforward. I used it on a 2004 Lexus SUV and got good results. My driver side light had some internal fogging that could not be addressed from the outside. The passenger side looks brand new.
C**R
Best product I've tried so far but still temporary. YMMV.
This product really does work. It is the best I've used. I purchased in September 2024 and am writing this review in May of 2026, roughly one year and 8 months later. I noticed product failure a little after a year after application and it has been degrading slowly since. Currently the product is visible like a layer of clear paint flaking off and you can physically scratch some off. Here are the pros and cons. Pros: Clarity, relative ease of use, value Cons: Taping and sanding, doesn't last for as long as you own your car as claimed Best used as a temporary fix. Bottom line, would I use it again? Yes. What am I doing today? Replacing the headlights completely. Why? I plan on keeping my car for longer than a year.
Y**Y
works as advertised!
I purchased this kit to renew the headlights on my 2016 Nissan Frontier pick-up. The headlights had become slightly oxidized and dull -- not that bad but it was bothering me and for the price of the kit I figured it was worth the effort to attempt to renew them. All I can say is -- WOW, what a difference. The end result looked like new -- clean, brilliant and bright. Read the directions (2 or 3 times) and follow them EXACTLY. Total time for me from opening the kit to being done was about 2 hours and I was taking my time. This kit is different in that the final step applies a UV resistant coating which really makes the glass super transparent. Great investment in the time and money. I can't stop admiring my new (old) headlights!
A**R
WOW! I am so impressed!!! You need to get this!
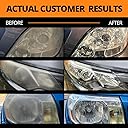
I do have before and after pictures, but I'm too lazy to upload them. Trust me when I say that the difference is DRAMATIC. It's as if I have brand new headlights! I took them from foggy/clouded to crystal clear, without even that much effort. And with the ceramic coating, I expect they will stay that way. Here are some tips from what I learned about using the kit. 1. If you are careful, and you're not doing the lights on a big truck, and the fogging isn't terrible, you can split the supplies in half and have enough left over to do another car! 2. It's not a bad idea to tape off the headlights through steps 1 and 2 (initial chemical cleaning, and especially, sanding). Even though I did this, I still managed to sand off a thin line of paint right next to one of the headlights. That was entirely my fault. 3. You can't really sand too much. I actually did it twice. Instead of going by the clock (they say 3 minutes per pad), I just told myself I would use the applicator twice on each piece of sandpaper, and then take off the sandpaper to sand by hand a third time. In other words, three passes with each grit, for a total of six passes per light. That worked out well, and it wasn't too hard, either. Just be careful you don't sand the paint on your car! 4. Bring a roll of paper towels with you before you start. I spent a lot of time running back and forth to the house. You won't need the whole roll. I used about ten towels, total. So bring a roll, and save yourself some time. 5. Make sure you set aside an hour to do the job, and another hour to let it cure. That's about how long it took me, and I'd never done it before. I believe I can do it again in under 45 minutes, easily. But you'll still need an hour for the final coating to cure. If it's raining, you won't be able to do this work. Also, you should work in the shade. I don't think it would come out very well if you do it in direct sunlight. 6. You will definitely need a spray bottle, filled with water. A 16 oz bottle would be about right. I used a little tiny 2 oz bottle, and had to refill it numerous times. 7. When they say to keep the surface of the headlight WET while you sand, they mean it! Your work will come out much smoother, and go faster, if you do that. If not, you end up with a gunky mess that you will have to clean off anyway, and probably have to sand some more - so why not spray while you go? 8. Be sure to use those paper towels to clean things around the lights very well between each step. It just makes the job easier when you don't have to worry about ruining your paint with the chemicals, and you get all the sanding glop out of the way, so you can see if you are sanding your paint, and not your headlights! 9. Be sure to REMOVE THE TAPE before you begin step 3 (ceramic coating). Then, use a hair dryer to THOROUGHLY dry out the surfaces around the lights (and the lights themselves) before you start coating the headlights. This last step 3 is crucial to performance, and is why this kit is so special. It takes no time at all to do the work, like rubbing alcohol once on the headlight surface. But the chemical isn't alcohol, and it's very strong, so prepare well - you don't want to have to stop in the middle of the application. Dry out those lights and surfaces first (because the chemical coating does not play well with water, at all)! Then know that putting on that coating only takes about 15 seconds per light. You just coat it once, with 50% overlap, wipe off any of the chemical that's dribbled onto your paint, and then DON'T TOUCH THOSE HEADLIGHTS FOR ONE HOUR! Let them cure, and they will be like-new! Again, this kit is marvelous. If I had known the end result would be so amazing, I would have taken it out of the box much sooner. I am going to do my wife's car next. It really is the best thing I've seen to do this job. Somebody put a lot of thought into this product, and you can tell. Not too much work for an absolutely fantastic end result!
A**Z
I can see the light!
I love my car. It is my baby. But somewhere between life, busy schedules, and total neglect, my baby’s headlights started looking like they had a severe case of cataracts. They weren’t just foggy; they were begging for some serious TLC. I was genuinely worried I’d have to start driving with a flashlight taped to the hood just to return it to its former glory. Enter this kit. I am not exactly what you’d call a "master mechanic," so I opened the box with a healthy amount of skepticism. But the instructions were so easy to follow that even I couldn't mess it up. Step one, step two, step three—idiot-proof. The real shocker here was the quality of the tools included. Usually, these DIY kits give you sandpaper that disintegrates if you look at it wrong and a microfiber cloth the size of a postage stamp. Not this one. Everything felt high-quality, durable, and up for the task of wiping away years of absolute neglect. After a little bit of elbow grease, the results were nothing short of amazing. The transformation was instant. My baby’s eyes went from "haunted house chic" to "fresh off the dealership showroom floor." It looks incredible, it sees incredible, and my pride has been completely restored. If your car is currently crying out for a glow-up, buy this kit right now. 10/10, highly recommend!
G**E
Great results if you follow instructions
Great product. I used this on a 2010 Toyota Yaris headlights. The left side headlight had yellowed from sun exposure, as a result of being ungaraged for 16 years. The right side looked ok. I followed the instructions carefully for the left side headlight and found it took less than 30 minutes to prep and apply. The end result was that the light looked almost as clear as new. However it was so good that it made the right side look old by comparison, and so I then treated the other side too! This does also mean both headlights now have UV protection and should have future aging delayed on both sides. The quantity of chemical on the wipes is ample for two headlights, I also had sufficient excess to apply to the Plexiglas screen of my motorcycle. The box contained a QR code for a YouTube tutorial video that is essential to watch. The process isn’t difficult but it identifies where water must be used and where the lights must be meticulously dry. This has made a great improvement to the aesthetics of the car and is cheap and easy.
N**E
Nice and good
Nice and good
D**K
Excellent product.
Works.
E**D
Geweldig resultaat! Mijn koplampen zijn weer als nieuw.
Ik ben echt onder de indruk van deze set. De instructies zijn heel duidelijk en het proces is makkelijk te volgen, zelfs als je geen ervaring hebt. Na drie simpele stappen zijn mijn doffe, vergeelde koplampen weer volledig helder geworden. Het mooiste is de keramische coating die voor een langdurige bescherming zorgt. Het bespaart je een hoop geld vergeleken met een professionele behandeling. Absoluut een aanrader voor iedereen die zijn auto weer een frisse look wil geven!
Y**N
Sehr gutes Ergebnis und einfache Anwendung
Die Anwendung war einfach und das Ergebnis wirklich überzeugend. Die Scheinwerfer sahen vorher matt und alt aus, nach der Behandlung wirken sie wieder deutlich klarer und gepflegter. Der Vorher-Nachher-Unterschied ist sofort sichtbar. Für den Preis ein sehr gutes Komplettpaket und definitiv empfehlenswert.
Trustpilot
2 weeks ago
1 week ago