Desertcart purchases this item on your behalf and handles shipping, customs, and support to Japan.
🚀 Elevate your outdoor WiFi game—connect farther, faster, and smarter!
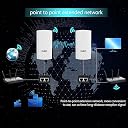
The KuWFi 900Mbps Wireless Bridge Kit is a professional-grade outdoor WiFi solution designed for long-range point-to-point and point-to-multipoint connections up to 1KM. Featuring dual RJ45 Ethernet ports, 24V PoE power, and IP65 weatherproof housing, it ensures robust, high-speed wireless bridging for surveillance, remote monitoring, and extended network coverage in demanding outdoor environments.


| ASIN | B07Z4KHHLN |
| Antenna Location | Business |
| Best Sellers Rank | 22,897 in Computers & Accessories ( See Top 100 in Computers & Accessories ) 56 in Wireless Access Points |
| Box Contents | 2 x Outdoor Bridge CPEs, 2 x PoE Adapter, 2 x Ethernet Cables, 2 x Plastic Straps, 1 x Quick Installation Guide |
| Brand | KuWFi |
| Brand Name | KuWFi |
| Colour | CPE120-300Mpbs |
| Compatible Devices | Laptop, Personal Computer, Tablet, Smart Television, Switch, Security Camera |
| Compatible devices | Laptop, Personal Computer, Tablet, Smart Television, Switch, Security Camera |
| Connectivity Protocol | Wi-Fi |
| Connectivity Technology | Ethernet, Wi-Fi |
| Control Method | App |
| Country of Origin | China |
| Coverage | 0.9 km |
| Customer Reviews | 4.0 out of 5 stars 183 Reviews |
| Data Transfer Rate | 300 Megabits Per Second |
| Frequency | 2.4 GHz |
| Frequency Band Class | Single-Band |
| Frequency band class | Single-Band |
| Has Internet Connectivity | Yes |
| Is Modem Compatible | No |
| Item Highlight | 1KM Long Range WiFi Bridges, Ethernet Bridge with 24VPoE, 2RJ 45 Ethernet Port, for Garden, Starlink, Farm, Indoor, 2 Pack |
| Item Weight | 0.98 Kilograms |
| LAN Port Bandwidth | 100 Mbps |
| Manufacturer | KuWFi |
| Manufacturer Part Number | CPE70R |
| Maximum Upstream Data Transfer Rate | 300 Megabits Per Second |
| Model Name | CPE120 |
| Model Number | CPE120 |
| Model name | CPE120 |
| Number of Items | 1 |
| Number of Packs | 1 |
| Number of Ports | 2 |
| Operating System | Linux (OpenWRT) |
| Other Special Features of the Product | Access Point Mode, LED Indicator, Remote Access, Securoty Camera, Weatherproof |
| Router Network Type | hybrid |
| Security Protocol | WPA2-PSK |
| Special feature | Access Point Mode, LED Indicator, Remote Access, Securoty Camera, Weatherproof |
| Unit Count | 1.0 count |
| Voltage | 24 Volts |
| Wi-Fi Generation | Wi-Fi 4 |
| Wireless Compability | 802.11a, 802.11n |
| Wireless communication standard | 802.11a, 802.11n |
J**R
instructions overly conveluded but easy to get going
as i said the instructions are super weird and not beginner friendly but do some research look up a video and it will tell you how to get it working straight away. probably your best option if you want wifi in a different part of your property. They need to be mounted outside though or else you're gonna have issues. This also means you will need a longer Cat6 ethernet cable. In my case I got a 10 metre and 5 metre one respectively. There are ethernet cables that come in the box, which is useful for the power brick connecting it to the wifi box but you're most likely gonna have one left over as they weren't long enough whatsoever in my case.
A**N
Work perfectly and provide a great signal over 250-300m. Setup guide included
Fantastic product. Works far better then expected. Used to transmit WiFi from the house to the garage 250-300m away. The receiver in the garage then repeats the WiFi signal and allows for lan connectivity. Over that distance even with a coverage from trees and bushes we still get the same speed and little latency (barely noticeable). There really isn't much information on how to get these setup. So I'll try and provide what I think is the most straightforward way. 1. Power them on using the POE adapters. They should connect to one another but if not dont worry. They connect properly in the later steps. (if you already have them setup but want to start again hold the reset button on both of them for 7-10s). 2. I recommend using a laptop/desktop for the setup process. Go into control panel->network and right click on the WiFi adapter and set the adapter's IP addresses to 192.168.188.100. 3. Then connect to H (master) via WiFi. This will be sending the WiFi to the garage in our case. The WiFi will be called Wireless 2.4G and then a series of numbers/letters. The password by default is eight 6's (66666666) 4. Then go into any web browser and enter the IP address 192.168.188.253. You will connect to the master. 5. Then enter admin as the password. Go on to the wizard page, click AP Mode and then it'll take you through the setup. Here you can change the WiFi name and password and various other settings. I recommend to change the lan from static to same as AP. 6. Once the master is configured. Go into control panel on your laptop and change your ethernet adapters IP address to 192.168.188.253 (similar to what we did in step 2). 7. Then get an ethernet cable and connect your laptop to the POE adapter for the C (slave). 8. Then go into a web browser and type in the IP address 192.168.188.100. You will connect to the slave. (If your laptop is trying to use the WiFi and ignoring the ethernet then you can simply turn off your laptop's WiFi and force it to use ethernet). 8. Then use admin as the password. Go into the wizard like before and then set up the slave to be a repeater. Here you will need to enter the master's WiFi details to connect to it. 9. You can then decide if you want the repeater to only repeat the signal from the master via the lan port or if you want it to set up its own hotspot at the other end as well.
G**L
Great product
These are really good, and work really well. I have a caravan around 200 metres away from my mum's house, and wanted Internet for the caravan. I have one box in my mum's, one on a cow she'd, and a ethernet cable into an access point in the caravan. I would have given the product 5 stars, but dropped a star due to the instructions being quite vague, and I actually wanted to link them to a BT disc extender. The bridges would link, but without Internet. I'm not sure whether that were the bridges themselves, or whether it was the connection from the bt disc, to the tp link access point. Anyway, it didn't work, which was quite frustrating. Other than the instructions, these work really well, I'd highly recommend.
J**E
Wrong injectors sent instantly broke them
sent the wrong POE injectors in the box which instantly broke the bridges the second i plugged them in now there just scrap. went to a computer shop to take a look at them to see if i could order the right ones and they said they are now broken from plugging the injectors that come with it in which where to higher voltage, before this i contacted the people who sent it (Kuwfi support) they said they would send the right one and never did, definitely going for a refund
I**N
Powerful and cheap AP solution.
I bought this pair to use as access points around my block of flats because the mobile phone signal is so bad and so that my kids could watch whatever rubbish on their devices with their friends. The only issue I had with it was forcing the IP address into the correct range (192.168.188.xxx) to access the web interface, but once I did that it was very straightforward; no different to setting up any other AP at home with SSID and the like. Make sure that both are switched to master and they will both run as APs. The performance of these is excellent and I have good Wi-Fi signal roughly 400m away from my block of flats, which is very impressive. After a year of use, it's still working well, however I'm concerned about the discolouration that has happened since it was installed.
N**.
Great for Farm Yard Cameras
In order to set up a lambing camera down in one of the sheds on the farm, we needed to install one of these. Our house is situated on a hill looking down at the shed approx. 600 yards away. I have included a quick diagram of our whole set up. What comes in the box: 2 WIFI Bridges – either can be set up as a master (receives connection from your home) and the other will be set up as the Slave (this will receive the connection). 2 Short Ethernet Leads 4 POE injector plugs – 2 UK and 2 EU (only two will be used) Cable Ties *Unsure if screws came with as we had a lot of open boxes at the time. What you need: I had initially assumed that two longer cables would be delivered with the Bridge, however I soon learned that that was not the case. No big deal, as I was able to purchase some cables on amazon pretty cheaply. You will need to buy two cables long enough to go from the following: Plug near your home router to the Master bridge box outside – we used a 10/15 m cable to go through the wall and reach up to the top corner of the house. Plug near your switch/poe receiver in the shed(or wherever you will need internet connection) to the slave bridge – we used a 5 metre cable here. Using cables are not your only option though – I have seen some reviews on youtube where they used tplink wifi extenders which plug straight into the wall at either end of the house (i.e one plugged near the router and another plugged near the bridge and then one short cable between the router and the extender and another between the second extender and the Master bridge. This is definitely a viable option; however, I chose to go with one long wire as it meant that the bridge received a stronger data connection. The Instructions: The instructions provided with the box were complete and technically had everything you needed written down, but I had a hard time following it. After about an hour or two I eventually went straight to Youtube and found a great video showing you the whole process – with that, I was done in no time! What you need to do: If you don’t want to watch the video, heres a quick outline of the steps needed: 1. Plug in the two POE injectors into a socket beside yourself 2. Open the cover on both bridges and set one as your Master and another as the slave (the instructions have this pretty clear) 3. Plug each one of your bridges into the POE port of each of the injectors and wait for them to synchronise. The H (Master) and C (Slave) should both end up with the same number i.e. H001, C001. 4. As soon as this is complete (or if it doesn’t sync) press the reset button on both of the boxes at the same time. When the set up is complete the boxes will have paired successfully. Please note – unless you press the reset button on each within a minute of the initial sync it will automatically reset, so try to be a bit quick about it 5. Once the boxes have been paired, grab another ethernet lead (or just connect through wifi) and connect your laptop/computer to the MASTER Bridge. 6. The devices themselves have been set up with a static IP address, which means that you will not be able to log straight into them until you change your IP address to the required IP address. The instructions are pretty clear on how to do this, however I still got a bit lost on this bit: a. You will have to change the computers IP address so that it is in the same subnet as both devices – i.e. Master Device IP is 192.168.188.253 and Slave Device is 192.168.188.100. Change your Ip address to 192.168.188.X (X can be any number other than the end number of each of the devices – aka do not use 100/253. 7. Once you have changed your IP address you will go to your web browser and type in the IP address of the Master Device 192.168.188.253. This will take you to a landing page where you will sign in. 8. Go through the Wizard and set up the various options needed – I would definitely do the following: a. Change Default password b. Change WIFI access PIN c. Potentially hide SSID d. Definitely disable Telnet e. For the use of an IP Camera, I changed the Bridge so that it was no longer a static device – that way I can access the IP camera down in the yard on an NVR in the house 9. Once you have gone through this, the Master will be set up. Next you should now connect the Slave device to your computer and you will do the same as above (7-8), however you will be going to the Slave IP address 192.168.188.100. a. The only difference here is that you have the option of creating a WIFI access point from your Slave device. I chose against this, as I will be using router access point connected into a switch so that the connection will be stronger 10. Once these settings have been completed, you should change your IP address back to your normal IP address (refer to video) 11. Finally, mount the devices – make sure they are in line of sight of each other then it will be pretty much plug and go These devices are really good, and they have made lambing season a lot easier now that we do not have to get up in the middle of the night and walk down to the yard to check on the animals!
L**R
performing beyond expectation
I have a staff member living in a cottage about 600m as the crow flies across the road from the main building. There is no Internet connection; not even a phone connection and we have no mobile in the are. I installed 2 KuWifi units using a small TV mount so i could adjust the angle as the cottage is about at a 30 degree angle to my main outside wall. The whole thing took 30 minutes. Setting them up was even faster. I did put a router inside the cottage cable connected to the KuWifi unit to improve signal inside. Its fantastic the 100mb link is only 100mb as that is the limit on my internal network hub. We have tested the link using WiFi calling, WhatsApp video and Video conferencing via Zoom.
C**Y
Very fidly setup
Be warned unless you are somewhat tech savvy then these will be a pain to configure with the correct security. Good product, but instructions are terrible. Product works as described.
O**N
Works perfect. Easy to install
Works perfect.
C**T
Super
Parfait Installation facile
M**N
Todo perfecto
De momento no puedo menos que ponerle 5 estrellas. Preconfigurados en puente, sólo hay que instalar uno en un lado y otro en el otro para extender la red LAN. En mi caso lo instalé en dos sitios, uno sin nada en el medio, pero otro con una nave metálica entre la oficina central y la máquina, y una distancia de unos 200 metros. Todo bien a la primera, incluso con el máster dentro de la oficina (aunque al final lo instalé fuera en un poste de comunicaciones). No los he probado como punto de acceso wi-fi porque no es para lo que los quería, pero como puente LAN entre dos puntos alejados, perfecto.
D**N
Perfect
Idealny tunel, latwa konfiguracja, dziala bez zarzutu nawet przez szybe. Polecam!!!
T**N
tres bien installation facile
excelent
Trustpilot
2 weeks ago
2 weeks ago