Desertcart purchases this item on your behalf and handles shipping, customs, and support to Japan.
🚀 Elevate your prints with speed, precision, and zero jams—because your projects deserve the best!
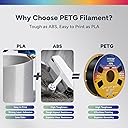
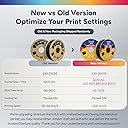
OVERTURE PETG Filament 1.75mm is engineered for high-speed, high-precision 3D printing with ±0.02mm dimensional accuracy. Its tangle-free, AMS-friendly spool design ensures clog-free, reliable extrusion at speeds up to 300mm/s. Vacuum-sealed and pre-dried, this filament delivers consistent, bubble-free prints with vibrant colors, perfect for professional prototypes and functional parts. Compatible with most FDM printers and backed by expert support and a 1-year warranty, it’s the go-to choice for millennial makers demanding flawless results.


| ASIN | B07SB761QR |
| Additional Features | Clog-Free & Bubble-Free Printing Experience |
| Best Sellers Rank | #176 in Industrial & Scientific ( See Top 100 in Industrial & Scientific ) #10 in 3D Printing Filament |
| Brand | OVERTURE |
| Brand Name | OVERTURE |
| Color | Transparent |
| Customer Reviews | 4.3 out of 5 stars 16,558 Reviews |
| Item Diameter | 1.75 Millimeters |
| Item Weight | 1 Kilograms |
| Manufacturer | OVERTURE |
| Manufacturer Part Number | OVPETG175 |
| Material | Polyethylene Terephthalate Glycol |
| Material Type | Polyethylene Terephthalate Glycol |
| Model Number | OVPETG175 |
| Number of Items | 1 |
| Special Feature | Clog-Free & Bubble-Free Printing Experience |
| UPC | 850006233267 |
| Unit Count | 35.2 Ounce |
| Warranty Description | 1-year Warranty |
J**.
Flawless high-flow melt dynamics and zero speed gaps—the gold standard for rapid PETG!
I picked up this spool of Overture High Speed PETG in Black to mass-produce functional structural brackets and custom machine brackets on my enclosed high-velocity printer. Standard PETG formulas are historically notorious for being slow-printing materials; if you try to push them past 60–80mm/s, they suffer from severe cold under-extrusion, a dull matte finish, and terrible layer separation. This rapid formulation completely eliminates those old constraints, keeping pace with aggressive modern kinematics effortlessly. Why this rapid PETG is an exceptional blend: Legitimate High-Velocity Flow: The melt flow index on this plastic is outstanding. Pushing it on my high-speed machine, it melted rapidly and consistently inside the hotend. I was able to comfortably crank my volumetric flow rates up to 18–20 mm³/s in the slicer, maintaining linear print speeds well past 200mm/s without encountering any extruder clicking, skipping, or gaps in the layer walls. Impeccable Precision Winding: The "neatly wound" claim is 100% accurate. The filament is layered perfectly flat and uniform from the inner core all the way to the outer rim. This meticulous mechanical winding completely removes the risk of overlapping cross-over knots, giving you total peace of mind during long, unattended overnight runs. Low Stringing & Oozing: PETG is famous for being incredibly sticky and leaving spiderweb strings all over a print. This Overture formula pulls away from the nozzle much cleaner than legacy budget alternatives, leaving crisp outer walls and requiring minimal clean-up with a heat gun. Makerspace Setup & Slicer Tuning Tips: A Deep Bake is Mandatory: Even though it arrives beautifully vacuum-sealed, all PETG is highly hygroscopic. To completely eliminate micro-stringing and fine surface bubbling, bake the roll at 65°C for 6 to 8 hours in a dedicated filament dryer before hitting print. My Settings: I achieved pristine, glass-smooth results running a 245°C nozzle temperature, an 80°C bed temperature on a textured PEI sheet, and dropping the part cooling fan down to a maximum of 20% to guarantee the absolute toughest structural bonds. The final verdict: Overture has engineered a top-tier engineering plastic that gives you all the industrial impact resistance of traditional PETG, but completely strips away the slow print speed limitations. It feeds flawlessly, winds perfectly tangle-free onto the spool, and maintains ironclad interlayer toughness under heavy torque. It is a fantastic value buy that has earned a permanent place in my workshop's daily material rotation.
H**S
Easy to print and strong
Good PETG for the price. It is not too picky on temperature, it prints fine anywhere from 245-255 on my Ender 3 V2. It doesn't bridge very well but that is to be expected for PETG, if you want to bridge I recommend printing at 245 and turning on bridging settings in Cura which makes bridges possible although pretty ugly. Supports work better than bridging, but can be hard to remove because PETG sticks to itself so well. Here are my settings for Ender 3 v2: micro swiss all-metal hotend / original extruder / original bowden tube bltouch leveling probe + yellow springs nozzle 0.4mm 250c bed plain glass + gluestick, 85c first layer speed 10 speed after first layer 30 first layer height: 0.28 layer height after first layer: 0.2 fan: none unless you are trying to bridge, if so use bridge detection to turn fan 100% only for the bridge retraction 3mm @ 30 I find that the biggest struggle with PETG is just getting the first layer to stick and look good. Once you get past the first layer it is usually smooth sailing. If you have problems with the first layer, first of all dry your filament even if it is brand new. It is an easy way to eliminate frustrations. Also go ahead and calibrate your extruder steps and measure your filament diameter and put that into your slicer, again these are easy steps that ensure you will not be fighting under/over extrusion while you are trying to get everything else figured out. Next use glue stick on plain glass and let the glue stick dry. You want the glass to look dull, not shiny, but it also shouldn't feel sticky to the touch. This combo works great for me, it adheres well but not TOO well and the prints pop themselves off when they cool. Lots of people like hairspray too but gluestick works fine for me and is less messy. Finally the #1 most important thing is to adjust your z offset and first layer height. You cannot mush the filament onto the bed like PLA, it needs to fall out of the nozzle and gently lay down onto the bed. Before doing anything with your z-offset I recommend turning your first layer height up to .28 or .3. The reason is that this sets your nozzle higher AND automatically adjusts the flow rate to match. If you just start bumping your z-offset higher and higher, you will be under-extruding by a lot which can cause its own problems. Once you set your first-layer height to .28, then start printing a test print and live-adjust your Z until the lines lay down and stick to the bed, and are neither gooping up onto the nozzle, nor being hit by the nozzle and pulled off the bed. This is tricky because the sweet spot here is TINY. Like within one or 2 micro-adjustments on the z, either side of that you will have issues. But once you hit the sweet spot on the Z you are golden. Then print some bed leveling test prints and adjust your first layer extrusion multiplier or line width if needed so your lines are touching. I recommend always using the bed level print that is CIRCLES when starting off, not squares. The sharp corners on the squares are super unforgiving and will pop off instantly if your settings aren't right. It is easier to use a bed leveling print with circles to dial your settings in without frustrating yourself and needing to restart the print a hundred times. When printing things over 2" tall I recommend using a wide brim because originally I was using skirt and I have had taller prints pop off the bed right as they are nearly finished, I think the reason is due to the lower part of the print cooling off. A brim is cheap insurance against your whole print being ruined at the last moment, and is easy to remove and leaves little trace that it was ever there.
S**H
Issues at first (new printer), but good quality now
I’m still learning about my 3D printer. Running on a Creality Ender 5 Pro Quick version: followed the recommendations of others for printing with this filament, still had issues, and the fix for me was the aluminum extruder had a very tight spring installed, changed the spring to a much lighter weight. I had read some of the reviews and did research before purchasing this filament, seems like a decent quality, followed all the recommendations for temperature and speed settings, I could get it to start ok (initial adhesion problem, see below) but then the feed would go wrong and the material would stop extruding. Thought it was a clogged or bad nozzle, tried unclogging, and even changed the nozzle out twice, no change. Upped the temperature, that seemed to help for the first layer, but then the extruder would start clicking and not push any filament thru. What was frustrating was if I told the machine to extrude a test length of filament it would do that just fine. After searching online and trying different things I finally found a chart that someone suggested that the spring on the extruded for the Ender 5 Pro can sometimes be really tight and crunch and deform softer filaments such as PETG, so I changed the spring to a light weight spring I had in the garage. They also suggested that sometimes the zip ties on the wires and tubing might construct the tubing, so I changed those out as well. The filament was difficult to pull out of the tube, could hear it being pulled out, turns out it was all chewed up from the extruded, not broken but deformed and had tooth marks from the extruder gear. Cut that section off and started fresh. Now everything is printing fine. I’m printing at the recommended slow 20-25 speed, haven’t tried upping that yet, might do that on a smaller test part later. Still tweaking and figuring things out. Also I’m using the Ender glass bed, and it was recommended to let that heat up an extra 10-15 minute, and that has helped with adhesion as well. Hope this helps someone.
M**M
Update...user error. Read for details on what it took to get this PETG to print on my E3v2 Neo.
UPDATED REVIEW: Getting this PETG to print was a real struggle for me but... it ended up eventually working so in all fairness I've upped my review stars and I take credit for this as "user error". What it boiled down to was print speed. I was working with common slicer templates for PETG which print around 50mm/sec and I see other people reporting success at that speed but, it was a total mess for me. I found a few reviews that suggested turning the speed way down so I tried it and it made all the difference. I am working with a new Ender 3 v2 Noe with PEI build plate. Using about 240 nozzle and 80 bed. My esteps are calibrated spot on, and my flow calibrated to about about 88 for this material in my machine and these temps. I turned the main print speed down to 30mm/sec and the initial layers, supports, and walls down to 15mm/sec and it completely changed my printing experience with this material. ***HERE IS MY INITIAL REVIEW BEFORE I DISCOVERED SLOWING DOWN THE PRINT SPEED*** Based on other reviews and pictures, it seems some people have had great results with this filament. My expectations are low, I just wanted decent results as my prints are mostly functional and I am not overly concerned with aesthetics. Unfortunately after hours of testing and tuning I have not achieved a single acceptable result and will likely give up with this Overature PETG. The filament arrived sealed, I have stored it in a vacuum bag and use a heated filament holder when printing. My machine is a new E3v2 Neo with capricorn PTFE tube and a bi-metal heat break. I also print in an enclosure. ZERO luck with this roll of PETG. The pictures show two temp towers, the one on the left I printed with TECBEARS PLA and the one on the right with Overature PETG. Yes, PLA is nice to work with and as you can see, the PLA tower printed clean starting with 215 and 180 on the top; all layers were good with just a little stringing at the top cooler levels. Again, I just hoped for acceptable results with the PETG; I started at 245 on the bottom with 85 bed temp and finished at 215 on the top layer. All levels look terrible. My e-steps are tuned perfect, I did several flow tests printing single and double walled cubes which resulted in overflow and an adjusted flow rate of 88 which resulted in good flow test results on the test cubes but still most all prints fail, I barely got this temp tower shown in my pictures to print and as you can see, it is terrible in all regards. I have done a ton of tests for 1st layer adhesion and z-offset, my bed is super level (I use octoprint to visualize) and I've tried a few z-offset adjustments, no love... My last 1st layer tests turned out good and then I go to print and it wont stick, the filament globs up on the print head and smears around. I absolutely must have a brim, or better yet a raft or my print fails on the first layer. Sure, some folks have had good luck although I've put in the time and a lot of effort and I give up; I cannot get this filament to produce a useable print on my E3v2 Neo. I am not the only one reporting these challenges, maybe Overature has quality control issues with their PETG? Maybe I never found the perfect adjustments but I sure tried and I have to move on now, I can't spend my whole life trying to get a filament to produce "OK" results. ***SEE TOP OF REVIEW FOR UPDATED SUCCESS STORY***
B**H
Perfect for Newbies, Works Great with Bambu A1, Zero Snags or Troubles
I've been using this on my Bambu A1 for about a month now and have been through four spools. It consistently produces an excellent product - everything from Multiboard plates and drawers to tiny stitch makers comes out beautifully. I did need to calibrate it to my machine and environment after some initial stringing issues, but after that, it's been smooth sailing. It loads perfectly, never, ever snags, and runs through perfectly. Post-print, it's sturdy and attractive. The white also matches across spools, so my Multiboard collection looks cohesive. Overall, this is a must-have for newbies - it makes 3D printing a cinch.
S**.
Print Slow & Hot to Get Maximum Clarity Possible
Overture transparent PETG is widely reputed as among the very best for achieving “glass like” clarity with careful tuning of your slicer settings. Thus, I decided to give it a try on my Bambu Lab X1E. I set a custom filament profile via Bambu Handy, titled “OVERTURE PETG Transparent @ Bambu Lab X1E 0.4 Nozzle”. If I understand correctly, this profile should update to the Bambu cloud so that other users can pick and use the profile for their prints. I started with the “Generic PETG” profile and amended the following: Flow ratio = 1.01 Max nozzle temp = 270 deg C Nozzle temp = 270 deg C (for initial layer & other layers) Minimum fan speed = 0 Maximum fan speed = 0 The slicer setting are absolutely essential: Wall loops = 1 Top shell loops = 0 Bottom shell loops = 0 Sparse infill density = 100% Sparse infill pattern = Aligned Rectilinear Infill direction = 0 deg (or 90 deg) Change all print speeds to 1/10th the defaults = 20 mm/s for most settings Layer heights (all) = 0.1 mm Line widths (all) = 0.5 mm Seam = I used “Back” (avoid using ‘Random’) Some design tips: 270 deg C nozzle temp is needed to create the infill to be as solid (unified) as possible, but be careful about avoiding overhangs and bridges as with the cooling turned off completely the filament will droop / sag extensively at such high nozzle temps. Even 45 deg overhangs will not print well. Thus, go with straight walls wherever possible for any that are not directly adjacent to the print plate. Also, keep any walls on your print design as thin as possible … 1 to 3 mm … for the best results. Ensure that there are no mesh errors as these will cause gaps inside the print that obstruct the clarity. Furthermore, orient the object you are printing so that the print direction parallels the longest axis (of the object). Dry the filament for at least 8 hours on the maximum dryer heat setting of 70 deg C for most non-industrial drying units. PETG is extremely hygroscopic and any absorbed moisture will cause bubbles of steam that will cloud the clarity of the print. You can print this filament from the AMS as long as you re-spool it to a plastic spool. Cardboard retains a lot of moisture. Thus, if you put the cardboard spool into your AMS, even with the plastic rims, you’ll end up raising the interior humidity of the AMS. So, how did the print go? Please see the attached video and photos. First, I was amazed at how little stringing occurred at 270 deg C. It did come with over-extrusion artifacts along the seams but that is par for the course for such high nozzle temps. This is why I recommended using the seam profile that creates the least amount of seams, which you can visually confirm in the slicer previews. The bottom wall and layers are amazingly clear. In the attached photos, you can read the text printed on the Overture filament box right through the bottom wall of the print. The side walls of my printed object (a purge chute, waste bin cover) are translucent but more diffuse. If I were to manually polish all the walls of my printed object, I am certain I could achieve “glass like” transparency. So, overall, a good print with excellent results with Overture Transparent PETG on clarity, cleanliness of the print, and its dimensional stability.
K**H
Awesome stuff
This stuff is amazing. It feeds well and extrudes just fine. I do need to use glue on my plate to help get it off because of how well it sticks. It came very dry and vacuum sealed making it very easy to print with.
L**L
Good filament but the paper spool clogs the rollers and binds and forces a stop in print.
I like the filament but the holders not so much. The spools come warped and bent and have breaks in them so they jam in the AMS. but the filament is good and its cheaper so its kinda a double edged.
F**O
Excelente material PETG oro
El producto es muy bueno y el tono es agradable. Es un poco más caro que otras marcas pero vale la pena por lo que es el tipo de material y tono disponible. Lo negativo (y no tan grave) es que al ser carrete de cartón, llega a dañarse en el traslado y si lo usas con algun sistema multicolor (ams,CFS,ace pro, etc) puede que te de algún tipo de problema.
D**B
Good filament
I'm using this filament with my Anycubic i3 Mega-S and it is working fine. Prints in a nice.. what I'd describe as royal blue. This is my first roll of PETG, and in fact, the first non-PLA filament that I have tried. I expected issues, but I actually got a darn near perfect print on my first try. I used the same default settings for PLA in Cura, but I changed the extruder temperature to 245 and the bed temperature to 85. Because I'd heard horror stories of people pulling chunks out of their ultrabases when printing PETG, I used the included build surface. It is smaller than my bed, but I just stuck it in the middle, re-leveled, and made sure that my project wasn't going to end up off the build surface. Worked great. Good adhesion. A bit difficult to remove, but not terrible. No discernable scent while printing. Comes in a resealable bag, which is super convenient! Also comes with a ruler, and the spool has markings on it (questionable accuracy?) to help you estimate how much filament you've used, and how much remains. EDIT: I was almost ready to downgrade my review because I was having so much trouble getting good prints after my first attempt. Globbing, stringing, oozing, oh my! Tried every setting tweak people suggested to no avail. Finally sprung on a dehydrator and dried the filament as a last ditch effort, and wow. People aren't lying when they say these filaments absorb moisture that can ruin a print. Huge difference.
M**R
Strong and good prints
This is a good filament that prints well and gives good strong finishes to my prints. Using with a creality 3 pro and it sticks to the print surface well and the flow is also good. Will buy more of this brand.
R**C
Bra kvalitet
Fungerar utan problem.
P**O
pessimo
forse il mio era vecchio, è secco
Trustpilot
3 weeks ago
1 week ago