


💻 Elevate your DIY game with sleek, smart display power!
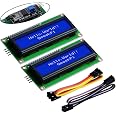
The GeeekPi 2-Pack I2C 1602 LCD Display Module offers a compact 16x2 character screen with blue backlight, powered by a 5V supply and controlled via I2C protocol to reduce wiring complexity. Compatible with a wide range of development boards including Arduino, Raspberry Pi, and STM32, it features an adjustable potentiometer for backlight and contrast, making it a versatile and essential component for IoT, smart building, and maker projects.


| RAM | LPDDR |
| Brand | GeeekPi |
| Operating System | Linux |
| Item Weight | 3.98 ounces |
| Product Dimensions | 3.15 x 1.22 x 0.28 inches |
| Item Dimensions LxWxH | 3.15 x 1.22 x 0.28 inches |
| Processor Brand | ARM |
| Number of Processors | 1 |
| Voltage | 5 Volts |
| Manufacturer | GeeekPi |
| ASIN | B07S7PJYM6 |
| Date First Available | May 26, 2019 |
B**E
Solid screen
Very inexpensive screens that work well. Easy to connect thanks to the I2C backpack. The adjustable contrast is really nice as well. Works perfectly for my Arduino projects.
J**S
Easy to use, works great, but details matter!
I am using this for a little project I'm working on. No complaints at all, but here are a couple of things that might be good to know:1. The LiquidCrystal_I2C library available from within the Arduino app works fine. You don't need any of the variant versions. Just go into the Library Manager and search for LiquidCrystal I2C. The default one by Frank deBrabander works great. The warning "THIS LIBRARY MIGHT NOT BE COMPATIBLE WITH EXISTING SKETCHES" is probably valid, but I had no issues.2. Be sure to check the pin order on the I2C thing. They are labeled. Don't just trust pictures in tutorials.3. The device ID on mine was indeed 0x27. Apparently there is at least one other commonly used value possible, 0x3F. I saw nothing on my display initially, so I tried the I2C scanner on Instructables, which confirmed mine was indeed 0x27. Moral of the story? The potentiometer on the back is very important! Once you're sure your device ID is correct, adjust brightness.Very good deal for what it is - 16x2 characters, nice and bright, and only requires 4 pins (2 of which are power and ground).
A**R
WOrks if you know the correct pin nymbers
Good display that can display any ASCII character as well as custom characters. It has a white background light that you can turn off by pulling a jumper on the back.I am using this display with a Raspberry Pi Pico. Initially I had difficulties because I confused the physical pin numbers with the logical pin numbers. I soldered SDA and SCL to the physical pins 4 and 5 on the left side of the RP Pico, and incorrectly used "Pin(4)" and "Pin(5)" in my MicroPython script. After changing the script to the logical pin numbers 2 and 3 it worked great. Here is the correct mapping:Solder pin 4: I2C1 SDA = GP2 = Python Pin(2)Solder pin 5: I2C1 SCL = GP3 = Python Pin(3)GeeekPi 16x2 LCD address = Python 0x27LCD displays take time until the text becomes readable. As an experiment I tried to run several counters as fast as possible (write both display rows more than 3 times/sec). The text - particularly on the second line - was not recognizable. My recommendation is to update the display not more than once per second if you write both lines.
A**R
Nice little LCD
Great Quality bright display easy setup using instructions provided on the link providedPreforms good for price and requires only 4 wire to use ! works with both Arduino and Raspberry
F**O
Good option
Cheap, bright, good contrast control w/backpack. Happy to use in future Pi Projects. Slightly finicky with power draw on Rpi3b at 5v 1.5amp cell phone charging brick and cable vs. OEM 2.1amp power supply wall wart.
C**Y
Nice Arduino displays, easy to use.
These are great little units. They do not take much power, in fact I connected the power to an output pin of an Arduino and I can turn it off and on when I need to display something ( for extreme low power ). If you are just doing text, the LiquidCrystal_I2C arduino library has a minimal code footprint that works well. Don't forget that the small two pin header on the back needs a jumper ( or a resistor for less brightness ) in order for the display to work. The contrast adjustment pot on the back will optimize the contrast of the LCD.
G**R
Power via Vin (5V) for better contrast
Works well with the Particle Photon and the IDE's LiquidCrystal_I2C_Spark library. I used 100 ohm pull up resistors on SDA and SCL pins. My IC2 address is 0x27. What I really like ... great price for 2 units in one package, and a 8 pin ribbon cable that may be used to interconnect with the I2C interface easily. I recommend this product.
A**R
WILL FRY YOUR PI IF YOU RUN IT AT 5V
The hardware itself is functional and as advertised. The issue is with the instructions. All over the Amazon page and the documentation page it says to wire the display to 5V input VCC. The documentation even has a pin diagram telling you to connect it to the 5V pin. Absolutely DO NOT do this! The I2C bus that the raspberry pi runs off of only takes 3.3 (3x3) Volts. If you connect the display to the 5V in like I did you will fry your pi or at least its I2C bus and will need to buy a completely new board. This is not a problem with Arduinos because they use 5V I2C.The good thing is that this product can still work using the 3x3 voltage pin, just with a dimmer backlight. But my review will stay at 1 stars until the page is updated with a warning about frying your pi with the wrong voltage input.
Trustpilot
5 days ago
1 day ago
1 month ago
4 days ago


![Arduino Uno REV3 [A000066] – ATmega328P Microcontroller, 16MHz, 14 Digital I/O Pins, 6 Analog Inputs, 32KB Flash, USB Connectivity, Compatible with Arduino IDE for DIY Projects and Prototyping](https://images-na.ssl-images-amazon.com/images/I/61AvdQOxFzL._AC_UL116_SR116,116_.jpg)