


✨ Upgrade Your Typing Game!
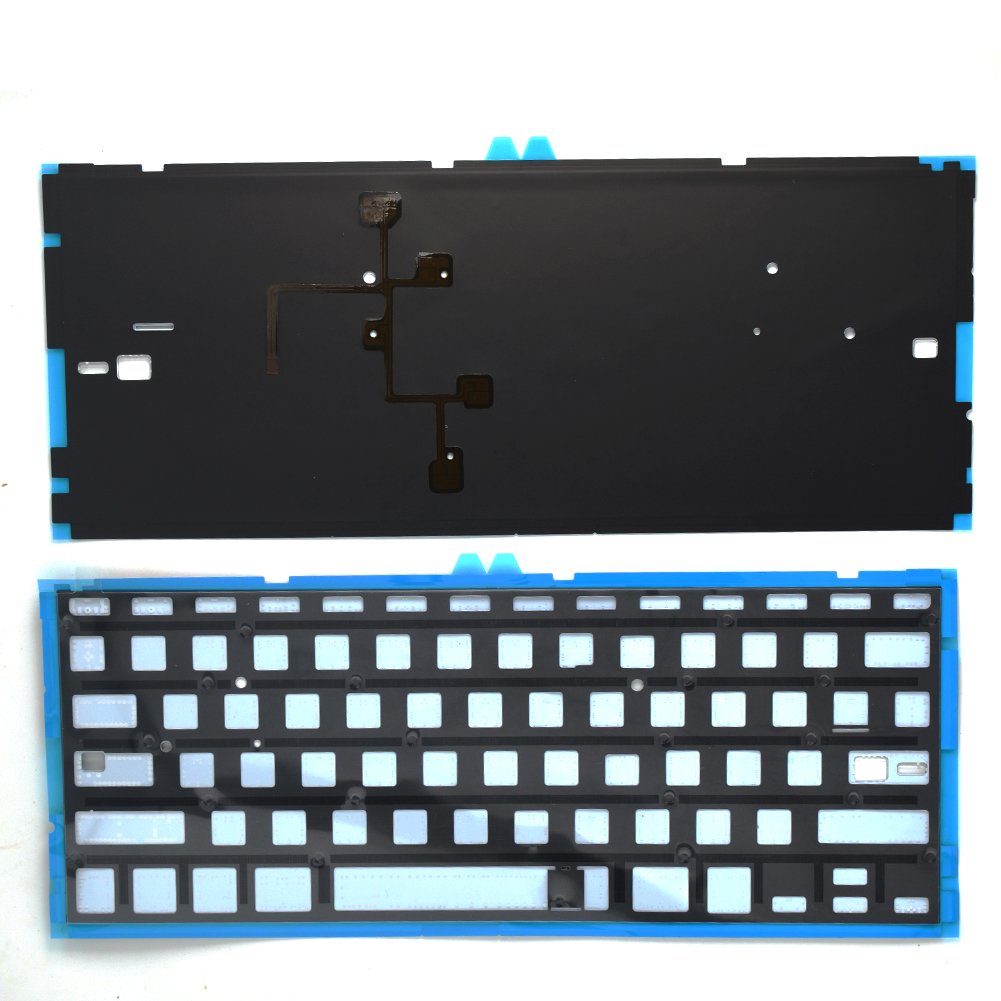
The Padarsey Replacement Backlight Keyboard is a brand new, high-quality keyboard designed for Apple MacBook Air 13-inch models A1369 and A1466 from 2011 to 2015. It includes a backlight feature for enhanced visibility, a backlight paper, and a set of 80 screws for easy installation. Each unit is tested for quality assurance, ensuring a reliable typing experience.
| Brand | Padarsey |
| Manufacturer | Padarsey |
| Model | 4328355328 |
| Package Dimensions | 34.8 x 14.7 x 2.4 cm; 160 g |
| Item model number | 4328355328 |
| Processor Count | 1 |
| Hardware Platform | Laptop |
| Compatible Devices | Laptop |
| Special Features | Backlit |
| Batteries Included | No |
| Batteries Required | No |
| Material | paper |
| Hand Orientation | Ambidextrous |
| Manufacturer | Padarsey |
| Country of Origin | USA |
| Item Weight | 160 g |
N**P
MAZAA AAGAYA
Mazza aagaya 1 number product
I**E
It works as advertised, all necessary parts included
I knew the installation was not going to be easy based on several research on how the replacement is done. I had to disassemble pretty much everything to get to the keyboard. Replacing the keyboard is also a pain, since you have to remove the backlighting stuck with glue, then carefully pop off the old keyboard and making sure to use a cover so as not to let the rivets fly all over. Then the installation: you have to screw in about 50 or so tiny screws. Amazingly, it all worked out.Be sure to watch several tutorial videos on youtube before starting (there is no single best video, so I had to pick and choose the best parts from each one). Just be sure to use anti-static, carefully note the wires and connectors (do not force anything or you will break the fragile flat cables and connectors), and be ready to troubleshoot (I oriented one of the cables the wrong way and the Mac wouldn't even turn on, and I almost thought the keyboard was at fault, and spent an hour troubleshooting, until I found another video that showed the correct orientation.)And when you finally start putting in 50 or so tiny screws, don't let them fall through the tiny empty spaces in the keyboard. It's a pain to take them out of the cracks trying not to damage the key membranes. And don't push too hard otherwise the tiny screws will fly off and it's almost impossible to locate one that is about the same size as a medium-sized dust. They provide screws with enough leftovers, but I'm proud to say I didn't lose one single screw in the process.Aside from the complexity of the installation (no fault of the keyboard vendor), the keyboard is of good quality with good price. My Macbook Air now looks new (I also updated it with larger capacity battery, 1TB M2 SSD, and brand new feet. The only thing I couldn't upgrade was the RAM, which is a shame. I'm no expert on soldering, and not interested in investing money on an expensive soldering station).
R**D
Great replacement keyboard
Great replacement keyboard. Fits perfect, all keys functioning, backlight works brightness adjustments work. The extra screws comes in handy although only used a couple dozen since not all rivets pop off cleanly. The keyboard frame seems stiff enough that not all the rivets are absolutely needed to be replaced which would have been a real pain to remove. In all about an hour of work to save having to send in for service. Note to self never again eat soup near the Mac again...Some hints of disassembly:1. Be careful of the logic board heat sink. Over time it can become brittle. The furthest section that mounts to the chassis is realistically only connected by a fin, and is very easy to snap. Mine did so as I was repositioning the rubber spacer.2. Have all your screwdrivers handy, you will need a Pentalobe P5, Torx T5 and a Phillips 00, and if you want to disconnect the display to prevent scratching, you also need a Torx T8. Keep several small trays to store the loose screws so you don't lose them, or get them out of sync. There are tons of screws and even for a single board or component there are different lengths so can be confusing when it comes time for reassembling. Also found it handy to have a tiny flat blade screwdriver (I used a 1.5) to unlatch the various connector clasps.3. See if you can get an anti-static bag handy in order to protect the logic board from static damage. Make sure the table and area you are working in is properly ground, as also yourself. Discharge any static build up by grounding yourself before handling the logic board.4. Have a plastic spatula or prying tool to loosen the speakers. They are taped/glued down, but are very tight so there is a sufficient amount of force needed to pry them off.5. Honestly don't expect to get the backlight off in one piece without some tearing. If it was spilled liquid on the keyboard, likely the backlight sheet is stuck to the keyboard. The backlight sheet is such low cost it's not worth it.6. Also don't expect to remove the keyboard intact, unless you plan on methodically removing close to 60 micro rivets. The Macbook chassis is a very strong aluminum, and just pulling the keyboard off is fairly painless and quick.7. Unless you're an absolute purist, many rivets will still remain. There is no real need to pull these all out, just use the extra screws to replace the rivets that have pulled out. I have found the replacement keyboard frame has sufficient rigidity that a few missing rivet positions will not greatly affect the operation. NOTE - the rivet holes might not be of uniform sizes, the tiny screws can be forced in but heads may strip, so you may need to use a tiny 1.0 or 1.5 flat head screwdriver instead of PH 00.
Q**.
all working well except that the spacebar squeeks when pressed
The keyboard is working great except that the spacebar squeek when pressed. The backlight is rather weak in terms of the intensity of the light, when compared to the original backlight. Nonetheless, it's a worth buy especially when it comes as a two piece units (keyboard + backlight) and screws. Hopefully this keyboard last.
N**Y
MacBook Air Mid 2012
The process to tear down my mid 2012 MacBook Air was a little nerve wracking, especially the part where you literally tear out the oem keyboard. I didn’t rate the “ease of installation” because the manufacturer of the keyboard has nothing to do with making the install of an Apple keyboard “easy” lol. It is fairly involved!There are plenty of guides on YouTube that show how careful you have to be, or you’ll tear one of the many delicate ribbon cables, or connector wires, etc. As i was doing my tear down, I took the liberty to clean and add new thermal paste, and blast the dust out of it - which thankfully wasn’t caked in dust. I keep a pretty tidy home 😊.As a tip, you want to do that outside, as the tearing out process sends upwards of 40-50 (I can’t remember how many rivets) flying all over the place.As a second tip, look for the little ziplock bag of screws, and don’t tear open the box and throw it away by accident.After installing this keyboard, and carefully putting humpty dumpty back together again, after pressing the power button it boots up to login. I type in my password and press enter without a hitch and I am back in. I quickly open Notes, and begin typing every key, shift+every key, pressing function keys to test brightness, backlight, volume, play, pause, etc, and it is all flawless!Phew.Compared to the oem keyboard, these keys feel a little light, and obviously not as solid or the quality of the original butterfly keys. However, aesthetically and with the backlighting on, you can’t even really notice.The key differences - no pun intended - are that the keys do not sit as high as the original, and seem to be near flush with the aluminum housing. The keys also feel a little lighter when typing and don’t give that firm stability you’ve gotten used to. The click sound is also a little higher in pitch, compared to the more deeper tone of the original keys when typing. These are all minor issues, and compared to the cost of an oem keyboard/backlight module from Apple… this is worth every penny.Thank you for a more affordable alternative for those wanting to save a bit of money, to keep our older tech going strong. To pay for the oem keyboard/backlight module doesn’t make any sense, because the MBA is barely worth the price of that component as is.Thank you with kindness! ❤️🧘🏻
D**M
Great keyboard! Feels almost like OEM
I bought this keyboard to replace the one in my 2013 MacBook Air that I bought recently. The keyboard was replaced by the previous owner, but the replacement that they installed was not of good quality. The keys were super loose, very loud, and the overall feel of the keyboard was awful. This keyboard was a night and day difference. It sounds amazing, feels like the OEM keyboards, and the keys are nice and tight and the depth is exactly how it should be! Installation was annoying, but only took me about 45 minutes. All of the included screws went in just fine. The backlight was a little weird, it hadn't been cut properly but I managed to make it work. Overall this is an absolutely great choice for a replacement keyboard, especially for the price!
Trustpilot
3 weeks ago
1 week ago