🔑 Unlock Your DIY Potential!
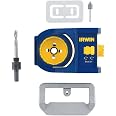
The IRWIN Door Lock Installation Kit (3111001) is a professional-grade solution designed for seamless installation of door locks on wooden doors. Featuring carbon hole saws for quick openings, a self-centering jig for precision, and adjustable backsets, this kit ensures a hassle-free experience for both DIY enthusiasts and professionals alike.

| Manufacturer | IRWIN |
| Part Number | 3111001 |
| Item Weight | 9.6 ounces |
| Product Dimensions | 9 x 7 x 3 inches |
| Country of Origin | China |
| Item model number | 3111001 |
| Is Discontinued By Manufacturer | No |
| Color | Blue |
| Style | Wood Door Lock Kit Only |
| Finish | Blue |
| Material | Carbon |
| Item Package Quantity | 1 |
| Number Of Pieces | 2 |
| Included Components | ...... |
| Batteries Included? | No |
| Batteries Required? | No |
D**F
Works Amazingly Well, no wobble, would buy again, I'd recommend having a small, sharp chisel on hand
I don't know if I've ever wrote a good review on a product, usually it's only when I have an issue with an item, but this thing is really amazing. I was able to complete the whole process within a very short period of time with what I'd call professional results. Many of the reviews said there was a "wobble" while they were drilling the holes - there was no wobble, in fact the only way that I could see that it might wobble is if you put the threaded collar on upside down so that it didn't tighten properly - I'm not sure, those claims baffle me as drilling was solid and straightforward. The little "router" bit is a little difficult to use in a regular hand drill but it worked - if I was doing several doors I might load this bit in my dremel tool and use my dremel router base, but it really wasn't worth the time to set it all up. A small, sharp chisel would be handy to complete this part of the process. I gave it 4 stars on sturdiness as it is made of plastic (what else could you expect for this low price?) - I made a slight error and nicked the template with the router bit but it'll still work for many, many more doors. Overall a great value for the money.
T**H
Great for the DIYer
I purchased this product to drill out for the larger diameter hole needed a new deadbolt. When drilling larger an existing hole, there is no material for the pilot bit. This guide work flawlessly on both the solid wood door and the solid core composite door I drilled. The existing door did not have the mortice latch and the mortice template and router bit was easy to use. I was to lazy to grab a router just used the my cordless drill with no issues. The price was right and I was very happy with the resulting lock install.Plastic template was rigid enough if you were careful and cut slow. Just stop and check it often when you are starting the hole to make sure you are still at the correct setback setting as it is easy to change when starting the cut. Did not use the hinge mortice tool, but was a nice bonus in the kit. This kit saved me real $$$ over having a handyman/locksmith out to change out to a newer style deadbolt lock.
C**D
Read this and learn from my experience.
I have never hung a door before and I hung five slab doors with this jig set. After five doors, the kit was pretty much ready for the trash, but I more than got my money's worth out of it.As with anything else, you will get better with each door you hang. Perhaps a more professional (and costly) kit would keep you from some of the mistakes, but if you are careful, you can hang a door and nobody will be able to tell you're not experienced.I'll do the review on a piece-by-piece basis and try to explain what mistakes you should avoid and why the kit does not prevent your making the mistake. Hopefully armed with this info, you will make fewer mistakes than I did, or at least make different mistakes,Small hole saw: this was the worst part of this kit -- it has metal flashing left over from poor manufacturing that prevented it from being assembled properly. I had to grind out the flashing to get it to fit together at all, but then it wobbled quite noticeably. It turned out not to matter too much as the hole it cut was fairly round. In any case it was invisible, so didn’t matter, and it was never so bad as to damage the door. It was just a bit unpleasant holding the drill that wobbled worse than a Weeble®.Large hole saw: This fit together much better than the small holesaw, but the drill bit was very dull and required a lot of force to get it to operate as a pilot hole. The little bit of wobble did cause the plastic jig to move around, but if you go slow at first, make sure you’re centered and not expecting the plastic guide to do too much for you, you can get a round hole in the right place and straight through. Be careful though. Back the hole saw out several times as it contacts the door to make sure you are still centered and not at an angle.Main hole jig: This is a well thought out, but flimsy guide system. Do not expect it to force your tools to the proper position and angles — its a guide that helps you but does not prevent your tool from cutting in the wrong place. You need to hold the drill steady when using this jig, the jig will not do that for you. The biggest problem I had with with jig/guide was with the latch hole and mortise positioning. On such a small dimension (1.5”) a small misplacement amounts to a large miss. The jig has two plastic spring-loaded guides to align the latch hole in the middle of the edge of the door. These plastic “springs” do not force you into the exact middle of the edge. You can easily be off ~1/16” and that amounts to a large miss from the center. Even if you mark the center to try to minimize this error, its difficult to drive the screws into the edge without the jig getting slightly off. This is where the system needs beefing up more (Irwin, if you’re reading…). For the large hole, it would be nice if the jig were more stout, but small errors in the large hole placement don’t amount to much since the door knob bezel covers it up.Latch mortise template and router bit: This was absolutely the best part of this whole kit. The little router bit worked incredibly well with the latch mortise template, and chiseling out the remainder of the wood from the latch mortise was trivial. I encountered two problems in this area. First, the holes for the template pegs are the same holes left over from the main hole jig when its mounted. This is convenient, but as I mentioned above, it’s all-too-easy to be slightly off in the positioning due to the springy, flimsy nature of the edge positioning. So its all-too-easy to be off in the positioning of the mortise template and its difficult to correct issues since the holes in the wood are so close to where you might want to put new holes (for better alignment). Get yourself some good wood tooth picks and glue, or some small dowel pegs. The other problem with the mortise template is that its easy to flub the bit depth when using a drill as a router. It only happened once, but I flubbed the bit depth and compromised my template. I was able to keep using it, but be sure to always press in on the drill and don’t let it lift out of the template track.Hinge mortise template: The hinge mortise template worked a whole lot better than I thought it would. It definitely takes some skill and I can guarantee you will get better with each hinge you mortise. But you will also make new mistakes on each hinge you mortise. One tip is to make sure you clamp your door to something solid behind the spot where you will be chiseling. Also, cut the outline of your hinge mortise with a box cutter. Finally, be aware that higher-quality solid-core doors will behave very differently than hollow core doors — the wood on the edges of solid core doors is just stronger, I discovered. The wood grain also resists clean cutting and chiseling in the stronger doors. Be patient with the stronger doors — make your outline cuts as good as you can before using the chisels.However… if you are hanging higher quality doors, you should seriously consider a different approach for the hinge mortise. I wish I had a router and router template for the hinge mortise. The chisel approach is just too error prone and labor intensive. I wish Irwin had made a template for the hinge mortise that would allow using the router bit they provided. As mentioned above, the latch mortise router bit and template were absolutely the best part of this kit, it would have been nice if the same (or similar) bit could have been used for the hinge mortise. (I guess the hinge mortise depth is shallower than the latch mortise depth, so it would require a different bit, but I definitely think this would be worth paying for vis-a-vis the 19th century chiseling approach).
K**N
WORKS GREAT-A DOLLAR A DOOR!!A++++
I don't know how you couldn't be pleased with this item for the money. I paid 10 or 11 bucks for this with an Irwin incentive discount. Even without that it was well worth the money. I used it right away for three lock sets that were upgrades from the old style. I had pulled the old mortised in lock and glued a block to fill the cavity. I also glued in a small block around where the flange had been. It was a real mess to figure out where to drill and this set did it all. Yeah its plastic and flimsy-its a ten dollar item-but it gets the hole saw started in the right place on each side. Yeah the hole saws are not the best but they are fine if you keep pulling them out and cleaning the teeth. Plus its all figured out. I was very skeptical of the "router bit" you put in your drill but as long as you keep your RPM's up it does the job fine. I haven't even used the hinge jig so that's another project for my ten dollar purchase but the rest I know works and is well worth it. I didn't experience blue rubbing off but my doors needed to be puttied sanded and painted from the old lockset anyway. I have a dozen doors to do-It will make it through them all then thats it-A dollar a door!! A+++++
Trustpilot
1 week ago
3 days ago